

In this tutorial we’ll add an NPC to speak to.
Speaking to an NPC, collecting an item … these are interactions with the game world.
For the player to be able to interact with something, we need an Interaction Controller.
We’ll set up
- interaction controller (prefab + setup)
- a dialogue schematic
- NPC in town
Let’s get to it!
Interaction Controller #
The Interaction Controller is used to interact with any interaction within it’s trigger when the player uses the Interact key.
You can even use multiple interaction controllers on the combatant to interact with different things at different distances, e.g. speaking to an NPC when standing before it but collecting items all around.
We’ll create a prefab that’s automatically added to the player.
Prefab Setup #
We start with setting up the prefab – you can do this in any of the scenes.
As usual this is pretty easy using the scene hierarchy’s context menu (ORK Framework > Interaction Controller (3D)) or the ORK toolbar (search for: Interaction Controller 3D).
Change the following settings in the inspector.
Interaction Controller Component #
- Interact With Nearest
Enable
This’ll interact with the interaction that’s closest to the interaction controller.
Depending on your game’s setup, there might be multiple interactions available at the same time.
Box Collider Component #
- Size
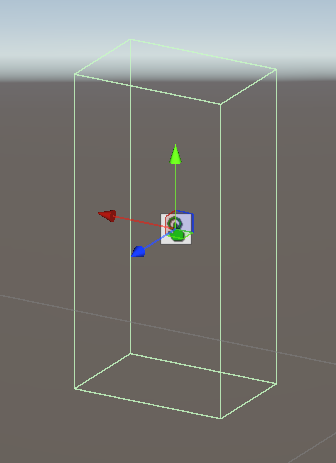
Set to: X=1.5, Y=3, Z=1
The finished interaction controller should look like this.
Create Prefab #
Create a prefab out of the Interaction Controller (3D) object.
Remove the object from the scene.
Interaction Settings #
Open the ORK editor and navigate to Controls > Interaction Settings.
We’ll now set up to automatically add the interaction controller to our player.
Base Settings #
The default setup should already use an interaction controller and the Accept input key.
- Interaction Control
Select: Interaction Controller - Interact Key
Select: Accept
Interaction Controller Settings #
These settings handle adding our prefab to the player.
- Add Automatically
Enable - IC Prefab
Select: Interaction Controller - Local Space
Enable - Offset
Set to: X=0, Y=1.5, Z=1
This’ll place the interaction controller at a position matching our player combatant prefabs.
Save Changes #
Save the changes before we set up the dialogue schematic.
Don’t forget to save your changes by clicking on Save Settings at the bottom of the editor.
Dialogue Schematic #
We’ll set up a dialogue that has changing messages each time we talk to the NPC.
This is done by using object variables on our NPC’s object. We’ll use a long variable with the variable key counter to count the dialogues.
Open the schematic editor.

Settings #
- Block Player Control
Enable
We don’t want our player to run around while talking to the NPC.
Speakers #
We’ll set up a speaker for our dialogues.
Click on Add Speaker.
- Object (Speaker Object)
Select: Machine Object
The Machine component we’ll use to start the dialogue will be placed on the NPC, so the machine object will be the NPC’s object. - Custom Object Content
Enable
We’ll define a custom content here.
Otherwise, you can set up object content and add it to the NPC’s object. - Name
Set to: Random Citizen
Variable Fork #
Add Node > Value > Variable > Variable Fork
This node is used to check a single variable for multiple values – each value check has it’s own next slot to continue from.
We’ll cycle through 3 different dialogues, so we’ll need 3 conditions.
- Variable Key
Set to: counter - Variable Origin
Select: Object
This’ll use object variables attached to an object (via an Object Variables component). - Object
Select: Machine Object
There’s already a variable condition added for us, so let’s change Variable Condition 0 to our needs.
- Type
Select: Long - Check Type
Select: Is Equal - Check Value
Select: Value > Value
Set the value to: 0
0 is also the default value for any not yet set int variable (for bool variables it’d be false, for string an empty text, etc.).
Copy Variable Condition 0.
- Check Value
Set the value to: 1
Copy Variable Condition 1.
- Check Value
Set the value to: 2
Show Dialogue #
Add Node > UI > Dialogue > Show Dialogue
We’ll show the first dialogue.
This node is connected to the is Equal 0 slot of the Variable Fork node.
- Dialogue Type
Select: Message
We simply display a message text. - UI Box
Select: Dialogue
The Speaker Settings handle if a speaker is used, e.g. to display a name in the UI box’s title content.
- Use Speaker
Enable - Actor
Select: Speaker 0: Random Citizen - Show Name
Enable - Text (Message Content)
Set to: Hello there!
Show Dialogue #
Copy the previous Show Dialogue node.
This node is connected to the is Equal 1 slot of the Variable Fork node.
We’ll just change the message.
- Text (Message Content)
Set to: Can I help you?
Show Dialogue #
Copy the previous Show Dialogue node.
This node is connected to the is Equal 2 slot of the Variable Fork node.
We’ll change the message again.
- Text (Message Content)
Set to: Please go away …
Change Variables #
Add Node > Value > Variable > Change Variables
We’ll now increase the counter variable by 1.
This node is connected the Next slots of all Show Dialogue nodes.
Click on Add Variable.
- Change Type
Select: Variable - Variable Key
Set to: counter - Variable Origin
Select: Object - Object
Select: Machine Object - Type
Select: Long - Operator
Select: Add - Float Value
Select: Value > Value
Set the value to: 1
Change Variables #
Copy the previous Change Variables node.
We’ll now set the counter variable to 0 in case the initial Variable Fork check failed.
This node is connected the Failed slot of the Variable Fork node.
Connect the node’s Next slot back to the Variable Fork node – i.e. if the fork failed, it resets the variable and checks again, restarting the dialogue.
- Operator
Select: Set - Float Value
Set the value to: 0
And that’s it for the schematic – save it, e.g. as ChangingDialogue.
Adding the NPC #
Open the World scene – we’ll now add the NPC to talk to.
Add one of the NPC prefabs to the town, you can find the NPC prefabs in Assets/Tutorial Assets/Prefabs/NPCs/ – I’m using the Casual_Bald prefab and place it somewhere in the center of the town.

Object Variables Component #
Add an Object Variables component to the NPC’s object using the component menu.
This component is used to bind object variables to an object and allows the Object variable origin to find variables on an object.
Object variables can either persist and be shared between multiple objects by using the same Object ID to identiy them, or be used as local variables. We’ll use them as local variables, i.e. they’re only accessible for this object, not shared and not saved with save games. Once the object is destroyed (e.g. when we change scenes), they’ll be gone. That’s all we need for our changing dialogue.
- Local Variables
Enable
Machine Component #
Add a Machine (Schematic) component to the NPC’s object using the component menu.
Start Settings #
Click on Interact, this will add the Interact start type.
If you want, you can also add mouse interaction, click on Add Start Type.
- Start Type
Select: Interaction > Mouse Up As Button
Expand the Object Turn Settings, we’ll let the player and NPC face each other.
- Turn Starting Object
Enable - Turn Component Object
Enable
Asset Settings #
- Schematic Asset
Select: ChangingDialogue
And that’s it – save the scene.
Testing #
Hit play and walk up to the NPC.

Using the accept input key (Space) lets us speak with the NPC and cycle through the dialogue.
Next, we’ll add items to collect.