

In this tutorial we’ll set up larger use ranges and affect ranges for magic attack spells.
This tutorial is part 7 of a mini-series covering grid battles. You can find the start of this series here.
We’ve got working grid battles, but currently, all actions have a use range of 1. That’s fine for the physical attacks, which should be used on targets directly neighbouring the user. However, the magic spells should be useable at a larger distance.
We’ll set up a use range that uses a larger range but only cells in a cone shape in front of the user for all magic attack spells. We also add an affect range of 1 – i.e. beside the selected target, all enemies within a grid distance of 1 will also be affected. Support spells will get a higher use range
We’ll set up:
- battle range template for the new use range
- 2 target selection templates
- updating spell and support content types
- add orientation command to battle menu
This tutorial is based on the ORK 4 Unity Quickstart 3D tutorials and using a phase battle system, but can be used in any project and with any battle system.
Battle Range Template #
We’ll start with a new battle range template, setting up a grid range that uses a grid mask to define which cells to use.
Open the ORK editor, navigate to Battles > Battle Range Template and add a new template.
- Name
Set to: Grid Front 5
Grid Shape #
The grid shape settings are only used in grid battles.
- Shape Type
Select: Mask - Range
Set to: 5 - Local Space
Enable
The orientation of the mask will be based on the combatant’s rotation.
Click on Create Grid Mask. This’ll create the mask with the defined range – if you change the range, you’ll have to create the mask again.
You can select and deselect cells by clicking on them. Select all cells in a cone shape in front of the origin cell (green cell at the center). The result should look like this:
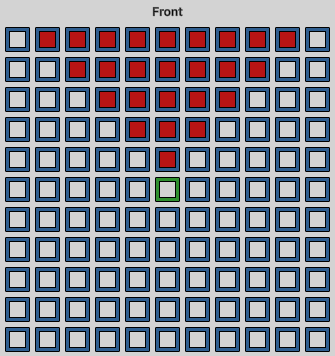
We’ll also add Line of Sight checks and have blocked cells prevent using cells behind them.
- Use Line of Sight
Enable - LOS Blocked Cells
Enable - LOS Allied Combatants
Disable - LOS Enemy Combatants
Disable
Target Selection Templates #
We’ll use the new battle range template in a target selection template – targeting enemies and adding an affect range of 1.
For support spells, we’ll add another new template with a reguar range of 3.
Enemy Single Grid Magic Range 5 #
Navigate to Battles > Target Selection Templates and add a new template.
- Name
Set to: Enemy Single Grid Magic Range 5
Target Settings #
The default setup is already what we need, targeting a single enemy.
- Target Type
Select: Enemy - Target Ranget
Select: Single
Use Range Setting #
We’ll override the default use range.
- Own Use Range
Enable
Click on Add Range.
- Range Type
Select: Template - Template
Select: Grid Front 5 - Grid Battles
Select: Yes
I.e. this use range is only used in grid battles.
Affect Range Settings #
- Affect Range
Select: Calculation
The affect range will be used when the action is calculated – i.e. the affected targets are not available in schematics.
Click on Add Range.
- Range Type
Select: Template - Template
Select: Range 1 - Grid Battles
Select: Yes
Ally Single Grid Range 3 #
Add a new template.
- Name
Set to: Ally Single Grid Range 3
Target Settings #
- Target Type
Select: Ally - Target Ranget
Select: Single
Use Range Setting #
- Own Use Range
Enable
Click on Add Range.
- Range Type
Select: Template - Template
Select: Range 3 - Grid Battles
Select: Yes
Updating Content Types #
Since our abilities use the Target Selection Settings defined by their content types, all we have to do is update the content types for Spells and Support abilities.
Spells #
Navigate to Content > Content Types and select the Spells type.
Base Settings > Target Selection Settings #
- Target Selection Type
Select: Template - Template
Select: Enemy Single Grid Magic Range 5
Support #
Select the Support type.
Base Settings > Target Selection Settings #
- Target Selection Type
Select: Template - Template
Select: Ally Single Grid Range 3
Battle Menu #
Since the attack spells now depend on the rotation of the user, we’ll add the grid orientation command to the battle menu.
Navigate to Menus > Battle Menus and select the Default battle menu.
Copy Option 1 (the Grid Move command) and change the newly added copy (Option 2).
- Type
Select: Grid Orientation
Save Changes #
And that’s it for the use/affect range setup.
Don’t forget to save your changes by clicking on Save Settings at the bottom of the editor.
Testing #
Hit play and start a battle.
The new orientation and use/affect ranges are working, great!
The next part of the grid mini-series will set up a new camera control that’ll be used during grid battles.