

In this tutorial we’ll set up a phase battle system.
Phase battles give each faction participating in a battle their own phase to select and perform actions in. Like turn based battles, phase battles can use actions per turn to manage how many actions a combatant can use. We’ll make use of that and allow combatants to use multiple actions.
We’ll set up:
- phase change schematics
- updating factions (using the schematics)
- phase battle system
- action costs
- battle camera
- battle menu update
- default battle system
This tutorial is based on the ORK 4 Unity Quickstart 3D tutorials, but can be used in any project. We’ll change the quickstart tutorial’s battle system to phase.
Player Phase Schematic #
We’ll start with setting up the phase change schematics – we’ll use one for the player and one for the enemy. You can use a start and end phase schematic to handle custom systems or announce which faction’s phase it is. The combatants that are part of a phase are used as Machine Object of the schematic.
The schematics will change the camera control target to focus on the combatants of the faction and show a dialogue to inform the player of who’s phase it is.
Open the schematic editor.

Camera Control Target #
Add Node > Input > Camera Control Target
This node changes the camera of the active camera control.
The default setup is already correct for us:
- Target Type
Select: Object - Object (Target Object)
Select: Machine Object
Show Dialogue #
Add Node > UI > Dialogue > Show Dialogue
We’ll simply show Player in an auto close dialogue.
An auto close dialogue will autoamtically close after a defined time – we’ll allow the player to accept the dialogue to start the phase faster.
- Dialogue Type
Select: Auto Close - UI Box
Select: Action Info - Block Accept Button
Disable - Close After (s)
Set to: 3 - Wait
Enable - Text (Message)
Set to: Player Phase!
Wait #
Add Node > Base > Wait
We’ll wait for another second.
- Time (s)
Select: Value > Value
Set the value to: 1
And that’s it – click on Save Schematic and save the schematic as PhaseStartPlayer.
Enemy Phase Schematic #
We’ll continue working on the schematic and save it as a new schematic using the Save Schematic As button.

Show Dialogue #
We simply need to change the text.
- Text (Message)
Set to: Enemy Phase!
And that’s it – click on Save Schematic As … and save the schematic as PhaseStartEnemy.
Updating Factions #
Phase change schematics are set up in the factions that should use them, so we’ll need to update the player and enemy factions.
Player Faction #
Open the ORK editor, navigate to Combatants > Factions and select the Player faction.
Phase Change Schematics #
- Phase Start Schematic
Select: PhaseStartPlayer
Enemy Faction #
Select the Enemy faction.
Phase Change Schematics #
- Phase Start Schematic
Select: PhaseStartEnemy
Phase Battle System #
Navigate to Battles > Battle System and select the Phase battle system.
A new ORK project already has a version of each battle system added – if you’ve removed yours at some point, simply add a new battle system and change it’s Battle System Type to Phase.
Base Settings #
We’ll allow camera controls in battle and use the battle start/end schematics we created in the quickstart 3D tutorials.
Control Block Settings #
- Block Camera Control
Select: None - Block in Battle Menu
Disable
Battle Start/End Schematics #
- Start Schematic
Select: BattleStart - Victory Schematic
Select: BattleEndVictory - Defeat Schematic
Select: BattleEndDefeat
Phase Settings #
These settings handle the Phase battle system, the other settings are the same for all battle systems.
Battle Mode #
- Use Active Command
Enable
Selected actions are performed immediately, similar to the Active mode in turn based battles. - Auto Start Turn
Select: Phase Start
All combatants that are part of the phase start their turn at the start of the phase, this has e.g. impact on status effects that use changes on turn start. - Auto End Turn
Enable
A combatant’s turn will automatically end under defined conditions.
The default setup will check if the combatant can still use their base attack, any ability or item. The turn will also end if the remaining actions per turn (see below) reached 0.
We’ll stick with this default setup.
Phase Order #
The phase order can be based on formulas or other values, but we’ll simply use phases based on the order in which the factions are defined in the editor, i.e. sorted by ID.
- Sort By
Select: ID
Combatant Order #
The player will be able to freely select in which order the combatants are used – but we’ll let the enemy combatants be ordered by their agility.
- Calculate Order
Enable - Order Calculation
Select: Combatant > Status Value - Status Value
Select: AGI
Other Options #
- Selecting Control Map
Enable
This’ll use the control maps of the combatant who’s currently selecting actions.
We enable this in case we later add control maps to the game.
Player Combatant Selection #
These settings handle if and how the player can select combatants in the player phase.
- Use Combatant Choice
Enable - Show Selection Box
Enable
The player can select the combatants in a UI box. - Allow Back
Enable
The player can back out of a selected combatant – the combatant can be selected again, as long as it can perform actions. - UI Box
Select: Battle Menu - Add End Phase (End Phase Button)
Enable
The UI box will have a button to end the phase. - Text (End Phase Button)
Set to: End Phase
Action Settings > Actions Settings #
Combatants can perform multiple actions per turn.
We’ll give combatants 2 action points, but not all actions will cost 1 point. Using items or the base attack will cost 1 point, but other abilities or special commands will cost 2.
- Actions Per Turn
Select: Value > Value
Set the value to: 2
The Default Action Cost is used by all actions unless they define their own cost – we’ll use this to have everything cost 2 points.
- End Turn
Enable
Using an action will end the turn. - Use Remaining
Enable
This’ll use all remaining action points – not really needed in our setup, but it doesn’t hurt to use it either. - Action Cost
Select: Value > Value
Set the value to: 2
Now, we’ll set up the exceptions that only cost 1 point.
- Own Item Cost
Enable - Action Cost
Select: Value > Value
Set the value to: 1
We’ll also have the none action (does nothing and ends the turn) only cost 1.
- Own None Cost
Enable - Action Cost
Select: Value > Value
Set the value to: 1
In case we later add more player group members and allow them to be changed in battle, we’ll also have changing members cost only 1 point.
- Own Change Cost
Enable - Action Cost
Select: Value > Value
Set the value to: 1
Now, all that’s left is to change the base attack to cost only 1 action point.
Updating Base Attack #
Navigate to Status > Abilities and select Attack.
Level Overrides > Phase Action Cost #
We’ll set the action cost in phase battles to 1.
- Own Phase Action Cost
Enable - Action Cost
Select: Value > Value
Set the value to: 1
Battle Camera #
ORK has an optional battle camera that can automatically show the battle’s action.
Since our setup allows camera controls during battles, we’ll use the battle camera to change the camera’s target to the combatant who’s turn it is.
Navigate to Controls > Battle Camera.
Battle Camera #
- Battle Camera Type
Select: Allow Schematics
This’ll allow schematics animating actions to also perform camera changes.
You can also completely block schematics from changing the camera.
Look At Latest User #
This’ll look at the combatant who’s performing the latest action.
- Enable
Enable - Look At Type
Select: Camera Control Target
This’ll use the combatant as the target for the camera control.
This only works if camera controls are allowed during battle. - Reset Current Target (Transition Settings)
Enable
Look At Selecting User #
This’ll look at the combatant who’s currently selecting an action – this is for both player and non-player combatants.
If you only want this for player combatants, use the Look At Menu User settings instead.
- Enable
Enable - Look At Type
Select: Camera Control Target - Reset Current Target (Transition Settings)
Enable
Battle Menu Update #
We’ll also make a small adjustment to the battle menu – adding a back button to the base list of the battle menu.
This allows returning to the combatant selection.
Navigate to Menus > Battle Menus and select the Default battle menu.
Base Settings #
- Back In Base
Enable
The back button is only added in Phase and Real Time battles.
Default Battle System #
And finally, to actually use the Phase battle system, we’ll change the default battle system.
Navigate back to Battles > Battle System and select General Settings.
Base Settings #
- Default Battle System
Select: Phase
Save Changes #
And that’s it for the phase battle system setup.
Don’t forget to save your changes by clicking on Save Settings at the bottom of the editor.
Testing #
Hit play and start a battle.
Everything seems to be working as it should.
However, we can’t really see how much AP the player still has, or how much using something will cost – let’s change that.
Use Cost Display #
The use cost display settings handle how the costs of an action are displayed.
The default setup doesn’t include the action costs, so let’s add them.
Open the ORK editor and navigate to Texts > Use Cost Display.
Action Cost Text #
- Default Content
Set to: <name> <value>
The content information definition for action cost (i.e. the name) can be found right below the text, in case you want to change it. The default name is AP.
Save Changes #
That’s it for the cost display, don’t forget to save your changes by clicking on Save Settings at the bottom of the editor.
Updating Player Battle HUD #
We want to dispaly the remaining actions per turn of a combatant in the player’s HUD.
Since we’re using Unity UI, the HUD is set up as a prefab. Locate your HUD prefab (should be named Player Battle HUD) and open it for editing.
HUD Text Content #
Select the Player Battle HUD > Text Content child object, we’ll add another text as a child object of the name.
Use the scene hierarchy’s context menu (ORK Framework > HUD > Content > HUD: Text Content) or the ORK toolbar (search for: HUD Text Content) to add a HUD text content.
Rect Transform #
We’ll adjust the bounds to have the same size as the parent text.
Select the stretch stretch anchor preset.
- Left, Top, Right, Bottom
Set all to: 0
HUD Text Content #
This component handles the text content that’s displayed – the standard setup already shows the combatant name, but let’s look into it anyway.
- Content Type
Select: Actions Per Turn
This type is used to display the actions per turn of a combatant. - Default Content (Text)
Set to: <valueremaining> AP
TextMeshPro – Text (UI) #
We’ll adjust the alignment of the text to keep it in the (vertical) center.
- Alignment
Select: Right and Middle
Save Changes #
And that’s it – save the changes you’ve made to the prefab.
Testing Again #
Hit play and start another battle.
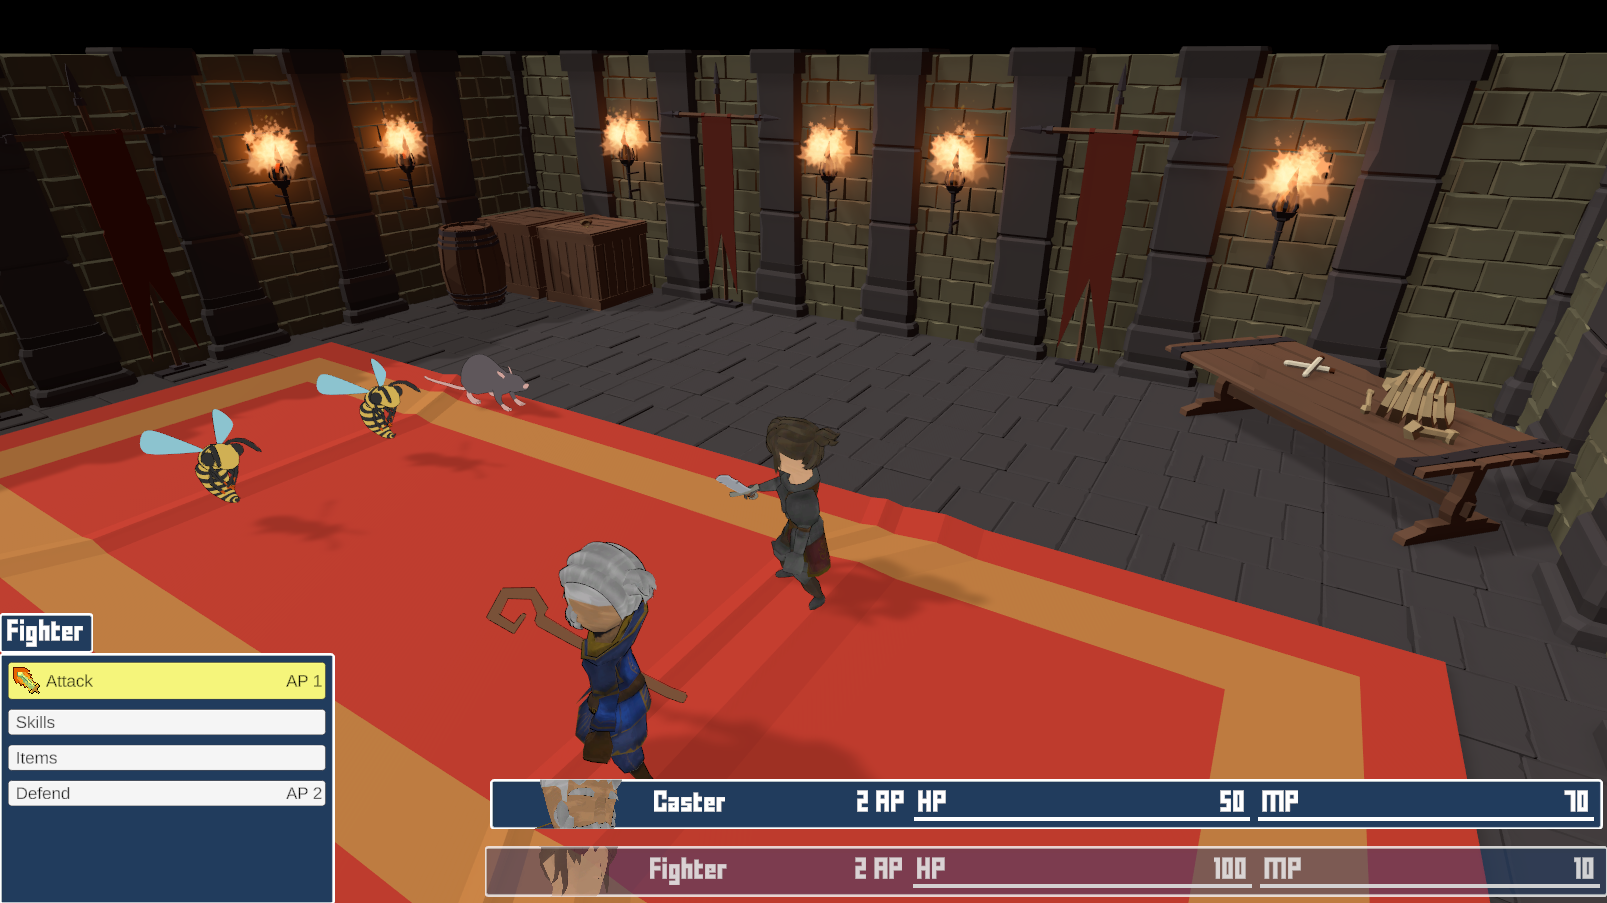
Great, actions show their AP cost and the player HUD shows the remaining AP.