

In this tutorial we’ll set up a dragging notification to show dragged content.
Dragging something from a UI (e.g. a menu screen, battle menu or shortcut HUD) can display the dragged content using a dragging notification. The dragging notification is set up in the UI settings, each UI box can optionally use a custom dragging notification (as well as shortcut slot HUD elements).
In this tutorial we’ll create a UI box for our dragging notification, which will also have some HUD components attached to have more control over the displayed content. You don’t need to use HUD components (or a template HUD) in a dragging notification, as it can also display information in it’s regular message, but using HUDs allows to create more complex UI (though we’ll keep it simple in this tutorial).
This tutorial is based on the ORK 4 Unity Quickstart 3D tutorials, but can be used in any project.
As with all content when using Unity UI, we’ll set up prefabs. It’s best to do this in the UI Environment Scene, so open it.
UI Box Prefab #
The UI box should adjust it’s size to the displayed content, and as said above, we’ll also add HUD components to display information about the displayed content.
Base UI Box #
We’ll start with creating the UI box either using the scene hierarchy’s context menu (ORK Framework > UI Box > UI Box Fit Size) or ORK toolbar (search for: UI Box Fit Size).
Rect Transform #
We’ll change the Rect Transform to have the upper left corner of the box be placed at the cursor position.
For this, we’ll change the pivot of the object.
- Pivot
Set to: X=0, Y=1
UI Receive Cursor Events #
This component is automatically added when creating a UI box using the context menu. It handles detecting if the UI box was clicked or if the cursor is over it.
Since our dragging notification will follow the cursor, it’s best to remove it to not interfere with the other UI boxes.
Remove the component.
Content Size Fitter #
The default setup for this UI box will only adjust the vertical size (height) to the displayed content. Let’s change it to also adjust the horizontal size (width).
- Horizontal Fit
Select: Preferred Size
HUD Content Provider #
Next, we’ll add start with the HUD component setup of the UI box.
HUD components need a content provider that handles the content they display. In regular HUDs, their root HUD component is usually their content provider.
When UI boxes directly display HUD components (e.g. instead of using a HUD template), they need to add a content provider component to be able to display content in HUD components.
Add a HUD Content Provider component to the UI Box object to handle this for us.
- Provider Type
Select: None
This is the default setup of a new content provider – it’s used when the content provider will receive it’s content from somewhere else.
In our case, the content will come from the UI Content component distributing the UI box’s content.
UI Content #
In order to get the displayed content to the content provider we added, we need to select it in the UI box’s UI Content component (which handles displaying the UI box’s main content).
- HUD Content Provider
Select the HUD Content Provider component we just added.
E.g. by dragging it on the field (or selecting the UI Box object). - Text Disable If Empty
Enable
This’ll disable the object that displays the regular content text (the Text child object of the UI box in this setup) in case no text is displayed. This’ll prevent an empty text from having an impact on the layout.
Add Icon #
Now, we’ll add actual HUD content to the UI box.
The UI box is set up to list content vertically – we’ll add an icon as our first HUD content.
Just like creating HUDs, either use the scene hierarchy context menu (ORK Framework > HUD > Content > HUD: Icon Content) or ORK toolbar (search for: HUD Icon Content).
HUD Text Content #
Icons are also displayed using HUD Text Content components, but this setup doesn’t add a component for displaying the text, only an Image for the icon.
The default setupof the component that was created is already what we need, using the General content type that can show content information of any content. The setup shows no text, only the icon of the content.
UI Content #
We want to disable the icon’s object in case some displayed content doesn’t have any icon.
The icon is displayed with a sprite, so we need to disable it if no sprite is available.
- Sprite Disable If Empty
Enable
Layout Element #
Additionally, we want to display the icon with a fixed size of 100×100.
Add a Layout Element to the Icon Content object.
- Preferred Width
Enable
Set the width to: 100 - Preferred Height
Enable
Set the width to: 100
Add Text #
And as the last content added to the UI Box object, we’ll add a HUD text content to display the name of the dragged content.
Again, either use the scene hierarchy context menu (ORK Framework > HUD > Content > HUD: Text Content) or ORK toolbar (search for: HUD Text Content).
HUD Text Content #
We want to display the name of the content, i.e. we’ll use the text code <name>.
- Default Content
Set to: <name>
UI Content #
Same as the icon, we want to disable the text in case something doesn’t have a name.
- Text Disable If Empty
Enable
TextMeshPro – Text (UI) #
This component handles displaying the actual text.
In case you want to change the font, size, color, etc. – this is where you can do it.
Create Prefab #
And that’s it for the UI box prefab – the finished UI box will look something like this:
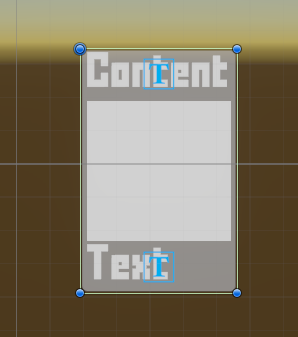
Create a prefab out of the UI Box object and name it UI Box Drag.
You can now remove the object from the scene.
UI Box Setup #
With our prefab created, we can now set up the UI box that’s used by the dragging notification (and uses the UI box prefab).
Open the ORK editor, navigate to UI > UI Boxes and add a new UI box.
Base Settings #
- Name
Set to: Drag - UI Layer
Select: HUD
It’s best to have the drag box shown above your other UI boxes used by menus.
This makes sure the drag is always displayed on top of the menus. - Cursor Over
Disable
We don’t want the UI box to recognized by cursor over checks to prevent it from blocking the drag+drop operation.
Position Settings #
We want the drag notification to follow the cursor and also stay within the screen bounds.
- Limit to Screen
Enable - At Cursor
Enable - Follow Cursor
Enable
Unity UI #
- UI Box Prefab
Select: UI Box Drag
Drag and Drop Setup #
Navigate to UI > UI Settings.
Drag/Drop Settings #
These settings handle dragging and dropping content.
The Raycast Settings are used when something is dropped into the world, e.g. dragging an item on a combatant uses a raycast to find what it was dropped on. Make sure the Layer Mask is set up correctly for your layer setup.
We’ll set up some basic settings first.
- Layers
Select only the Default layer. - Drag Set Selection
Enable
This’ll set an input (e.g. button) as the selected input when starting a drag from it. - Drop Set Selection
Enable
This’ll set an input (e.g. button) as the selected input when dropping a drag on it. - Block Tooltips
Enable
Tooltips will be blocked while dragging something.
Dragging Notification #
Finally, we set up the dragging notification.
- Show Drag
Enable - Drag Box
Select: Drag
Message Content #
- Add HUD
Enable
This’ll add HUD content information to the displayed content and allows the HUD Content Provider we added to the UI box to use it. - HUD
Select: None HUD (default selection)
Not selecting a HUD here will still add the HUD content for the content provider, but not use a HUD as template.
If you select a HUD, the HUD’s prefab will be used to create an instance of the HUD as a child object of the UI box. - Text
Set it to an empty text, since we handle displaying the content using the HUD components.
Save Changes #
And that’s it – click on Save Settings to save the changes.
Testing #
To test the dragging notification, you need to enable dragging in one of your menus – e.g. a menu screen (Menus > Menu Screens).
Menu screen parts that support drag/drop will have their separate Drag and Drop settings, e.g. the Inventory menu part.
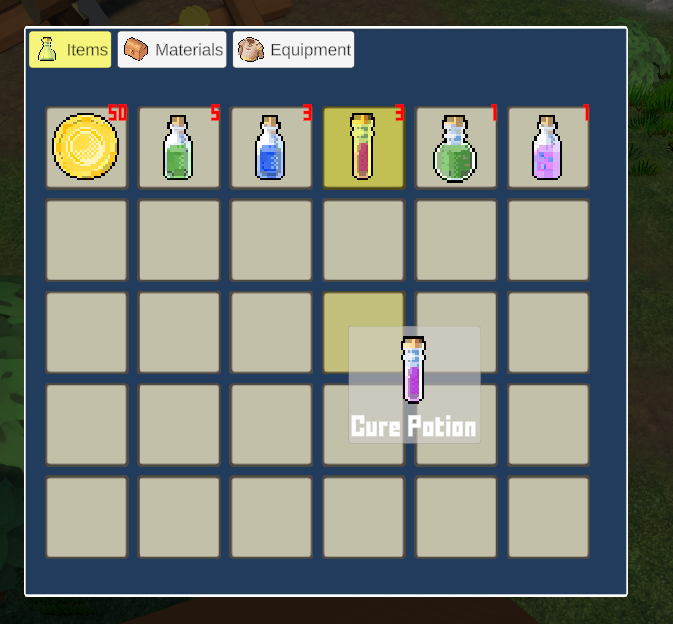
Tip: Using HUD Templates #
Instead of adding the HUD components directly to the UI box as described in this tutorial, you can also use an existing HUD as a template. Tooltip type HUDs are probably the best fit, but you can use any HUD you want.
Using a HUD template is a good idea if you’ve already set up a HUD that looks like you want your drag notifications to look, or want to reuse the drag look in other parts of the UI.
To use a HUD template, simply select a HUD in the dragging notification’s settings instead of using the None HUD. And don’t add HUD components to the UI box, or they’ll both be used.