

In this tutorial we’ll set up the main menu screen.
This tutorial is part 4 of a mini-series covering menu screens. You can find the start of this series here.
We’ll set up the Main menu screen, i.e. the menu screen that’ll we called via the Menu input key. The main menu will act as a menu navigation, calling the other menus, showing the information of all player group members and another information box with the current area, game time and currency in the player’s inventory.
This tutorial is based on the ORK 4 Unity Quickstart 3D tutorials, but can be used in any project.
Main Menu Screen #
Open the ORK editor and navigate to Menus > Menu Screens, we’ll add a new menu screen. If you haven’t set up a menu screen yet, you can also change the Default one.
- Name
Set to: Main Menu
Settings #
- Remember Selection
Enable - Single Screen
Enable
The menu screen can only be displayed alone instead of combined with other screens.
This is the default setup for new menu screens.
We’ll set up our menus to block showing notifications or flying texts, e.g. using an item or healing magic in the menu will not show flying texts.
- Pause Notifications
Enable
Already displayed notifications will be paused and hidden. - Block Notifications
Enable - Block Flying Texts
Enable
We’ll also pause the game.
- Pause Game
Enable - Freeze Pause
Enable
This’ll set the time scale to 0, halting all animation and other time-related functionality.
Settings > Call Screen Key #
Beside using a call key, we’ll also play a sound when opening the menu using the key.
- Use Call Key
Enable - Input Key
Select: Menu - Audio Type
Select: Custom - Audio Asset
Select: chainmail1
You can optionally use a Menu Requirement to limit the menu call to certain conditions. However, menu screens can only be called when the player can be controlled, so that’s enough for now.
In case you’ve set up the menu screens of the quickstart 3D tutorials, make sure to disable using the call key in the original Overview menu screen that was set up in the tutorials.
Button List Part #
With our base setup of the menu screen done, we can start adding menu screen parts to it. A part adds specific functionality to the menu, e.g. Inventory part will add an inventory menu.
The Button List part is used to display multiple buttons, each having different functionality – e.g. we’ll add buttons to close the menu, open other menu screens (in the next tutorials) or exit the game.
Scroll down to the bottom of the settings to see the Add Menu Part button.
Click on the Add Menu Part button and select Button List.
- UI Box
Select: Blue Top Right Fit
Click on Add Menu Item to add a button to the part.
- Type
Select: Close - Text (Button Content)
Set to: Close
Click on Add Menu Item.
- Type
Select: Save - Text (Button Content)
Set to: Save
Click on Add Menu Item.
- Type
Select: Exit Game - Show Exit Question
Enable - Text (Button Content)
Set to: Exit Game
We’ll add new buttons for each menu screen we’ll add to the system.
Combatant Part #
The Combatant part is used to display information of one or multiple combatants. When displaying multiple, each combatant will be displayed using an input (button).
Scroll down to the bottom of the settings to see the Add Menu Part button.
Click on the Add Menu Part button and select Combatant.
- UI Box
Select: Blue Menu Center Scroll - Combatant Scope
Select: Group Battle Sorted
This’ll show all group members, but lists the battle group members first. - Custom Input Prefab
Select: Empty Button
Entry Page 0 #
The Combatant part can show multiple pages of information, e.g. to create a status information menu, cycling through various content.
We’ll just use one page, so change the settings of the already added Entry Page 0.
- Add HUD
Enable - HUD
Select: Template: Combatant Information EXP
Information Part #
The Information part is used to display any kind of information. We’ll use it to show the current area, gold and game time.
Scroll down to the bottom of the settings to see the Add Menu Part button.
Click on the Add Menu Part button and select Information.
- UI Box
Select: Blue Bottom Left Fit - Auto Update
Enable
We’ll display the game time, this’ll periodically update the text for us. - Update Every
Set to: 0.1
This controls how often the update happens, you can leave it at the default setup.
Information Page 0 #
Like the Combatant part, the Information part can show multiple pages of information.
We’ll just use one page, so change the settings of the already added Information Page 0.
- Text (Message Content)
Set to: <area.current.name><currency.inventory=YOUR_GOLD_GUID> <currency.name=YOUR_GOLD_GUID><time>
Please note that the YOUR_GOLD_GUID is just a placeholder for using your own currency’s GUID, so please use the buttons above the text editor to add that information.
While editing text, click on Data to show all available data that’s set up in the editor.
- First Dropdown
Select: Currency - Second Dropdown
Select: Gold - Third Dropdown
Select: In Inventory
Click on Add to add the In Inventory text code for gold.
- Third Dropdow
Select: Name
Click on Add to add the Name text code for gold.
Tip!
You can also change the GUIDs of your data by using the edit buttons beside the GUID information at the top of their settings.
And with that, our first menu screen is completed.
Save Changes #
And that’s it!
Don’t forget to save your changes by clicking on Save Settings at the bottom of the editor.
Testing #
Hit play and use the Menu input key to call the main menu.
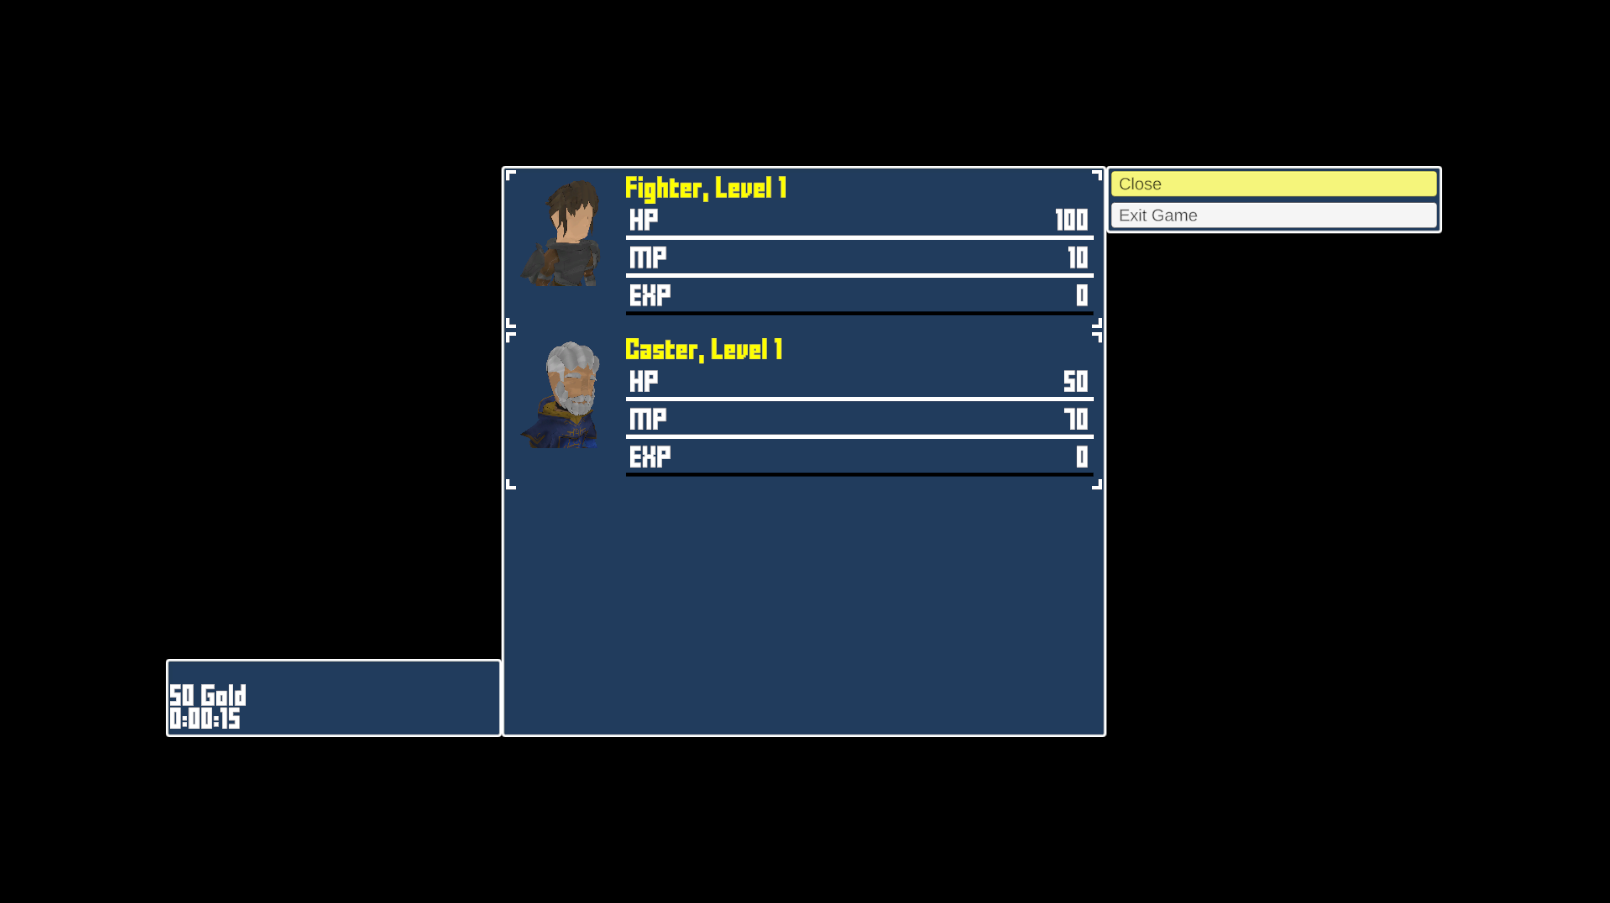
The main menu works, we can’t do much yet, though.
Also, if you haven’t added areas to your game yet (e.g. the quickstar 3D tutorials don’t add them), the current area text code will be replaced by an empty text, so no information is shown.
The next part of the menus mini-series will set up the inventory menu screen.