
Use battle grid formations to move combatants into formations.
Battle Grid Formations #
Battle grid formations are used in grid battles to move or place combatants in formation positions. They are set up in Battles > Battle Grid Formations.
Grid formations can be used by AI controlled combatants to move them into a formation in grid battles. When used by the player, you can use grid highlights to show the formation positions to allow moving into formation via the move command.
Base Settings #
The base settings of a grid formation define the size (rows and columns) of the formation and allows placing the leader and formation members on a grid shape.
Placing Positions #
Left-click on grid cells to place leader/positions. Right-click to remove a placed position, the leader can only be removed when all positions have been removed. Double-left-click to change the cell of an already placed leader/position.
Hold shift and left-click or right-click to change the priority of a position (green number).
The leader’s cell has a green border and a yellow filling – placing the first position will place the leader of the formation. The cells of other formation members have a blue border and red filling. Empty cells a blue border and no filling.
In Square grids, a grid formation setup can e.g. look like this.

In Hexagonal grids, a grid formation setup can e.g. look like this.
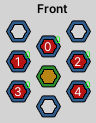
The white number in a cell shows the position’s index.
Priority #
Positions will be filled based on their priority, the higher the priority number, the sooner they’ll be filled.
E.g. priority 1 positions will be filled before priority 0 positions.
Priority is shown by the small green number in the grid mask. Hold shift and left-click or right-click to change the priority of a position.
Formation #
Define the settings of the formation’s leader and individual positions.
Formation Leader #
The formation leader can either be the group leader of the combatant who initiated the position.
If the formation is used in local space of the leader, it’ll be rotated with the leader.
The leader’s death in battle can:
- Keep
The dead combatant will remain the leader of the formation.
The formation ends if the leader is removed from the group. - Break
The formation ends. - Select
A new leader is selected (optionally based on conditions).
The formation ends if no new leader is found.
Formation Position #
Define the settings for individual formation positions (not the leader).
Formation positions can optionally use conditions to determine which combatants can fill it – e.g. use status conditions or check variables. The conditions can optionally be ignored if no matching combatant is found, filling it with combatants that don’t have a position.
E.g. fill front row positions with tank type combatants and rear positions with ranged type combatants.
Formation positions can be freed for other combatants if their current combatant dies.
You can also define the priority of the position here.
Status Effects #
Optionally use status effect changes upon certain formation conditions.
Call Formation #
These status effect changes will be used on all formation members when calling the formation.
Break Formation #
These status effect changes will be used on all formation members when breaking the formation.
Finished Formation #
These status effect changes will be used on all formation members when finishing the formation, i.e. when all combatants reached their positions.
End Finished Formation #
These status effect changes will be used on all formation members when an already finished formation is unfinished, e.g. a combatant moving from their position.
Used when the Finished Formation check fails and the formation was previously finished.
Using Battle Grid Formations #
Battle grid formations can be used in different ways.
Battle AI #
The battle AI can use, break and check grid formations.
E.g. use the Use Grid Formation node to initiate a grid formation or a Break Grid Formation to end the formation.
The Grid Move node can be used to move combatants to their formation position via the Grid Formation move type.
Learn more about the battle AI in this documentation.
Schematics #
Schematics can use, break and check grid formations.
E.g. use the Use Grid Formation node to initiate a grid formation or a Break Grid Formation to end the formation.
Formulas #
Formulas can check grid formations.
E.g. check if a combatant is the leader of a grid formation (Is Grid Formation Leader node). Battle AIs and schematics have the same check nodes available.
Formations #
Formations can optionally be linked to grid formations.
This allows to automatically use a grid formation (when the combatants are in a grid battle) when using regular formations.
Learn more about formations in this documentation.


