
The status system is the core of each RPG – with ORK Framework, you can create this system however you like, using status values.
There are three kinds of status values:
- Normal
Examples: ATK, AGI - Consumable
Examples: HP, MP - Experience
Examples: Exp
Status values are mainly used to calculate something (using formulas), like the damage of an attack, the chance an item is created and other things.
Defining the status values
For our little game we will create the following status values:
- MaxHP (Normal)
Defines the maximum HP of a level. - HP (Consumable)
The health of a combatant - MaxMP (Normal)
Defines the maximum MP of a level. - MP (Consumable)
Will be consumed when using abilities. - ATK (Normal)
Used for physical attacks. - DEF (Normal)
Defence against physical attacks. - MATK (Normal)
Used for magical attacks. - MDEF (Normal)
Ddefence against magical attacks. - AGI (Normal)
The agility of a combatant. - DEX (Normal)
The dexterity of a combatant. - LUK (Normal)
The luck of a combatant. - EXP (Experience)
The experience of a combatant – this will cause level ups.
Open the ORK Framework editor and navigate to Status > Status Values. We need 12 status values, so add 11 new ones to the already existing one and change the following settings.
Status value 0
- Name
Change to MaxHP. - Type
Select Normal.
Click on Edit Value Range to change the minimum and maximum value of the status value.
- Minimum
Set to 0. - Maximum
Set to 9999.
Click on Ok to accept the changes.
Status value 1
- Name
Change to HP. - Type
Select Consumable. - Max. Status Value
Select MaxHP (the status value we just created). - Death On
Select On Minimum.
A combatant will die if it’s HP reaches the minimum defined in the max. status value (i.e. the minimum MaxHP).
Status value 2
- Name
Change to MaxMP. - Type
Select Normal.
Click on Edit Value Range.
- Minimum
Set to 0. - Maximum
Set to 999.
Click on Ok to accept the changes.
Status value 3
- Name
Change to MP. - Type
Select Consumable. - Max. Status Value
Select MaxMP (the status value we just created).
Status value 4
- Name
Change to ATK. - Type
Select Normal.
Click on Edit Value Range.
- Minimum
Set to 1. - Maximum
Set to 255.
Click on Ok to accept the changes.
Status value 5
- Name
Change to DEF. - Type
Select Normal.
Click on Edit Value Range.
- Minimum
Set to 1. - Maximum
Set to 255.
Click on Ok to accept the changes.
Status value 6
- Name
Change to MATK. - Type
Select Normal.
Click on Edit Value Range.
- Minimum
Set to 1. - Maximum
Set to 255.
Click on Ok to accept the changes.
Status value 7
- Name
Change to MDEF. - Type
Select Normal.
Click on Edit Value Range.
- Minimum
Set to 1. - Maximum
Set to 255.
Click on Ok to accept the changes.
Status value 8
- Name
Change to AGI. - Type
Select Normal.
Click on Edit Value Range.
- Minimum
Set to 1. - Maximum
Set to 255.
Click on Ok to accept the changes.
Status value 9
- Name
Change to DEX. - Type
Select Normal.
Click on Edit Value Range.
- Minimum
Set to 1. - Maximum
Set to 255.
Click on Ok to accept the changes.
Status value 10
- Name
Change to LUK. - Type
Select Normal.
Click on Edit Value Range.
- Minimum
Set to 1. - Maximum
Set to 255.
Click on Ok to accept the changes.
Status value 11
- Name
Change to EXP. - Type
Select Experience.
Click on Edit Value Range.
- Minimum
Set to 0. - Maximum
Set to 100000.
Click on Ok to accept the changes.
- Experience Type
Select Level.
We want a combatant to automatically level up if the experience exceeds a level’s maximum. - From Minimum
Disable this setting.
We want the experience to build upon the previous levels – when enabled, the experience would start from the minimum value (e.g. 0) after a level up. - Init to Level
Enable this setting.
The experience of the combatant will be initialized to the appropriate level.
That’s it for our status values – now we want to set up our player’s start values. There are two ways to do this, either define the values directly on the combatant, or use Status Development, which allows us to define a combatant’s development on different levels. Let’s use status development!
The player’s status development
As said, status developments are used to define status values for multiple levels, you can learn more about them and the available types of development in this how-to.
Navigate to Status > Status Development. Change the following settings of the Default Development (the first status development in the list).
- Name
Change to Player Development.
Click on Edit Level Range to change the minimum and maximum level of this status development.
- Minimum Level
Set to 1. - Maximum Level
Set to 99.
Click on Ok to accept the changes.
Now we will edit the development of all Normal and Experience status values – the Consumable status value development is defined by their max. status value.
We will use curves to define the values for the different levels. This is done in the curve editor.
Let’s create the development curves for our status values.
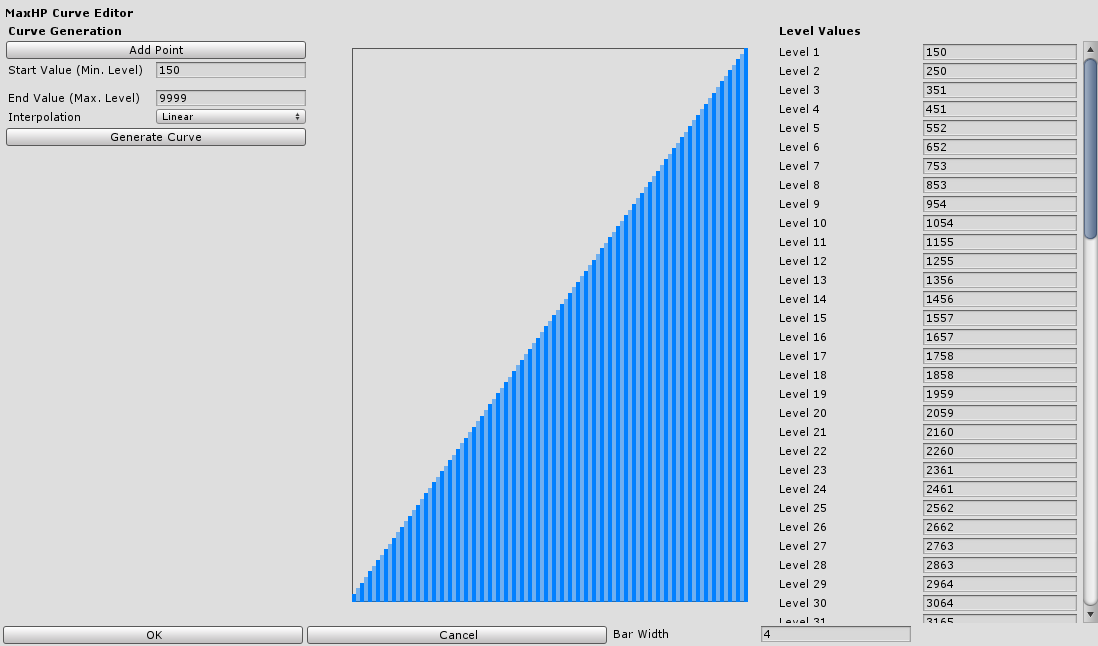
MaxHP
- Type
Select Curve.
Click on Edit Curve.
- Start Value
Set to 150. - End Value
Set to 9999. - Interpolation
Select Linear.
Click on Generate Curve to create a development curve. Click in Ok to accept the changes.
MaxMP
- Type
Select Curve.
Click on Edit Curve.
- Start Value
Set to 50. - End Value
Set to 999. - Interpolation
Select Linear.
Click on Generate Curve to create a development curve. Click in Ok to accept the changes.
ATK
- Type
Select Curve.
Click on Edit Curve.
- Start Value
Set to 15. - End Value
Set to 255. - Interpolation
Select Linear.
Click on Generate Curve to create a development curve. Click in Ok to accept the changes.
DEF
- Type
Select Curve.
Click on Edit Curve.
- Start Value
Set to 10. - End Value
Set to 200. - Interpolation
Select Linear.
Click on Generate Curve to create a development curve. Click in Ok to accept the changes.
MATK
- Type
Select Curve.
Click on Edit Curve.
- Start Value
Set to 3. - End Value
Set to 150. - Interpolation
Select Linear.
Click on Generate Curve to create a development curve. Click in Ok to accept the changes.
MDEF
- Type
Select Curve.
Click on Edit Curve.
- Start Value
Set to 5. - End Value
Set to 180. - Interpolation
Select Linear.
Click on Generate Curve to create a development curve. Click in Ok to accept the changes.
AGI
- Type
Select Curve.
Click on Edit Curve.
- Start Value
Set to 12. - End Value
Set to 220. - Interpolation
Select Linear.
Click on Generate Curve to create a development curve. Click in Ok to accept the changes.
DEX
- Type
Select Curve.
Click on Edit Curve.
- Start Value
Set to 20. - End Value
Set to 255. - Interpolation
Select Linear.
Click on Generate Curve to create a development curve. Click in Ok to accept the changes.
LUK
- Type
Select Curve.
Click on Edit Curve.
- Start Value
Set to 5. - End Value
Set to 175. - Interpolation
Select Linear.
Click on Generate Curve to create a development curve. Click in Ok to accept the changes.
EXP
- Type
Select Curve.
Click on Edit Curve.
- Start Value
Set to 0. - End Value
Set to 100000. - Interpolation
Select Ease In Quad.
This way the experience needed to level up will increase with every level.
A Linear curve would result in the same experience needed for every level.
Click on Generate Curve to create a development curve. Click in Ok to accept the changes.
That’s it for creating the status development, now we only need to select it on our player combatant.
Updating the player’s combatant
Navigate to Combatants > Combatants, select our player combatant Brown Pants and change the following settings.
Status Settings > Status Value Settings
- Start Level
Set to 5. - No Status Development
Disable this setting.
We want to use status development. - Status Development
Select Player Development (the status development we just created).
Click on Save Settings to save all of the changes we made.
Now your player will be able to receive experience and level up, the status values will be changed with every level the player gains.
And that’s it for now – the next lesson will cover Attack and Defence Attributes.