
Learn how to add a turn based grid battle in this short gameplay tutorial series.
This is the first part of multiple gameplay tutorials about adding turn based grid battles to your game. These tutorials are based on the game tutorial series.
In this part we’ll set up the basic battle grid settings and grid cell types. You can learn more about grid battles in this how-to.
I’ll use the prefabs provided in the Grid Prefabs for the grid cell type prefabs – you can download them here:
The other parts of the grid battle tutorials handle:
- Part 2: Scene Setup
- Part 3: Move and Ranges
- Part 4: Battle AI
- Part 5: Cell Targeting
- Part 6: Teleport Battles
- Part 7: Tips
- Part 8: Phase Battles
- Part 9: Active Time Battles
- Part 10: Real Time Battles
Battle Grid Settings
First, we’ll set up the basic battle grid settings – e.g. which grid type we’re using, cell selections and highlighting.
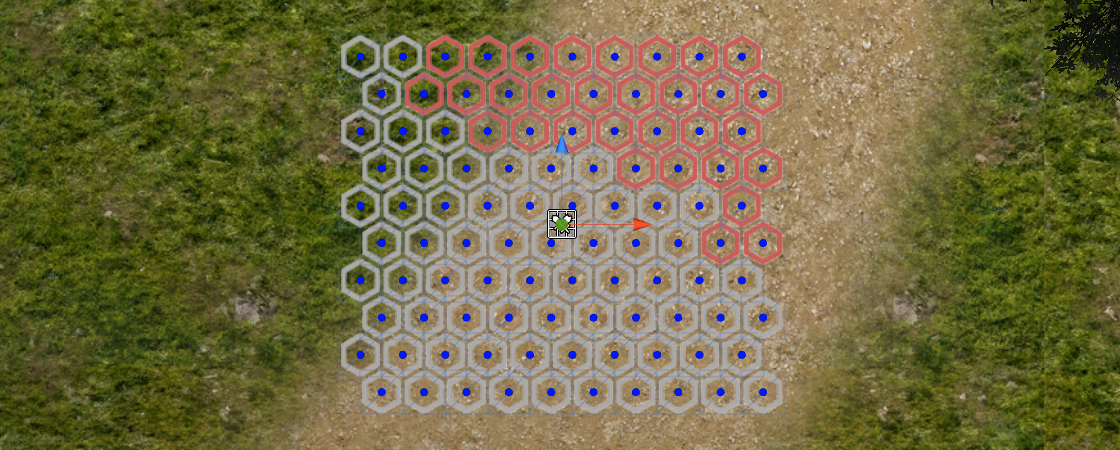
We’ll go with a Hexagonal grid using the Horizontal Odd type, i.e. a corner of the cells will face north and every odd row will be offset horizontally by half a cell’s width, like this:
Grid Settings
- Grid Type
Select Hexagonal. - Hexagonal Type
Select Horizontal Odd. - Cell Size
Set to 2. - Cell Offset
Set to X=0.1, Y=0.1.
The Raycast Settings are used for mouse/touch based cell selection. Usually you’ll set the layer mask to use the layer your ground is placed on.
- Layer Mask
Select Default. - Distance
Set to 100.
Cell Selection
The cell selection handles how the player can select cells. We’ll use input keys as well as mouse/touch input.
Input Key Settings
- Use Input Keys
Enable this setting. - Vertical Axis
Select Vertical. - Horizontal Axis
Select Horizontal. - Axis Minimum
Set to 0.3. - Use Camera Direction
Enable this setting.
The vertical and horizontal selection axis will depend upon which way the camera is facing. - Cursor Timeout
Set to 0.25.
Mouse/Touch Control
- Use Click
Enable this setting. - Mouse Button
Set to 0. - Use Touch
Enable this setting. - Touch Count
Set to 1. - Click Count
Set to 1. - Mode
Select Start.
Audio Settings
The audio clips can be found in Assets/Tutorial Resources/Audio.
- Select Audio
Select cursor01. - Accept Audio
Select accept01. - Cancel Audio
Select cancel01. - Fail Audio
Select fail01.
Orientation Selection
The orientation selection is used when the player has to select the orientation of a combatant, e.g. when using the turn end orientation.
- Only Neighbour Cells
Enable this setting.
The cell selection will only select cells around the combatant. - Rotate On Selection
Enable this setting.
Info Text
- Show Info Text
Enable this setting. - Info GUI Box
Select Top Info. - Text
Set to:
Select direction of %un.
Combatant Placement
The combatant placement is used when the player is asked to place combatants on the grid (e.g. in the battle start event).
Combatant Selection
- Use Selection
Enable this setting.
The player will be able to select which combatant to place – otherwise the combatants are placed in a defined order. - Combatant Selection
Select Default.
This defines which Combatant Selection (Menus > Combatant Selections) will be used to display the placeable combatants. - Sort By
Select Name.
Cell Selection
- Remember Cell
Disable this setting. - Place On Selection
Enable this setting. - Allow Cancel Cell
Enable this setting. - Select Orientation
Enable this setting. - Allow Cancel Orientation
Enable this setting.
Info Text
- Show Info Text
Enable this setting. - Info GUI Box
Select Top Info. - Text
Set to:
Select cell for %un.
Move Command
The move command settings handle how the player can select a target cell for movement and combatants move on the grid.
- Use Only Once
Enable this setting.
Combatants can only perform one move command per turn. - Allow Cancel
Enable this setting. - Use Shortest Path
Enable this setting. - Move Over Allies
Enable this setting. - Move Over Enemies
Disable this setting.
Default Move Range
The default move range defines how far a combatant can move on the grid. This can be overridden by each combatant individually.
We’ll use a move range of 5 as the default range.
- Value Type
Select Value. - Value
Set to 5.
Info Text
- Show Info Text
Enable this setting. - Info GUI Box
Select Top Info. - Text
Set to:
Move %un: %/%r
Target Cell Selection
The target cell selection defines how the player can select a target cell for None target range abilities/items (when using target cell selections).
- Allow Cancel
Enable this setting.
Info Text
- Show Info Text
Enable this setting. - Info GUI Box
Select Top Info. - Text
Set to:
Select target for %an.
Examine Grid
These settings handle how the player can examine the grid and which information is displayed of a selected combatant.
- Allow Cancel
Enable this setting.
Info Text
- Show Info Text
Enable this setting. - Info GUI Box
Select Top Info. - Text
Set to:
Select cell to examine.
Combatant Info Dialogue
- Show Move Range
Enable this setting. - Auto Show Move Range
Enable this setting. - Show Attack Range
Disable this setting. - Auto Show Info
Enable this setting. - GUI Box
Select Player HUD. - Show Ok Button, Show Cancel Button
Disable these settings. - At Combatant Position
Enable this setting. - Path to Child
Set to Head.
We’ll only show one page with basic combatant information – change the settings of the already added Entry Page 0.
- Use HUD
Enable this setting. - HUD
Select Player HUD.
Grid Highlighting
The grid highlighting defines how parts of the grid will be highlighted in different situations, e.g. how a selected cell or range is displayed.
We’ll first define the 3 base highlights for area, selection and no selection – they’ll be used by most of the different grid highlights.
Area Highlight
- Use Prefab
Disable this setting. - Use Blink
Enable this setting. - Blink Children
Enable this setting. - Time (s)
Set to 1. - Interpolation
Select Linear. - Fade Alpha/Red/Green/Blue
Enable these settings. - Start Color
Select a blue color with full alpha (R=0, G=0, B=1, A=1). - End Color
Select a blue color with half alpha (R=0, G=0, B=1, A=0.5).
Selection Highlight
- Use Prefab
Enable this setting. - Replace Cell Prefab
Disable this setting. - Prefab
Select CursorPrefab.
The prefab can be found in Assets/Tutorial Resources/Prefabs/BattleSystem. - Position Offset
Set to X=0, Y=1, Z=0. - Use Blink
Enable this setting. - Blink Children
Enable this setting. - Time (s)
Set to 1. - Interpolation
Select Linear. - Fade Alpha/Red/Green/Blue
Enable these settings. - Start Color
Select a green color with full alpha (R=0, G=1, B=0, A=1). - End Color
Select a green color with half alpha (R=0, G=1, B=0, A=0.5).
No Selection Highlight
- Use Prefab
Enable this setting. - Replace Cell Prefab
Disable this setting. - Prefab
Select CursorPrefab. - Position Offset
Set to X=0, Y=1, Z=0. - Use Blink
Enable this setting. - Blink Children
Enable this setting. - Time (s)
Set to 1. - Interpolation
Select Linear. - Fade Alpha/Red/Green/Blue
Enable these settings. - Start Color
Select a red color with full alpha (R=1, G=0, B=0, A=1). - End Color
Select a red color with half alpha (R=1, G=0, B=0, A=0.5).
Placement (Combatant Placement)
Defines how the available cells for placement are highlighted.
- Use Highlight
Enable this setting. - Own Highlight Settings
Disable this setting. - Base Highlight
Select Area.
Placement Selection (Combatant Placement)
Defines how the selected cell is highlighted, if it’s available for placement.
- Use Highlight
Enable this setting. - Own Highlight Settings
Disable this setting. - Base Highlight
Select Selection.
No Placement Selection (Combatant Placement)
Defines how the selected cell is highlighted, if it’s not available for placement.
- Use Highlight
Enable this setting. - Own Highlight Settings
Disable this setting. - Base Highlight
Select No Selection.
Move Range (Move Command)
Defines how the available cells for movement are highlighted.
- Use Highlight
Enable this setting. - Own Highlight Settings
Disable this setting. - Base Highlight
Select Area.
Move Selection (Move Command)
Defines how the selected cell is highlighted, if it’s available for movement.
- Use Highlight
Enable this setting. - Own Highlight Settings
Disable this setting. - Base Highlight
Select Selection.
No Move Selection (Move Command)
Defines how the selected cell is highlighted, if it’s not available for movement.
- Use Highlight
Enable this setting. - Own Highlight Settings
Disable this setting. - Base Highlight
Select No Selection.
Move Path (Move Command)
Defines how the path to the selected cell is highlighted.
- Use Highlight
Enable this setting. - Own Highlight Settings
Enable this setting. - Use Prefab
Disable this setting. - Use Blink
Enable this setting. - Blink Children
Enable this setting. - Time (s)
Set to 1. - Interpolation
Select Linear. - Fade Alpha/Red/Green/Blue
Enable these settings. - Start Color
Select a purple color with full alpha (R=1, G=0, B=1, A=1). - End Color
Select a purple color with half alpha (R=1, G=0, B=1, A=0.5).
Target Cell Selection (Target Selection)
Defines how the selected cell is highlighted, if it’s a valid target.
- Use Highlight
Enable this setting. - Own Highlight Settings
Disable this setting. - Base Highlight
Select Selection.
No Target Cell Selection (Target Selection)
Defines how the selected cell is highlighted, if it’s not a valid target.
- Use Highlight
Enable this setting. - Own Highlight Settings
Disable this setting. - Base Highlight
Select No Selection.
Orientation Selection
Defines how the selected cell is highlighted for selecting the orientation.
- Use Highlight
Enable this setting. - Own Highlight Settings
Disable this setting. - Base Highlight
Select Selection.
Use Range
Defines how the cells within use range of an ability/item are highlighted.
- In Action Selection
Enable this setting.
The use range will be highlighted when an ability/item is selected in the battle menu. - In Target Selection
Disable this setting.
The use range will not be highlighted when selecting a target for an action. - Use Highlight
Enable this setting. - Own Highlight Settings
Disable this setting. - Base Highlight
Select Area.
Affect Range
Defines how the cells within use range of an ability/item are highlighted.
- In Action Selection
Disable this setting. - In Target Selection
Enable this setting. - Use Highlight
Enable this setting. - Own Highlight Settings
Enable this setting. - Use Blink
Enable this setting. - Blink Children
Enable this setting. - Time (s)
Set to 1. - Interpolation
Select Linear. - Fade Alpha/Red/Green/Blue
Enable these settings. - Start Color
Select a yellow color with full alpha (R=1, G=1, B=0, A=1). - End Color
Select a yellow color with half alpha (R=1, G=1, B=0, A=0.5).
Examine Selection
Defines how the selected cell for grid examination is highlighted.
- Use Highlight
Enable this setting. - Own Highlight Settings
Disable this setting. - Base Highlight
Select Selection.
Grid Cell Types
Next we’ll set up the grid cell types that will be available for grids. Navigate to Battle System > Grid Cell Types and change the following settings.
The prefabs used for the grid cells are available in Assets/Grid/Prefabs after importing the GridPrefabs package.
Cell Type 0: Ground
- Name
Set to Ground. - Prefab
Select GridHexagonalHorizontal. - Position Offset
Set to X=0, Y=0.1, Z=0. - Use Prefab Rotation
Enable this setting.
Cell Settings
- Blocked
Disable this setting. - Deployment Type
Select None.
The Move Cost defines how much moving on this cell will cost a combatant.
- Value Type
Select Value. - Value
Set to 1.
Cell Type 1: Blocked
Copy the previous cell type and change the following settings.
- Name
Set to Blocked. - Prefab
Select GridHexagonalHorizontalBlocked.
Cell Settings
- Blocked
Enable this setting.
Cell Type 2: Deploy Player
Copy the 1st cell type (Ground) again, change the following settings.
- Name
Set to Deploy Player.
Cell Settings
- Deployment Type
Select Player.
Cell Type 3: Deploy Ally
Copy previous cell type and change the following settings.
- Name
Set to Deploy Ally.
Cell Settings
- Deployment Type
Select Ally.
Cell Type 4: Deploy Enemy
Copy previous cell type and change the following settings.
- Name
Set to Deploy Enemy.
Cell Settings
- Deployment Type
Select Enemy.
Cell Type 5: Deploy All
Copy previous cell type and change the following settings.
- Name
Set to Deploy All.
Cell Settings
- Deployment Type
Select All.
Cell Type 6: Empty
Copy the 2nd cell type (Blocked) and change the following settings.
- Name
Set to Empty. - Prefab
Select None (i.e. no prefab is used).
Cell Type 7: Heavy Ground
Copy the 1st cell type (Ground) again and change the following settings.
- Name
Set to Heavy Ground.
Cell Settings
- Value (Move Cost)
Set to 2.
And that’s it for now – don’t forget to save the changes by clicking on Save Settings.
The next grid battles tutorial will handle setting up the grid in the scene.