
Learn how to add a turn based grid battle in this short gameplay tutorial series.
This is the 6th part of the gameplay tutorial series focused on turn based grid battles – you can find part 1 here. In this part we’ll add a teleport battle to fight a grid battle in a different scene.
For this, we first need to set up the grid in the battle scene, create a new battle start event for changing to the battle scene and set up the battle in the field scene. We’ll also need new battle end events to get back to the scene we came from, but they don’t need a special setup like the battle start event, so we can just use the events created in this gameplay tutorial.
The Battle Scene
First, we’ll set up the grid in our battle scene – open 4 Battle Arena (can be found in Assets/Tutorial Resources/Scenes).
Spawn Point
We need a spawn point in the scene, create a new spawn point using the ORK scene wizard (Create Object > Spawn Point) and place it at X=0, Y=0, Z=0.
The spawn point’s Spawn ID should be 0.
Creating the battle grid
Add a new Battle Grid to the scene by using the ORK scene wizard (Create Object > Battle Grid) and place it at X=0, Y=0, Z=0.
Change the following settings in the Battle Grid component.
- Rows
Set to 10. - Columns
Set to 10. - Position Anchor
Select Middle Center.
This means that the game object will be the center of the grid.
Cell Settings
- Use Slope
Enable this setting. - Grid Cell Type
Select Ground.
This cell type will be used by all placed grid cells. - Empty Cell Type
Select Empty.
This cell type will be used by all cells that couldn’t be placed on the ground. - Use Blocked Type
Enable this setting.
We also want to automatically use a blocked cell type when the ground slope exceeds a defined value. - Block Slope
Set to 45. - Blocked Cell Type
Select Blocked.
Raycast Settings
- Layer Mask
Select Default (or whatever layer your ground is placed on). - Source Offset
Set to X=0, Y=10, Z=0.
This will add 10 to the raycast’s source Y-position, i.e. it’ll raycast from a height of 10 above the game object. - Raycast Distance
Set to 100. - Hit Offset
Set to X=0, Y=0, Z=0.
This would add an offset to positions hit by the raycast when placing cells.
Now, click on Generate Grid to generate the grid cells using those settings, but you wont see it yet.
Grid Setup
- Auto Show (Scene Load)
Enable this setting.
This will automatically show the grid when the scene is loaded.
Since we only load the scene when starting a battle, we don’t need to hide it. - Show Grid (Editor)
Enable this setting. - Show Prefabs (Editor)
Enable this setting.
Editing the grid
Now it’s time to paint some blocked cells on the grid – select the Paint mode in the Grid Setup and select the grid cell type you want to paint.
- Paint Cell Type
Select Blocked. - Brush Size
Set to 1.
Paint blocked cells on the grid where you like, e.g. creating different paths.
Next, we’ll need to add deployment cells for the player.
- Paint Cell Type
Select Deploy Player.
Paint 3 cells as player deployment cells, e.g. in one of the corners of the grid.
Finally, we’ll paint some enemy deployment cells.
- Paint Cell Type
Select Deploy Enemy.
Paint 3 blocks of 3 enemy deployment cells – we’ll be fighting against multiple enemy groups.
If you want, you can also paint some Heavy Ground cells for higher movement costs on some parts of the grid.
- Paint Cell Type
Select Heavy Ground.
I’ve painted all narrow paths with heavy ground.
The finished grid could look like this:
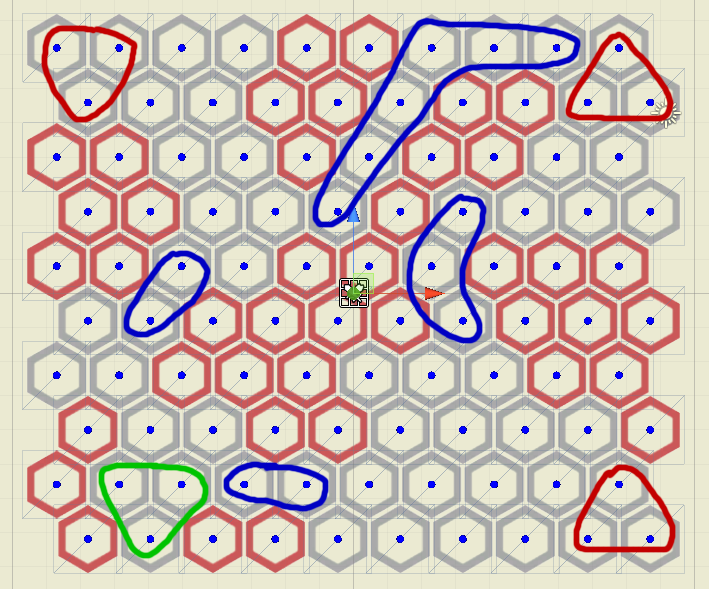
The player deployment cells are marked green, the enemy deployment cells are marked red and the heavy ground cells are marked blue.
That’s it for the battle scene – don’t forget to save the changes in the scene.
Battle Start Event
Next, we need to set up the battle start event for the teleport battle. Open the ORK Framework editor, navigate to Events and create a new battle start event. Change the following settings.
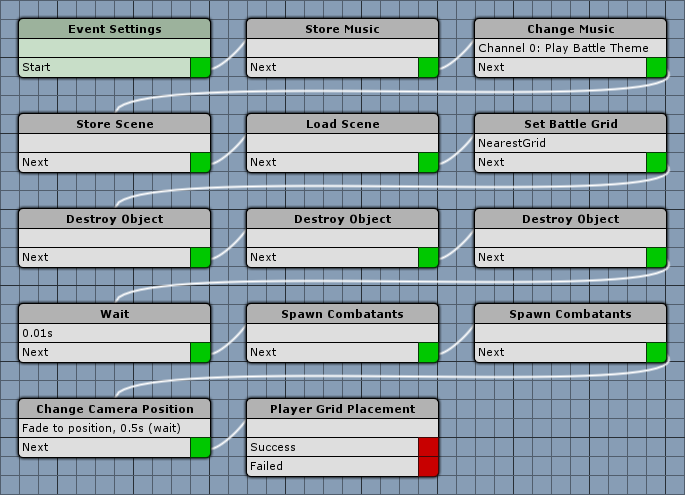
Event Settings
- Block Player Control
Enable this setting. - Block Camera Control
Enable this setting.
Store Music
Add > Animation + Audio > Music > Store Music
First we’ll store the currently playing music so that we can return to it after the battle.
No further settings needed, since we’re using the default channel and only want to store 1 track.
Change Music
Add > Animation + Audio > Music > Change Music
Now we’ll play the battle music.
- Play Type
Select Play. - Music Clip
Select Battle Theme.
Store Scene
Add > Game > Scene > Store Scene
Before changing to the battle scene, we need to remember where we’re coming from.
No further settings needed.
Load Scene
Add > Game > Scene > Load Scene
Now we’ll load the battle scene.
- Target Scene
Set to 4 Battle Arena. - Target Type
Select Spawn ID. - Spawn ID
Set to 0.
Fade Out Screen
- Fade Out
Enable this setting. - Time (s)
Set to 0.5. - Interpolation
Select Linear. - Fade Alpha/Red/Green/Blue
Enable these settings. - Start Color
Select black with no alpha (R=0, G=0, B=0, A=0). - End Color
Select black with full alpha (R=0, G=0, B=0, A=1).
Fade In Screen
- Wait Fade In
Disable this setting. - Fade In
Enable this setting. - Time (s)
Set to 0.5. - Interpolation
Select Linear. - Fade Alpha/Red/Green/Blue
Enable these settings. - Start Color
Select black with full alpha (R=0, G=0, B=0, A=1). - End Color
Select black with no alpha (R=0, G=0, B=0, A=0).
Set Battle Grid
Add > Battle > Grid > Set Battle Grid
After the new scene has been loaded, we need to set the battle grid used by the battle manually.
- Grid Use Type
Set to Nearest. - Object
Select Waypoint. - Waypoint
Select Arena.
Destroy Object
Add > Game Object > Game Object > Destroy Object
We need to destroy the game objects of all combatants participating in battle, as they’ll automatically be spawned when teleporting to the battle scene.
First, we’ll destroy the player group objects.
- Object
Select Actor. - Actor
Select Player Group.
Destroy Object
Add > Game Object > Game Object > Destroy Object
Next, we’ll destroy the enemy group objects.
- Object
Select Actor. - Actor
Select Enemy Group.
Destroy Object
Add > Game Object > Game Object > Destroy Object
Now we’ll destroy the ally group objects.
- Object
Select Actor. - Actor
Select Ally Group.
Wait
Add > Base > Wait
After destroying the game objects, we need to wait for a short moment before spawning the combatants on the grid again.
- Value Type
Select Value. - Value
Set to 0.01.
Spawn Combatants
Add > Battle > Combatant > Spawn Combatants
This will spawn all not yet spawned enemy combatants at their battle spots – which will automatically be placed at a free deployment cell.
- Spawn All
Disable this setting. - Group
Select Enemy Group.
Spawn Combatants
Add > Battle > Combatant > Spawn Combatants
This will spawn all not yet spawned ally combatants (i.e. not player combatants) at their battle spots – which will automatically be placed at a free deployment cell.
- Spawn All
Disable this setting. - Group
Select Ally Group.
Change Camera Position
Add > Game Object > Camera > Change Camera Position
Now it’s time to use our new camera position.
- Camera Position
Select Grid Battle View. - Object
Select Waypoint. - Waypoint
Select Arena. - Fade Position
Enable this setting. - Time (s)
Set Value Type to Value.
Set Value to 0.5. - Wait
Enable this setting. - Interpolation
Select Ease Out Quad.
Player Grid Placement
Add > Battle > Grid > Player Grid Placement
This will start the player’s combatant placement dialogue – no further settings needed.
And that’s it for the battle start event – click on Save Event to save it, e.g. as gridTeleportBattleStart.
Battle End Events
The battle end events for teleport grid battles don’t require any special setup – you can use the battle end events described in this gameplay tutorial.
Setting up a battle
Finally, we’ll set up a new battle for our teleport grid battle in the field scene. Open 2 Field (found in Assets/Tutorial Resources/Scenes), use the ORK scene wizard to add a turn based battle to the scene (Create Object > Battle > Turn Based Battle) and place it where you want it.
Change the following settings of the Battle component.
Start Settings
- Use Scene ID
Enable this setting. - Scene ID
This should be set to 1, since there already is our 1st grid battle in the scene. - Battle Type
Select Turn Based. - Can Escape
Enable this setting. - Look At Enemies
Disable this setting. - Grid Use Type
Select No Grid.
We’ll manually assign the grid in the battle start event after loading the battle scene.
Combatant Settings
- All Groups/Combatants
Enable this setting.
We’ll be fighting all enemy groups we’re going to define.
Change the already added first combatant/group’s settings.
- Faction
Select Enemies. - Use Group
Enable this setting. - Combatant Group
Select Fighter, Caster, Supporter.
Click on Add Group/Combatant to add another group.
- Faction
Select Enemies. - Use Group
Enable this setting. - Combatant Group
Select 2xCaster, Supporter.
Again, click on Add Group/Combatant to add another group.
- Faction
Select Enemies. - Use Group
Enable this setting. - Combatant Group
Select 2xFighter, Supporter.
Battle Settings
We’ll override the default battle start/end events here.
Battle Start Event
- Use Default
Disable this setting. - Start Event
Select gridTeleportBattleStart.
Battle End Events
- Use Default
Disable this setting. - Victory Event
Select victoryTeleport. - Escape Event
Select escapeTeleport. - Defeat Event
Select simpleDefeat. - Leave Arena Event
Select escapeTeleport.
And that’s it for now – don’t forget to save the scene.
Testing
Open the main menu scene (0 Main Menu), press play and run into the new teleport grid battle.
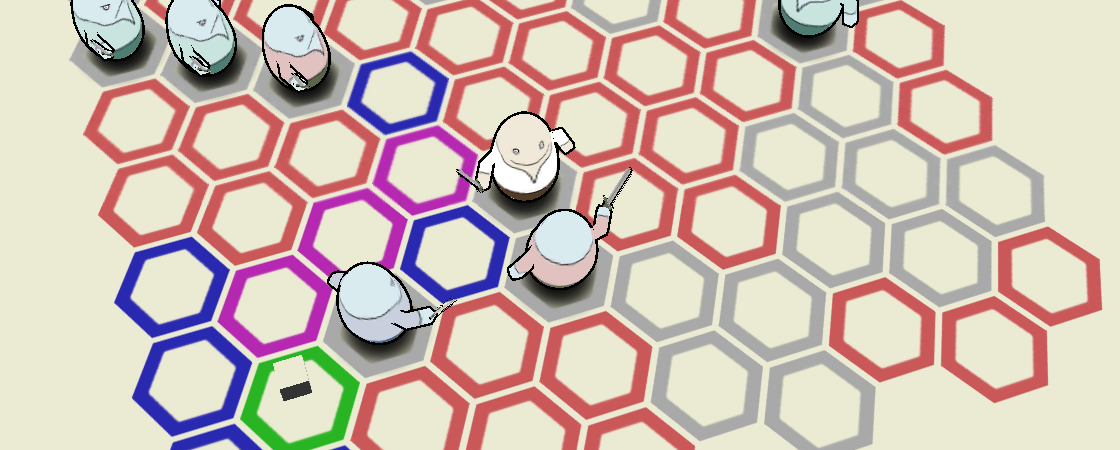
That’s one tough battle – better get Blue Pants to join you before trying it.
The next grid battles tutorial will contain some grid gameplay tips.