
Learn how to add a turn based grid battle in this short gameplay tutorial series.
This is the 2nd part of the gameplay tutorial series focused on turn based grid battles – you can find part 1 here. In this part we’ll set up the battle grid in the field scene, battle start/end events for grid battles, as well as a battle using the grid.
We’ll be working on the 2 Field scene in this tutorial, which is already pretty clustered with things from the game tutorial series at this point. I’ll remove all unneeded things from the scene, i.e. all battles and battle areas, item collectors and the introduction event (including the cam points). In case you’re doing the same, you can keep a backup of your scene by saving it using a different name (File > Save Scene As…).
I’m assuming you’re also working with a cleaned up scene for the rest of the tutorial, i.e. only leaving the areas, music player, scene changer and spawn point from the previous tutorials.
Adding a grid battle to the scene
First, we’ll need to find a nice place for our battle grid in the 2 Field scene (can be found in Assets/Tutorial Resources/Scenes). I’ll place my grid at the northern fork of the forrest path – use the ORK scene wizard to create a new Battle Grid (Create Object > Battle Grid) and place it somewhere around X=137, Y=2, Z=370.
Generating the battle grid
Using the scene wizard we’ve got a new game object with a Battle Grid component attached. We’ll use it to create a 10×10 grid at this position, change the following settings in the component’s inspector.
- Rows
Set to 10. - Columns
Set to 10. - Position Anchor
Select Middle Center.
This means that the game object will be the center of the grid.
The Cell Settings define the grid cell types that will be used when generating the grid.
- Use Slope
Enable this setting. - Grid Cell Type
Select Ground.
This cell type will be used by all placed grid cells. - Empty Cell Type
Select Empty.
This cell type will be used by all cells that couldn’t be placed on the ground. - Use Blocked Type
Enable this setting.
We also want to automatically use a blocked cell type when the ground slope exceeds a defined value. - Block Slope
Set to 45. - Blocked Cell Type
Select Blocked.
The Raycast Settings define the raycast that is used to place the individual cells on the ground. If the raycast didn’t hit anything, the empty cell type is used, otherwise the grid cell type, unless the ground’s slope is above 45 degrees – in which case it’ll use the blocked cell type.
- Layer Mask
Select Default (or whatever layer your ground is placed on). - Source Offset
Set to X=0, Y=10, Z=0.
This will add 10 to the raycast’s source Y-position, i.e. it’ll raycast from a height of 10 above the game object. - Raycast Distance
Set to 100. - Hit Offset
Set to X=0, Y=0, Z=0.
This would add an offset to positions hit by the raycast when placing cells.
Now, click on Generate Grid to generate the grid cells using those settings, but you wont see it yet.
Displaying the grid in the editor
By default, battle grid cells are not displayed in the editor. You have to change the following settings in the Grid Setup to see the individual grid cells.
- Auto Show (Scene Load)
Disable this setting.
If enabled, the grid would automatically be displayed in the game when the scene loads.
Since we also walk around in the scene, we only want to display it during battles – this will be handled by the battle start/end events. - Show Grid (Editor)
Enable this setting. - Show Prefabs (Editor)
Enable this setting.
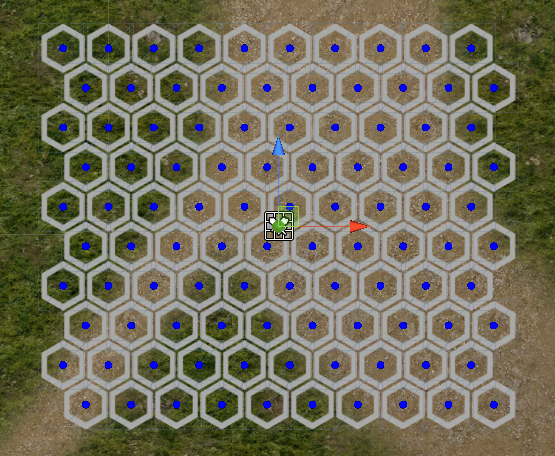
Now your grid will look like this:
Editing the grid
Since the ground is pretty even, we don’t have any blocked cells here from the grid generation – let’s change that by painting some blocked cells on the grid. To do this, select the Paint mode in the Grid Setup and select the grid cell type you want to paint.
- Paint Cell Type
Select Blocked. - Brush Size
Set to 1.5.
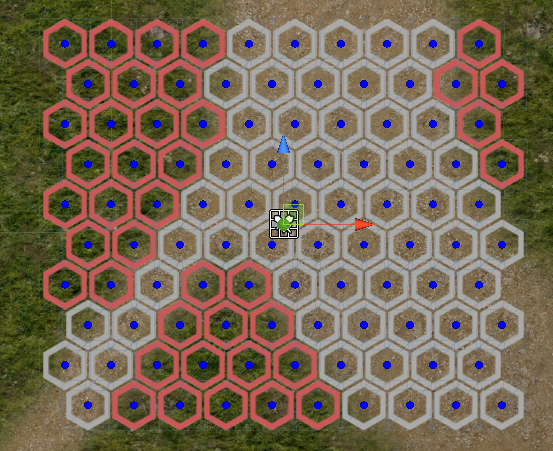
Now you can paint blocked cells on the grid in the scene view using the mouse cursor and pressing the left mouse button. Paint blocked cells on the grid where the ground is made of grass – afterwards it’ll look like this:
We only need to set some deployment cells for the player and enemies to finish our grid. Let’s start with the player deployment cells.
- Paint Cell Type
Select Deploy Player.
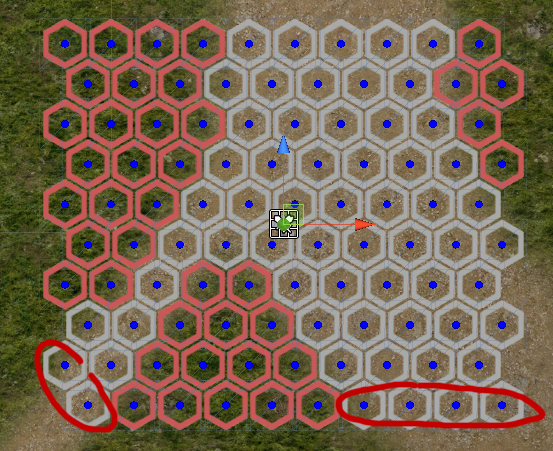
Paint some cells at the top side of the grid, e.g.:

And finally we’ll set some enemy deployment cells.
- Paint Cell Type
Select Deploy Enemy.
Paint some cells at the bottom side of the grid, e.g.:
That’s it for the battle grid – don’t forget to save the scene.
Battle Start Event
Our battle grid is set to be hidden during the game, i.e. we need to make it visible in the battle start event, as well as trigger the player combatant placement. But first, we’ll set up a new Camera Position for the battle.
Camera Position
Open the ORK Framework editor and navigate to World > Camera Positions, add a new camera position and change the following settings.
- Name
Set to Grid Battle View. - Local Space
Enable this setting. - Position Offset
Set to X=-15, Y=20, Z=5. - Rotation
Set to X=5, Y=0, Z=0. - Rotation Is Offset
Disable this setting. - Look At
Enable this setting. - Ignore X Rotation
Enable this setting.
Disable the other ignore settings. - Set Field of View
Enable this setting. - Field of View
Set to 40.
That’s it for the camera position – next we’ll create a new battle start event. This event is also included in the Grid Prefabs, in case you don’t want to set it up yourself.
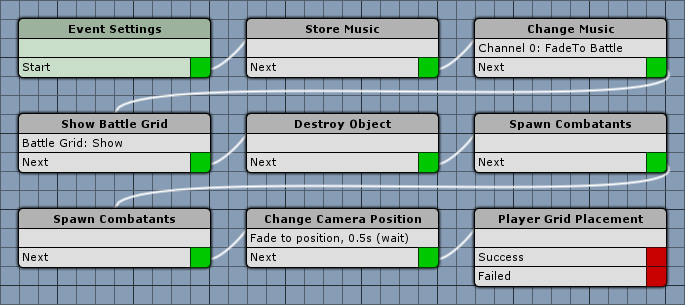
Event Settings
- Block Player Controls
Enable this setting. - Block Camera Controls
Enable this setting.
Store Music
Add > Animation + Audio > Music > Store Music
First, we’ll store the currently playing music. Since we only use one music channel and only want to store one clip, the default settings are enough here.
- Music Channel
Set to 0. - Store ID
Set to 0.
Change Music
Add > Animation + Audio > Music > Change Music
Now we’ll play the battle music.
- Play Type
Select Fade To. - Music Clip
Select Battle Theme. - Fade Time (s)
Set to 1.
Show Battle Grid
Add > Battle > Grid > Show Battle Grid
This is a crucial step in grid battles – in order to see the grid and be able to move/act on it, it needs to be displayed.
- Show/Hide
Enable this setting. - Use Game Object
Disable this setting.
Destroy Object
Add > Game Object > Game Object > Destroy Object
Since our player (or the whole group) is already spawned in the scene, we need to destroy them. Otherwise the player/group would be standing around on the grid during the player combatant placement.
- Object
Select Actor. - Actor
Select Player Group.
Spawn Combatants
Add > Battle > Combatant > Spawn Combatants
This will spawn all not yet spawned enemy combatants at their battle spots – which will automatically be placed at a free deployment cell.
- Spawn All
Disable this setting. - Group
Select Enemy Group.
Spawn Combatants
Add > Battle > Combatant > Spawn Combatants
This will spawn all not yet spawned ally combatants (i.e. not player combatants) at their battle spots – which will automatically be placed at a free deployment cell.
- Spawn All
Disable this setting. - Group
Select Ally Group.
Change Camera Position
Add > Game Object > Camera > Change Camera Position
Now it’s time to use our new camera position.
- Camera Position
Select Grid Battle View. - Object
Select Waypoint. - Waypoint
Select Arena. - Fade Position
Enable this setting. - Time (s)
Set Value Type to Value.
Set Value to 0.5. - Wait
Disable this setting. - Interpolation
Select Ease In Out Quad.
Player Grid Placement
Add > Battle > Grid > Player Grid Placement
This will start the player’s combatant placement dialogue – no further settings needed.
And that’s it for the battle start event – click on Save Event to save it, e.g. as gridBattleStart.
Battle End Events
For our battle end events, we only need to replace the victory and escape events – and we can build upon the already created battle end events from the game tutorials.
All we need to do is add a Show Battle Grid step to hide the grid after the battle. We don’t need to replace the defeat event, since this will result in a game over and load the game over scene anyway, so there’s no need to hide the grid.
Show Battle Grid
Add > Battle > Grid > Show Battle Grid
Add this step at the position it’s marked in the images.
- Show/Hide
Disable this setting. - Use Game Object
Disable this setting.
Victory Event
Open the simpleVictory battle end event that was created during the gameplay tutorials and add a Show Battle Grid step, set up as described above.
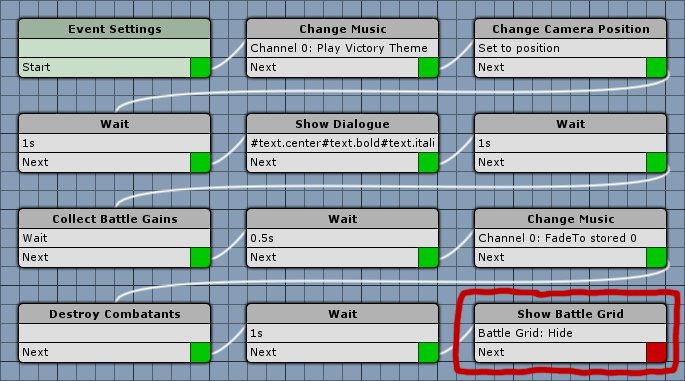
Since we may want to keep the old event around as well, click on Save Event As and save the event e.g. as gridVictoryBattleEnd.
Escape Event
Open the simpleEscape battle end event that was created during the gameplay tutorials and add a Show Battle Grid step, set up as described above. This time, we’ll add it before the last Fade Screen step.
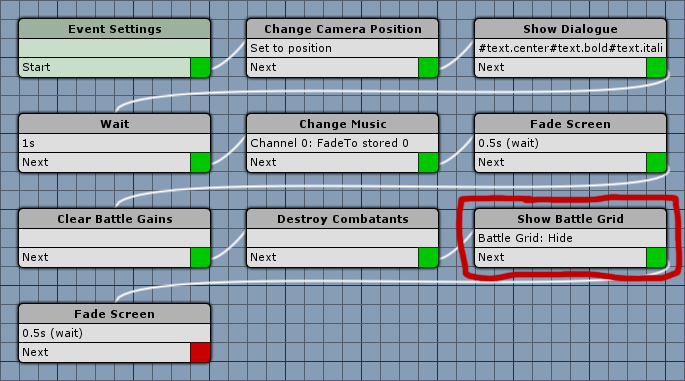
Since we may want to keep the old event around as well, click on Save Event As and save the event e.g. as gridEscapeBattleEnd.
Setting up a battle
Next, we’ll set up a battle that will use the grid and battle start/end events we just created. Use the ORK scene wizard to add a turn based battle to the scene (Create Object > Battle > Turn Based Battle) and place it at the position of the grid.
This is basically the same as any other battle we’ve set up so far – change the following settings of the Battle component.
Start Settings
- Use Scene ID
Enable this setting. - Scene ID
This should be set to 0 if there is no other battle in the scene.
Otherwise it’ll have an automatically assigned scene ID, or you can click on Get New Scene ID to obtain one. - Battle Type
Select Turn Based. - Can Escape
Enable this setting. - Look At Enemies
Disable this setting. - Grid Use Type
Select Nearest Grid.
This will automatically use the battle grid that is closest to the battle’s game object.
Combatant Settings
Change the already added first combatant/group’s settings.
- Faction
Select Enemies. - Use Group
Enable this setting. - Combatant Group
Select Fighter, Caster, Supporter.
Battle Settings
We’ll override the default battle start/end events here. Alternatively, you can also just replace the default events in Battle System > Turn Based Battles.
Battle Start Event
- Use Default
Disable this setting. - Start Event
Select gridBattleStart.
Battle End Events
- Use Default
Disable this setting. - Victory Event
Select gridVictoryBattleEnd. - Escape Event
Select gridEscapeBattleEnd. - Defeat Event
Select simpleDefeat. - Leave Arena Event
Select gridEscapeBattleEnd.
And that’s it for now – don’t forget to save the scene.
The next grid battles tutorial will handle grid movement and ranges.