
Again, we use Battle Events to animate defend, escape and death.
Die, combatant, die!
Up until now, when a combatant died in battle, he just vanished … that’s not pretty now, isn’t it?
Luckily we can change that by using a Battle Event to animate death itself – let’s open the ORK Framework editor and navigate to Events. Click on New Battle Event to create the event.
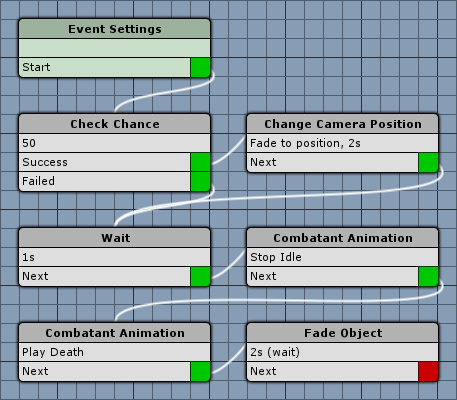
Event Settings
- Reset Camera
Enable this setting.
We’ll change the camera position in this event – this setting automatically resets the camera to where it was when the event started. - Calculation Needed
Enable this setting.
This will automatically call Calculate for the action that is being performed at the end of the event (if it wasn’t called in the event) – so we don’t have to add a Calculate step ourself.
Check Chance
Add > Base > Check Chance
We want to change a camera position in 50 % of the deaths. The chance check let’s us do this.
- Value Type
Select Value. - Value
Set to 50.
Change Camera Position
Add > Game Object > Camera > Change Camera Position
We’ll connect this step with the Success slot of the Check Chance step.
- Camera Position
Select Front View. - Object
Select Actor. - Actor
Select User.
In a death action, the user and the target are both the dying combatant. - Fade Position
Enable this setting. - Time (s)
Set to 2. - Wait
Disable this setting. - Interpolation
Select Ease In Out Quad.
Wait
Add > Base > Wait
We’ll connect this step with the Failed slot of the Check Chance step and the Next slot of the Change Camera Position step.
- Time (s)
Set to 1.
Combatant Animation
Add > Animation + Audio > Animation > Combatant Animation
In this step we’ll stop the Idle animation of the combatant – if we don’t do this (or stop all ongoing animations), the combatant might rise again after playing the Death animation.
- Object
Select Actor. - Actor
Select User. - Stop
Enable this setting. - Animation Type
Select Idle.
Combatant Animation
Add > Animation + Audio > Animation > Combatant Animation
Now it’s time to play the Death animation.
- Object
Select Actor. - Actor
Select User. - Stop
Disable this setting. - Wait
Disable this setting. - Animation Type
Select Death.
Fade Object
Add > Animation + Audio > Fade > Fade Object
Finally, we’ll fade the combatant to a black color.
- Object
Select Actor. - Actor
Select User. - Wait
Enable this setting. - Fade Children
Enable this setting. - Time (s)
Set to 2. - Fade Alpha/Red/Green/Blue
Enable this settings. - From Current
Enable this setting.
Whatever the combatant’s current colors are – we’ll start from them. - End Color
Select a black color with full alpha (R=0, G=0, B=0, A=1).
And that’s it for this event – click on Save Event and save it as death in Assets/Events/Battle/.
Defend yourself
The Defend command will let the combatant defend itself until his next turn – i.e. he will take less damage (how much is defined in Battle System > Battle Settings).
To animate the Defend command, we use a battle event – so click on New Battle Event.
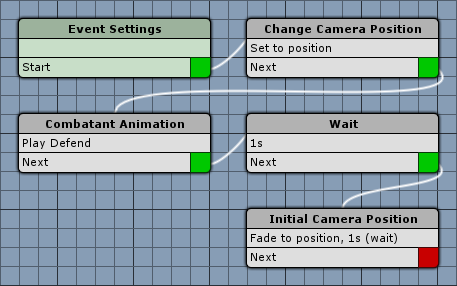
Event Settings
- Calculation Needed
Enable this setting.
Change Camera Position
Add > Game Object > Camera > Change Camera Position
- Camera Position
Select Front View. - Object
Select Actor. - Actor
Select User.
In a defend action, the user and the target are both the defending combatant. - Fade Position
Disable this setting.
Combatant Animation
Add > Animation + Audio > Animation > Combatant Animation
Now it’s time to play the Defend animation.
- Object
Select Actor. - Actor
Select User. - Stop
Disable this setting. - Wait
Disable this setting. - Animation Type
Select Defend.
Wait
Add > Base > Wait
- Time (s)
Set to 1.
Initial Camera Position
Add > Game Object > Camera > Initial Camera Position
This step is used to set of fade the camera to it’s initial position (i.e. where it was at the start of the battle event).
- Fade Position
Enable this setting. - Time (s)
Set to 1. - Wait
Enable this setting. - Interpolation
Select Ease In Out Quad.
And that’s it for this event – click on Save Event and save it as defend in Assets/Events/Battle/.
Run, combatant, run!
The Escape command let’s the combatant escape from the battle (by chance). We don’t have this command in our battle menu yet, but we’ll change that later.
To animate the Escape command, we use a battle event – so click on New Battle Event.
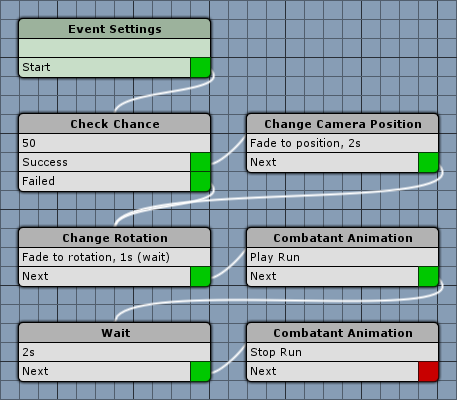
Event Settings
- Reset Camera
Enable this setting. - Reset Look Angles
Enable this setting. - Calculation Needed
Enable this setting.
Check Chance
Add > Base > Check Chance
We want to change a camera position in 50 % of the deaths. The chance check let’s us do this.
- Value Type
Select Value. - Value
Set to 50.
Change Camera Position
Add > Game Object > Camera > Change Camera Position
We’ll connect this step with the Success slot of the Check Chance step.
- Camera Position
Select Front View. - Object
Select Actor. - Actor
Select User.
In an escape action, the user and the target are both the escaping combatant. - Fade Position
Enable this setting. - Time (s)
Set to 2. - Wait
Disable this setting. - Interpolation
Select Ease In Out Quad.
Change Rotation
Add > Movement > Rotation > Change Rotation
Let’s turn the combatant around before running. We’ll connect this step to the Failed slot of the Check Chance step and to the Next slot of the Change Camera Position step.
- Object
Select Actor. - Actor
Select User. - Value Type (Rotation)
Select Value. - Value
Set to X=0, Y=180, Z=0. - Fade Rotation
Enable this setting. - Time (s)
Set to 1. - Wait
Enable this setting. - Interpolate
Enable this setting. - Interpolation
Select Ease In Out Quad.
Combatant Animation
Add > Animation + Audio > Animation > Combatant Animation
Now it’s time to play the Run animation.
- Object
Select Actor. - Actor
Select User. - Stop
Disable this setting. - Wait
Disable this setting. - Animation Type
Select Run.
Wait
Add > Base > Wait
- Time (s)
Set to 2.
Combatant Animation
Add > Animation + Audio > Animation > Combatant Animation
And stop running.
- Object
Select Actor. - Actor
Select User. - Stop
Enable this setting. - Animation Type
Select Run.
That’s it for this event – click on Save Event and save it as escape in Assets/Events/Battle/.
Adding the events
The battle events for our special actions are set up in Battle System > Battle Settings for all combatants, using the same way as we added battle events to items and abilities. Individual combatants can optionally override battle animations for these special actions, as well as for abilities and items. This can be done in the combatant’s Battle Settings > Override Settings > Battle Animations.
Navigate to Battle System > Battle Settings change the following settings.
Battle Animations
Defend Animation
First, the defend animation.
- Animate Defend
Enable this setting.
Edit the already added Defend Battle Event 0.
- Battle Event
Select defend. - Perform In
Enable Turn Based, Active Time, Real Time and Phase.
Escape Animation
Now, the escape animation.
- Animate Escape
Enable this setting.
Edit the already added Escape Battle Event 0.
- Battle Event
Select escape. - Perform In
Enable Turn Based, Active Time, Real Time and Phase.
Death Animation
Finally, the death animation.
- Animate Death
Enable this setting.
Edit the already added Death Battle Event 0.
- Death Event
Select death. - Perform In
Enable Turn Based, Active Time, Real Time and Phase.
That’s it for battle animations.
The escape command
We can’t use the escape command yet, because we didn’t add it to the battle menu – let’s change this. Navigate to Battle System > Battle Menus and change the following settings in the Default Battle Menu.
Click on Add Menu Item to add a new item to the menu.
Option 5
- Type
Select Escape. - Name
Set to Escape.
That’s it – click on Save Settings and close the ORK Framework editor.
Testing time
Open the main menu scene (0 Main Menu) and hit Play. Walk outside of the town and into the battle and use Defend and Escape – and watch your enemy die.
Tip: If the battle is still to hard for you, you can also increase the player combatant’s start level.
There’s still two things left for animating our battles – displaying the equipment and displaying the player’s status.
And that’s it for now – the next lesson will cover displaying the equipment.