
We still need to create an ending to our battle – this is done using Battle End Events.
Like battle start events, you can set up the battle end events for each battle system type individually – and each battle can override those default events as well. This way you can, e.g. add a dialogue at the end of a special battle. Battle end events are in charge of collecting the battle gains (loot, experience reward), playing victory music, removing any combatants that aren’t necessary any longer and return to playing the previous music.
There are three possible battle outcomes, this means we also need three different battle end events to react on the outcome of the battle:
- Victory
The player group won the battle.
We most likely want to collect our rewards. - Escape
The player group escaped the battle.
Just get the hell out of there, forget the rewards! - Defeat
The player group lost.
You’re dead … game over?
But first, let’s add another camera position.
The front view camera position
We need another camera position to show a good front view of our player when he won the battle. You can read more about them in this how-to.
Open the ORK Framework editor and navigate to World > Camera Positions. Add a new camera position and change the following settings.
- Name
Set to Front View. - Target Child
Set to Head.
We don’t want to look at the combatant’s feet. - Local Space
Enable this setting.
We always want to look at the front of our combatant. - Position Offset
Set to X=0, Y=1, Z=5. - Rotation
Set to X=0, Y=0, Z=0. - Look At
Enable this setting. - Ignore X/Y/Z Rotation
Disable this settings. - Set Field of View
Enable this setting. - Field of View
Set to 40.
In most situations we don’t really need to set the Field of View, but it doesn’t hurt, and you never know if a previous camera position changed it.
That’s it for this camera position – click on Save Settings.
Victory!
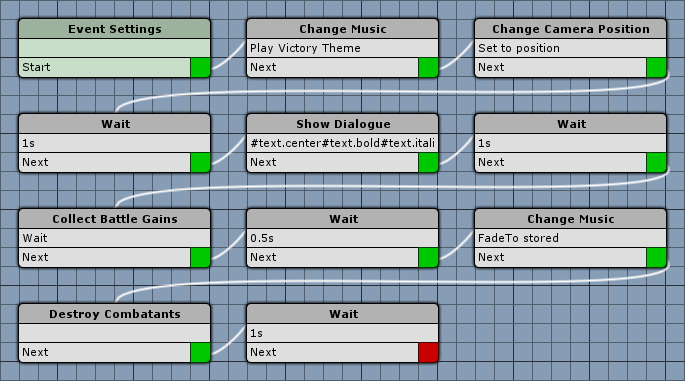
Now it’s time to create a battle end event in case we won a battle. Navigate to Events and create a new battle end event by clicking on New Battle End Event.
Event Settings
- Block Player Control
Enable this setting. - Block Camera Control
Enable this setting.
Change Music
Add > Animation + Audio > Music > Change Music
Now we’ll play the victory music we set up earlier.
- Play Type
Select Play. - Music Clip
Select Victory Theme.
Change Camera Position
Add > Game Object > Camera > Change Camera Position
Let’s face our player! We currently only have one combatant in our player group, but for future expansions, we want the camera to look at each member of the player group for some time.
- Camera Position
Select Front View. - Object
Select Actor. - Actor
Select Player Group.
This will allow us to use the whole player group participating in the battle. - Use All
Enable this setting.
Allows us to use the camera position on all group members in sequence. - Time Between (s)
Set to 2. - Wait Between
Enable this setting. - Fade Position
Disable this setting.
Wait
Add > Base > Wait
- Time (s)
Set to 1.
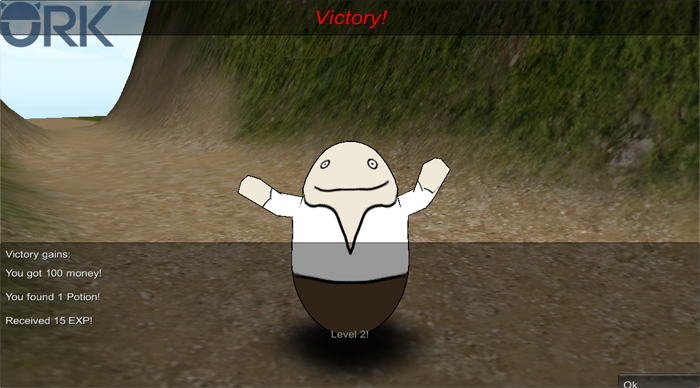
Show Dialogue
Add > UI > Dialogue > Show Dialogue
We’ll display a simple message to state that we’ve won.
- Dialogue Type
Select AutoClose. - GUI Box
Select Top Info. - Message
Set to #text.center#text.bold#text.italic#text.color3##text.size40#Victory!. - Block Accept Button
Enable this setting. - Close After (s)
Set to 5. - Wait
Disable this setting.
Wait
Add > Base > Wait
- Time (s)
Set to 1.
Collect Battle Gains
Add > Battle > Gains > Collect Battle Gains
This will collect all gains (loot, experience) from the battle.
- Show Gains
Enable this setting.
Displays a dialogue with our battle gains and level up notifications (if someone reaches a new level).
The GUI box and text are set up in Battle System > Battle End. - Wait
Enable this setting.
Wait
Add > Base > Wait
- Time (s)
Set to 0.5.
Change Music
Add > Animation + Audio > Music > Change Music
Continue playing the stored music.
- Play Type
Select Fade To. - Play Stored Music
Enable this setting. - Fade Time (s)
Set to 0.5.
Destroy Combatants
Add > Battle > Combatant > Destroy Combatants
This step will remove all game objects of combatants we don’t need from the scene.
- Destroy Player
Disable this setting.
We don’t want to destroy our player’s game object. - Destroy All
Enable this setting.
Destroys all other combatants.
Wait
Add > Base > Wait
- Time (s)
Set to 1.
That’s it for this event – click on Save Event and save it as simpleVictory in Assets/Events/Battle End/.
Escaping the battle
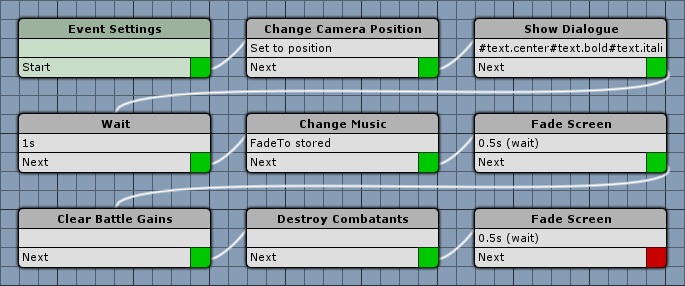
We aren’t using escape yet, but let’s quickly create a small escape event. Click on New Battle End Event.
Event Settings
- Block Player Control
Enable this setting. - Block Camera Control
Enable this setting.
Change Camera Position
Add > Game Object > Camera > Change Camera Position
- Camera Position
Select Front View. - Object
Select Actor. - Actor
Select Player Group. - Use All
Disable this setting. - Fade Position
Disable this setting.
Show Dialogue
Add > UI > Dialogue > Show Dialogue
We’ll display a simple message to state that we’ve escaped.
- Dialogue Type
Select AutoClose. - GUI Box
Select Top Info. - Message
Set to #text.center#text.bold#text.italic#text.color3##text.size40#You Escaped!. - Block Accept Button
Enable this setting. - Close After (s)
Set to 5. - Wait
Disable this setting.
Wait
Add > Base > Wait
- Time (s)
Set to 1.
Change Music
Add > Animation + Audio > Music > Change Music
Continue playing the stored music.
- Play Type
Select Fade To. - Play Stored Music
Enable this setting. - Fade Time (s)
Set to 1.
Fade Screen
Add > UI > Fade Screen
- Wait
Enable this setting. - Time (s)
Set to 0.5. - Fade Alpha/Red/Green/Blue
Enable this settings. - Start Color
Select a black color with no alpha (R=0, B=0, G=0, A=0). - End Color
Select a black color with full alpha (R=0, B=0, G=0, A=1).
Clear Battle Gains
Add > Battle > Gains > Clear Battle Gains
The player escaped, so he shouldn’t get anything … no further settings.
Destroy Combatants
Add > Battle > Combatant > Destroy Combatants
- Destroy Player
Disable this setting. - Destroy All
Enable this setting.
Fade Screen
Add > UI > Fade Screen
- Wait
Enable this setting. - Time (s)
Set to 0.5. - Fade Alpha/Red/Green/Blue
Enable this settings. - From Current
Enable this setting. - End Color
Select a black color with no alpha (R=0, B=0, G=0, A=0).
And that’s it for this event – click on Save Event and save it as simpleEscape in Assets/Events/Battle End/.
Defeat …
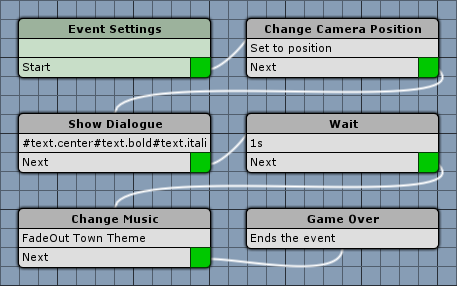
When the player group has been defeated, we want to end the game and call Game Over. Click on New Battle End Event to make that happen.
Event Settings
- Block Player Control
Enable this setting. - Block Camera Control
Enable this setting.
Change Camera Position
Add > Game Object > Camera > Change Camera Position
- Camera Position
Select Front View. - Object
Select Actor. - Actor
Select Player Group. - Use All
Disable this setting. - Fade Position
Disable this setting.
Show Dialogue
Add > UI > Dialogue > Show Dialogue
We’ll display a simple message to state that the game is over …
- Dialogue Type
Select AutoClose. - GUI Box
Select Top Info. - Message
Set to #text.center#text.bold#text.italic#text.color3##text.size40#Game Over!. - Block Accept Button
Enable this setting. - Close After (s)
Set to 5. - Wait
Disable this setting.
Wait
Add > Base > Wait
- Time (s)
Set to 1.
Change Music
Add > Animation + Audio > Music > Change Music
Fade out the music, the game is over.
- Play Type
Select Fade Out. - Fade Time (s)
Set to 3.
Game Over
Add > Game > Game > Game Over
This steps ends the game and loads the game over scene – something that we still have to set up! The game over step ends the event, no further settings.
And that’s it for this event – click on Save Event and save it as simpleDefeat in Assets/Events/Battle End/.
The game over settings
For our game over step to do the correct thing, we need to set up the game over settings. We can define the scene that will be loaded, the fade out/in when loading the scene – and if a game over menu should be displayed.
Navigate to Game > Game Settings and change the following settings.
Game Over Settings
- Load Scene
Set to 3 Game Over. - Auto Game Over
Enable this setting.
We want to fade out the screen (to black) for 3 seconds.
- Fade Out
Enable this setting. - Time (s)
Set to 3. - Fade Alpha/Red/Green/Blue
Enable this settings. - Start Color
Select a black color with no alpha (R=0, G=0, B=0, A=0). - End Color
Select a black color with full alpha (R=0, G=0, B=0, A=1).
The scene will be changed after the fade out – and we want it to fade in again.
- Fade In
Enable this setting. - Time (s)
Set to 0.5. - Fade Alpha/Red/Green/Blue
Enable this settings. - From Current
Enable this setting. - End Color
Select a black color with no alpha (R=0, G=0, B=0, A=0).
Finally, we want to display a the game over menu with Retry, Load and Exit options.
- Show Choice
Enable this setting. - GUI Box
Select Main Menu. - Show Retry
Enable this setting.
The retry option will load the last saved or loaded game, or a retry save game if available.
Retry save games are temporary save games that are only available in a running game – if the player exits the game, the retry save game is gone. - Text (Retry)
Set to Retry. - Show Load
Enable this setting.
This will call the load menu – something we also still have to set up to our liking, but the base settings are enough for now. - Text (Load)
Set to Load. - Show Exit
Enable this setting.
This will load the main menu scene. - Text (Exit)
Set to Exit.
That’s it for the game over settings.
Adding the battle end events
Now all we need to do is add the battle end events we created to the Turn Based Battles. Navigate to Battle System > Turn Based Battles and change the following settings.
Default Start/End Events
- Victory Event
Select simpleVictory. - Escape Event
Select simpleEscape. - Defeat Event
Select simpleDefeat.
That’s it – click on Save Settings and close the ORK Framework editor.
Test it, and see how it ends!
Again, open the main menu scene (0 Main Menu) and hit Play. Walk outside of the town and into the battle – and see how your battle ends for you.
Tip: If the battle is to hard for you, you can always change some of your player’s or the enemy’s status values – or simply add a bonus to MaxHP to your player’s combatant.
We’re still missing some things – like animating the Defend or Escape command … or Death.
And that’s it for now – the next lesson will cover animating those special actions.