
Camera positions are predefined and reusable settings to place a camera.
The event system uses camera positions to place or move the camera – but you can also use the camera as an event actor and use the normal movement and rotation steps. Camera positions are always used on a target object, like an actor in an event or the target of an attack.
You can set up camera positions in two ways, either you simply define the position, rotation and field of view in the ORK Framework editor, or you use the ORK Scene Wizard to create a camera position out of data in your scene.
Creating in the editor
Camera positions are set up in World > Camera Positions. The following settings are available.
- Name
The name of the camera position.
Simply used to find the thing you want. - Target Child
A child object of the target game object will be used. - Local Space
The camera position is defined in local space of the target object.
This way you can ensure that e.g. the camera will always look at the target from the left side. - Position Offset
The offset to the target’s position the camera will be placed at. - Rotation
The rotation the camera will be set to.
You can ignore every rotation axis individually. - Look At
The camera will look at the target object, ignoring the rotation settings. - Ignore X/Y/Z Rotation
Ignores the X/Y/Z rotation axis – depending on Look At this setting works different.
If Look At is enabled, the defined rotation axis will be used, ignoring the angle coming from the Look At.
If it’s disabled, the defined rotation axis will be ignored, using the current camera’s angle. - Set Field of View
Sets the camera’s field of view.
A normal field of view is around 40 – it’s best to keep it below 180.
Since the camera will always be placed using a target object, it’s crucial to know how positioning game objects work.
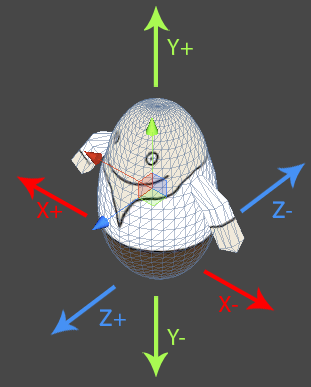
This picture displays how the different position axis change in local space of a game object. The X-axis is going from left to right, the Y-axis from bottom to top and the Z-axis from back to front.

This picture displays how the different rotation axis change.
While this pictures demonstrate local space, the world space placement work similar, but it’s not bound to the direction of the target game object.
Creating with the scene wizard
If you aren’t that good with positions and rotations, using the ORK Scene Wizard is the easier way to create camera positions.
To create a camera position this way, you first need to place a game object (e.g. a cube, or your player’s prefab) somewhere in your scene. Now, place the camera the way you want it to look at the object.
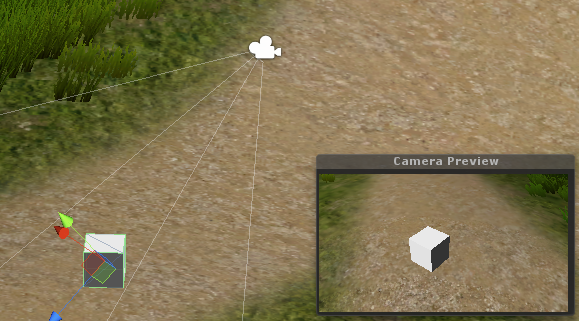
Select the game object and the camera and click on Create Camera Position in the scene wizard. You’ll now see the settings that will be created – if you click on Create Camera Position again, the camera position will be created and the ORK Framework editor opens.
Remember that you still have to click on Save Settings to save the new camera position!