
To animate battles, we first have to set up the animations of our combatants.
We already set up some basic animations for our player earlier – now it’s time to add the rest of the needed animations. In this tutorial we’ll create some needed animation types and the animations we need – read this how-to if you want to learn more about ORK’s way with animations in general.
Animation Types
Open the ORK Framework editor and navigate to Base/Control > Animation Types. You should already have 13 animation types in the list:
- Idle
- Walk
- Run
- Sprint
- Jump
- Fall
- Land
- Damage
- Evade
- Death
- Revive
- Victory
- Attack
The default animation types should also already be assigned to the types with the same name. This leaves three more animation types that we need.
Animation Type 13
- Name
Set to Use.
Animation Type 14
- Name
Set to Cast.
Animation Type 15
- Name
Set to Defend.
That’s it for the animation types.
Animations
Navigate to Base/Control > Animations. First we’ll extend the already existing animations by the rest of the animations we need. After that, we’ll create a new, smaller set of animations to override the default’s Idle and Run animation with animations for battles.
This way, we have a basic set of animations that has everything we need in them, but uses the combatant’s field animations for movement. Whenever we need some special animations (e.g. battle movement or a special weapon attack animation), we only need to create a small set of animations that only overrides those animations.
Change the following settings.
Animations 0: Default
We already added the three legacy animations for Idle, Walk and Run. Now we’ll add the rest of the animations we need – since we aren’t using all of them (e.g. Jump, Fall and Land), we need another eight animations. Add them by clicking on Add Legacy Animation multiple times. We’ll be using the default play settings for all animations (Cross Fade, Stop Same Layer, 0.1).
Legacy Animation 3
- Animation Type
Select Damage. - Animation Name
Set to damage. - Set Layer
Enable this setting. - Animation Layer
Set to 1.
Legacy Animation 4
- Animation Type
Select Evade. - Animation Name
Set to evade. - Set Layer
Enable this setting. - Animation Layer
Set to 1.
Legacy Animation 5
- Animation Type
Select Death. - Animation Name
Set to death. - Set Layer
Enable this setting. - Animation Layer
Set to 2.
Legacy Animation 6
- Animation Type
Select Revive. - Animation Name
Set to revive. - Set Layer
Enable this setting. - Animation Layer
Set to 2.
Legacy Animation 7
- Animation Type
Select Victory. - Animation Name
Set to victory. - Set Layer
Enable this setting. - Animation Layer
Set to 2.
Legacy Animation 8
- Animation Type
Select Attack. - Animation Name
Set to attack. - Set Layer
Enable this setting. - Animation Layer
Set to 2.
Legacy Animation 9
- Animation Type
Select Use. - Animation Name
Set to item. - Set Layer
Enable this setting. - Animation Layer
Set to 2.
Legacy Animation 10
- Animation Type
Select Cast. - Animation Name
Set to cast. - Set Layer
Enable this setting. - Animation Layer
Set to 2.
Legacy Animation 11
- Animation Type
Select Defend. - Animation Name
Set to defend. - Set Layer
Enable this setting. - Animation Layer
Set to 2.
That’s it for this animations.
Animations 1: Battle
- Name
Set to Battle.
We need two legacy animations to override the default’s Idle and Run animation. Add them by clicking on Add Legacy Animation two times. We’ll be using the default play settings for all animations (Cross Fade, Stop Same Layer, 0.1).
Legacy Animation 0
- Animation Type
Select Idle. - Animation Name
Set to battleidle. - Set Layer
Enable this setting. - Animation Layer
Set to -1.
Legacy Animation 1
- Animation Type
Select Run. - Animation Name
Set to battlerun. - Set Layer
Enable this setting. - Animation Layer
Set to 0.
And that’s it for the animations. Now we need add the animations to our combatants.
Animations for the combatants
Navigate to Combatants > Combatants. We’ll do this quick and easy and simply add the animations to our combatants.
Tip: Did you know that you can switch between data in a list (in our case: combatants) using the Page Up and Page Down keys?
Change the following settings in all combatants.

Animations & Movement > Animation Settings
- System Type
Select Legacy. - Animations
Select Default. - Use Battle
Enable this setting. - Animations (Battle)
Select Battle.
That’s it – click on Save Settings and close the ORK Framework editor.
Testing … again!
Open the main menu scene (0 Main Menu) and hit Play. Walk outside of the town and into the battle. Now, when a combatant takes damage or evades an attack you’ll see they’ll play an animation – and the idle animation of the battle is different as well.
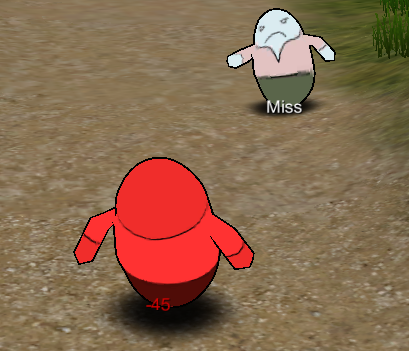
In case you’re wondering why sometimes there are two damage notifications coming from a combatant at the same time – that’s because the other combatant attacked and also countered the attack of the combatant. But we don’t see details yet, because we’re still missing battle events to animate the actions.
And that’s it for now – the next lesson will continue with animating the battle.