
We use Battle Events to animate battle actions like abilities or items – in this tutorial we’ll focus on the attack ability.
We’ve encountered Game Events (and Move Events) before – Battle Events are another type of events. They may lack some of the event steps available in game events, but in contrast offer their own event steps specifically for battle.
While you have to add Actors to game events yourself, battle events have them added automatically – the user of the action, and the targets. Also Waypoints are added automatically in battle events – the user base, target base and battle center.
One of the most crucial battle event steps is the Calculate step – this step is used to calculate the outcome of an action (e.g. the damage of an attack, the healed amount of HP or the escape chance). You can also use this step multiple times to do multiple damages in a single action. You can learn about doing damage in this how-to.
Items and abilities can have multiple battle events – they’ll be performed in sequence and can optionally perform only in selected battle system types. We will split the things we want our battle events to do in multiple smaller events to make them reusable and modular.
Open the ORK Framework editor and navigate to Events.
Animating: Attack
We’ll start with animating the ability Attack. For our attack, we want the user (i.e. the attacker) to run to the target, attack it (i.e. playing the attack animation and calculating the outcome), and return to the user’s previous position. Since we might reuse some part of this, or don’t want to use parts of it in other battle system types, we’ll break this down into tree separate events:
- running to the target
- attacking the target
- returning to the base position
Let’s get started! Click on New Battle Event to create a new battle event.
Running to the target
This first battle event is quite simple – we will move the user to the target.
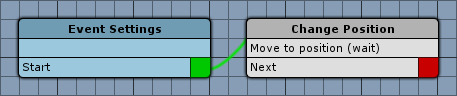
Change Position
Add > Movement > Movement > Change Position
Moving Object
These settings define which object will change position.
- Object
Select Actor.
This will move an actor of the event. - Actor
Select User.
Target Position
These settings define the target position of the object.
- To Object
Enable this setting.
We want to move to the position of another object. - Object
Select Actor. - Actor
Select Target.
Movement Settings
These settings define if and how the object will move. If this settings aren’t used, the object will be set to the target position immediately.
- Move
Enable this setting. - Wait
Enable this setting. - Controller Move
Enable this setting. - Apply Gravity
Enable this setting. - Face Direction
Enable this setting. - Stop Distance
Set to 0.
Since we’ve defined the radius for all of our combatants, we don’t need to add a stop distance. - Move By Speed
Enable this setting. - Speed Type
Select Run. - Follow Position
Enable this setting.
If the target object changes it’s position while we move, the new position will be used as target.
That’s it for this event – click on Save Event and save it as runToTarget in Assets/Events/Battle/.
Running to the base position
This event is very similar to the first event, so let’s just edit the already opened event and save it as a new event. Change the following settings.
Event Settings
- Reset Look Angles
Enable this setting.
This will make all combatants currently not in action look at their enemies.
Change Position
Target Position
We’ll change the target position to the user’s base.
- Object
Select Waypoint. - Waypoint
Select User Base. - No Combatant Radius
Enable this setting.
We’re running back to our base position, so we don’t need to stop earlier.
That’s it for this event – click on Save Event As … and save it as runToBase in Assets/Events/Battle/.
Attacking the target
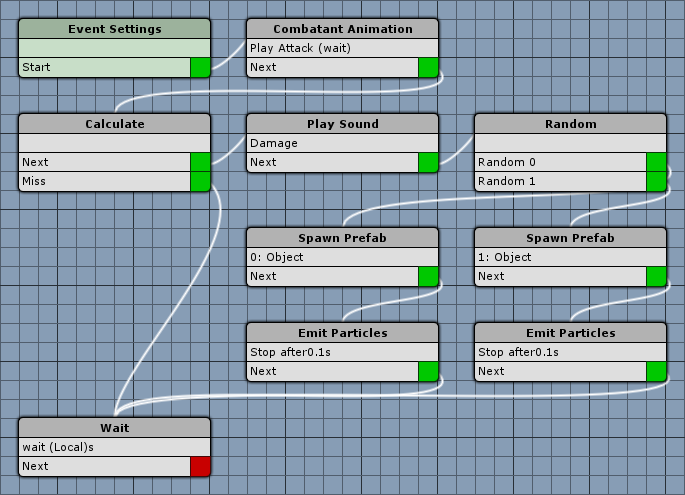
Now things will get a little bit more complex. We’ll play the attack animation, calculate the damage and, if the attack hit the target, spawn some sparks and play a damage audio.
Click on New Battle Event to create a new, blank event.
Event Settings
We’ll need two prefabs for our spark effects (which effect is used will be decided randomly).
- Destroy Prefabs
Enable this setting.
All spawned prefabs will be destroyed at the end of the event.
Click on Add Prefab.
- Prefab
Select Sparks.
Can be found in Assets/Tutorial Resources/Prefabs/BattleSystem/.
Click on Add Prefab again.
- Prefab
Select Sparks2.
Can be found in Assets/Tutorial Resources/Prefabs/BattleSystem/.
Combatant Animation
Add > Animation + Audio > Animation > Combatant Animation
- Object
Select Actor. - Actor
Select User. - Animation Type
Select Attack.
Remember – when playing animations, you always play an animation type.
The combatant will play the current animation bound to this type. - Wait
Enable this setting. - Normalized Time (0-1)
Set to 0.3.
A normalized time defines the animation’s time as a value between 0 and 1 (where 0 is 0 seconds and 1 is the full duration).
0.3 means we’ll wait for 30% of the animation’s duration before continuing the event.
We’ll store the remaining duration of the animation so that we can wait for it to finish after doing calculations and spawning particle effects.
- Store Duration
Enable this setting. - Normalized Time (0-1)
Set to 0.7. - Variable Origin
Select Local. - Value Type (Variable Key)
Select Value. - Value (Variable Key)
Set to wait. - Operator
Select Set.
Calculate
Add > Battle > Action > Calculate
This will calculate if the attack hits and how much damage it will make.
- Animate Target
Enable this setting.
The target will play the appropriate animation type (e.g damage or evade). - Use ‘Miss’ Next
Enable this setting.
This will allow us to react on the outcome of the attack.
The Next slot will be called when the attack hit the target, the Miss slot if the attack missed.
Play Sound
Add > Animation + Audio > Audio > Play Sound
This step is connected to the calculate step’s Next slot. We will play a sound type – they work similar to animation types and bind a audio file to a type in the combatant’s settings.
- Object
Select Actor. - Actor
Select Target. - Use Sound Type
Enable this setting. - Sound Type
Select Damage. - Wait
Disable this setting. - Play One Shot
Enable this setting. - Volume
Set to 1.
Random
Add > Base > Random
Now it’s time to randomly spawn a prefab – for this we’ll create two paths.
Click on Add Step once to create a 2nd path.
Spawn Prefab
Add > Game Object > Prefab > Spawn Prefab
Let’s spawn the prefab on the target.
- Prefab
Select Prefab 0. - Object
Select Actor. - Actor
Select Target. - Local Space
Enable this setting. - Offset
Set to X=0, Y=1, Z=0.
Emit Particles
Add > Game Object > Component > Emit Particles
Stop emitting the particles of the prefab. If we would destroy the prefab right away, it’ll generate an ugly cut.
- Emit
Disable this setting. - Value Type (Emit After)
Select Value. - Value (Emit After)
Set to 0.1.
This’ll stop emitting particles after 0.1 seconds. - Object (Target Object)
Select Prefab. - Prefab
Select Prefab 0. - Spawned Prefab ID
Set to -1.
This will use all spawned instances of the prefab.
Spawn Prefab
Copy the already added spawn prefab step and connect this one to the 2nd slot of the random step. Change the following settings.
- Prefab
Select Prefab 1.
Emit Particles
Also, copy the already added emit particles step and connect it to the 2nd path’s Spawn Prefab node. Change the following settings.
- Prefab
Select Prefab 1.
Wait
Add > Base > Wait
Connect the calculate step’s Miss slot and both emit particles steps to this wait step.
We’ll wait for the remaining duration of the animation (stored in the Combatant Animation node) before the event ends and the spawned prefabs are destroyed.
- Value Type (Time)
Select Game Variable. - Value (Time)
Set to wait. - Variable Origin
Select Local. - Variable Key
Set to wait.
That’s it for this event – click on Save Event and save it as attack in Assets/Events/Battle/.
Adding the events
Now it’s time to add the events to our Attack ability. Navigate to Status > Abilities and select the Attack ability. Change the following settings.
Battle Animation
- Animate
Enable this setting.
This ability’s animation consists of three battle events. Change the already added battle event settings.
- Battle Event
Select runToTarget. - Chance
Set to 100.
The chance decides if the battle event will be performed.
You can use this setting to bring some randomness into your animations. - Perform In
You can leave these settings as they are for now.
Turn Based, Active Time, Real Time and Phase should be enabled.
Click on Add Animation to add another battle event.
- Battle Event
Select attack. - Chance
Set to 100.
Click on Add Animation to add the last event.
- Battle Event
Select runToBase. - Chance
Set to 100.
That’s it for this ability. Repeat the same settings in the Mug Attack ability.
Don’t forget about the sound!
We’ve added a play audio step to our attack event and used Sound Types. Let’s look into that!
Sound types, like animation types, bind audio files to a type – but this binding is defined per combatant. When playing a sound type on a combatant, he will play his audio file assigned to this type. This way we can share events across combatants, but always play individual sounds.
Sound types are defined in Base/Control > Sound Types. There should already be some standard types defined:
- Damage
- Evade
- Death
- Use 1
- Use 2
- Use 3
- Attack 1
- Attack 2
- Attack 3
We don’t need other sound types for now, so let’s set up the damage sound on our combatants (the one we used in our event). Navigate to Combatants > Combatants and change the following settings on all combatants.
Base Settings > Sound Settings
Click on Add Sound to add a sound type binding.
- Sound Type
Select Damage. - Audio Clip
Select hit.
Can be found in Assets/Tutorial Assets/Audio/.
That’s it – click on Save Settings and close the ORK Framework editor.
Let’s test this!
Open the main menu scene (0 Main Menu) and hit Play. Walk outside of the town and into the battle. You will notice that the player and enemy now use the attack animations we just defined – cool!
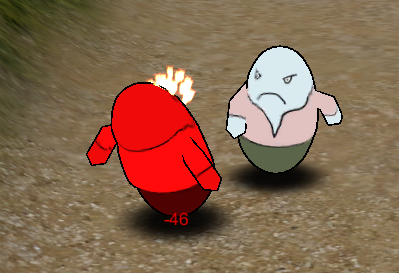
Combatants moving around, particle effects and sound … we’re on the right track, but still a lot of battle events to do.
And that’s it for now – the next lesson will continue with animating the battle.