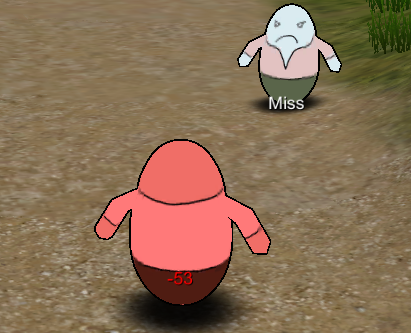
Flying texts give a visual feedback (e.g. displaying the damage of an attack) to what’s happening in a battle.
First, we’ll create a Move Event – a simple type of event that we can use to animate (move) a flying text in the scene.
It moves!
Open the ORK Framework editor and navigate to Events. Click on New Move Event to create a new move event.
A move event is a simple event that can be used to move objects around.
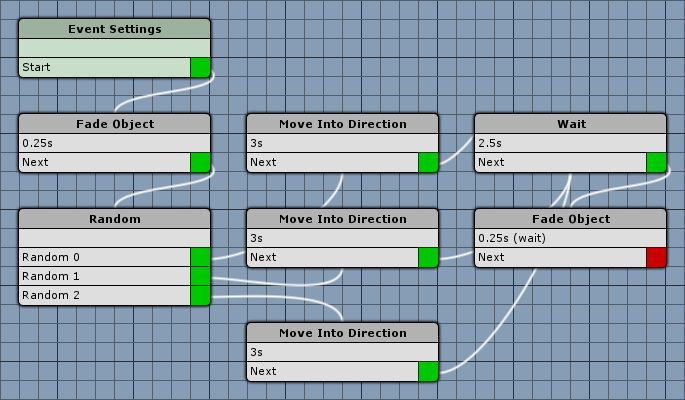
We’re creating a move event that will randomly move our flying text object into a direction.
Fade Object
Add > Animation + Audio > Fade > Fade Object
We want to fade the object from no alpha to full alpha.
- Wait
Disable this setting. - Time
Set to 0.25. - Interpolation
Select Linear. - Fade Alpha
Enable this setting. - Fade Red/Green/Blue
Disable this settings. - Start Color
Set alpha (A) to 0. - End Color
Set alpha (A) to 1.
Random
Add > Base > Random
This step will randomly execute one of the connected steps – we want to connect three steps, so add them by clicking on Add Step.
Move Into Direction 1
Add > Movement > Movement > Move Into Direction
Moves the object into a defined direction.
- Time (s)
Set to 3. - Wait
Disable this setting. - Speed Type
Select Value. - Speed
Set to 1. - Value Type (Direction)
Select Value. - Value (Direction)
Set to X=1, Y=0, Z=0. - Local Space
Enable this setting.
The rest of this step’s settings can be ignored.
Copy this step two times, connect them to the random step and change the following settings.
Move Into Direction 2
- Value (Direction)
Set to X=0, Y=1, Z=0.
Move Into Direction 3
- Value (Direction)
Set to X=0, Y=0, Z=1.
Wait
Add > Base > Wait
- Time (s)
Set to 2.5.
Fade Object
Add > Animation + Audio > Fade > Fade Object
We want to fade the object from full alpha to no alpha.
- Wait
Enable this setting. - Time
Set to 0.25. - Interpolation
Select Linear. - Fade Alpha
Enable this setting. - Fade Red/Green/Blue
Disable this settings. - Start Color
Set alpha (A) to 1. - End Color
Set alpha (A) to 0.
That’s it for our move event – click on Save Event and save it as notification1 in Assets/Events/Move/.
Status value flying texts
Now we set up how to display changes to HP and MP. Navigate to Status > Status Values.
First, select HP and change the following settings.
Flying Text Settings
Click on Add Flying Text to add flying text settings.
Flying Text 0
- Player
Enable this setting. - Ally
Enable this setting. - Enemy
Disable this setting.
We want the damage flying text for player and enemy combatants to use different colors, that’s why we disabled Enemy here.
Refresh
This flying text will display positive changes to the status value (i.e. healing/refreshing).
- Show Flying Text
Enable this setting. - Text (English)
Set to +%.
The % sign will be replaced with the actual value. - Text Color
Select Green. - Count to Value
Enable this setting.
With this setting enabled, the flying text will count to the real value instead displaying the value right away. - Start from (%)
Set to 50.
We will start counting from 50 % of the real value – e.g. counting from 10 to 20. - Interpolation
Select Ease Out Quad.
The counting will slow down at the end. - Time (s)
Set to 1.
The counting will take 1 second. - Move Event Asset
Select notification1. - Destroy Time
Set to 3.
Now, we also want to flash the game object of the combatant.
- Use Flash
Enable this setting. - Flash Children
Enable this setting. - Time (s)
Set to 0.5. - Interpolation
Set to Linear. - Fade Alpha
Disable this setting. - Fade Red/Green/Blue
Enable this settings. - Start Color
Select a white color (R=1, G=1, B=1). - End Color
Select a green color (R=0, G=1, B=0).
Damage
This flying text will display negative changes to the status value (i.e. damage).
- Show Flying Text
Enable this setting. - Text (English)
Set to -%.
The % sign will be replaced with the actual value. - Text Color
Select Red. - Count to Value
Enable this setting. - Start from (%)
Set to 50. - Interpolation
Select Ease Out Quad. - Time (s)
Set to 1. - Move Event Asset
Select notification1. - Destroy Time
Set to 3.
Now, we also want to flash the game object of the combatant.
- Use Flash
Enable this setting. - Flash Children
Enable this setting. - Time (s)
Set to 0.5. - Interpolation
Set to Linear. - Fade Alpha
Disable this setting. - Fade Red/Green/Blue
Enable this settings. - Start Color
Select a white color (R=1, G=1, B=1). - End Color
Select a red color (R=1, G=0, B=0).
That’s it for the player/ally flying texts – scroll back up to Flying Text 0 and click on the Copy button to duplicate the settings (since all we want to do is use a different color for enemy damage).
Flying Text 1
- Player
Disable this setting. - Ally
Disable this setting. - Enemy
Enable this setting.
Damage
- Text Color
Select Default Text.
That’s it for the HP.
Now, select MP from the list and change the following settings.
Flying Text Settings
Click on Add Flying Text to add flying text settings.
Flying Text 0
- Player
Enable this setting. - Ally
Enable this setting. - Enemy
Enable this setting.
Refresh
- Show Flying Text
Enable this setting. - Text (English)
Set to +%. - Text Color
Select Blue. - Count to Value
Enable this setting. - Start from (%)
Set to 50. - Interpolation
Select Ease Out Quad. - Time (s)
Set to 1. - Move Event Asset
Select notification1. - Destroy Time
Set to 3.
That’s it for MP, we only want to display a refreshing number, no flash or damage display.
Click on Save Settings and close the ORK Framework editor.
Testing again
Open the main menu scene (0 Main Menu) and hit Play. Walk outside of the town and into the battle. Now, at least, you’ll see what’s going on regarding the status value changes from attacks, abilities and items.
In case you’re wondering why you’ll sometimes (or often) can simply walk around after a few rounds and the enemy is still standing around – that’s because you’re dead, and there is no Battle End Event yet that will handle this situation. But that’s a topic for another tutorial.
And that’s it for now – the next lesson will cover animating the battle.


