
Create a simple quest to kill some enemies using the Quest System.
While you can simply use the Event System alone to create quests, the Quest System allows creating more complex quests and also supports automatic progression. This tutorial focuses on creating and adding the quest, you can learn more about the quest system in this how-to.
For our hunting quest we’ll create a new Quest Type, the actual Quest and it’s Quest Tasks. Also, we’ll look into adding the quest to our game using the Event System. Keep in mind that this gameplay tutorial is based on the game tutorials, so we’ll be using data already created there (e.g. combatants, GUI boxes), you can easily adjust it to be used with your own project by simply selecting the things you’d like to use (e.g. other enemy combatants).
Adding the quest type
Open the ORK Framework editor and navigate to Game > Quest Types. If you’ve already added your own quest types, you can either use one of them or add a new one – if this is your first time using the quest system, you can simply edit the Default Type. Change the following settings.
- Name
Set to Hunting Quests. - Description
Set to These quests require you to hunt enemies..
That’s it for the quest type.
Adding the quest
Navigate to Game > Quests. If this is your first quest, simply edit the exiting Default Quest, otherwise add a new quest. Change the following settings.
- Name
Set to Killing Evil Pants. - Description
Set to Evil Pants has made some bad choices in live – it’s time to hunt him down..
Quest Settings
- Quest Type
Select Hunting Quests.
Quest Text
The quest text is used to display more detailed information about a quest – it can be updated/replaced by individual quest tasks.
- Text
Set to:
Red Pants asked for your help to bring down Evil Pants. Go out into the field and hunt him down.
Rewards
A quest can give the player rewards (experience, items, weapons, armors and money) upon successfully completing it. We’re going to give the player some experience, items and money.
Click on Add Experience Reward to add an experience reward.
- Status Value
Select EXP. - Value Type
Select Value.
We’re giving a defined value reward. - Value
Set to 500.
Click on Add Item Reward to add an item reward.
- Type
Select Item. - Selection
Select Potion. - Quantity
Set to 5. - Chance
Set to 100.
Click on Add Item Reward again.
- Type
Select Money. - Selection
Select Gold. - Quantity
Set to 200. - Chance
Set to 100.
And that’s it for the quest.
Adding the quest tasks
The quest tasks handle the actual things the player need to do and the progress of a quest – navigate to Game > Quest Tasks. We’re going to need two tasks – one for killing the enemies and one for reporting back.
Task 0: Kill Evil Pants
For the first task, either edit the Default Task or add a new task. Change the following settings.
- Name
Set to Kill Evil Pants. - Description
Set to You need to kill 3 Evil Pants..
Base Settings
- Quest
Select Killing Evil Pants.
Activate Requirements
These settings handle the conditions for activating the task. All tasks are inactive when a quest starts – only active quests can be finished. This task is the first task of our quest and we want it to be activated automatically.
- Auto Activate
Enable this setting.
This means, the task will automatically be activated when the requirements are met.
Since we don’t add any requirements, the task will be activated when the quest is added.
Finish Requirements
These settings handle the conditions for finishing the task. The requirements can also be used to display the progress of a quest, in our case the number of already killed enemies.
- Auto Finish
Enable this setting.
The task will automatically finish when the requirements are met.
Now, we want the player to kill 3 Evil Pants to finish this task. Click on Add Enemy Kill to add a kill requirement.
- Combatant
Select Evil Pants. - Quantity
Set to 3. - Allow Overcount
Disable this setting.
If enabled, the kill counter of the task will still increase even if the required amount of enemies has been killed.
That’s it for our first task.
Task 1: Report to Red Pants
Create a new task and change the following settings.
- Name
Set to Report to Red Pants. - Description
Set to Report your success to Red Pants..
Base Settings
- Quest
Select Killing Evil Pants.
Quest Text
We want this task to update the quest’s text with new information.
- Update Quest Text
Enable this setting. - Text
Set to:You’ve killed Evil Pants, report back to Red Pants.Be sure to add an empty line before the text – this text will be appended to the already existing quest text and we want it to start in a new line.
Activate Requirements
This task should be automatically activated when the Kill Evil Pants task has been finished.
- Auto Activate
Enable this setting.
Click on Add Quest Task to add a finished task requirement.
- Finished Task
Select Kill Evil Pants.
Finish Requirements
This time we wont finish the task automatically – this will be handled by a game event used to report back to Red Pants. But we want the task to finish the quest when finished.
- Finish Quest
Enable this setting.
And that’s it for the tasks.
Default quest layout
Quest layouts are used by menus and quest choices to display information of a quest (e.g. the tasks and rewards). The default quest layout is defined in Game > Game Settings in the Quest Settings. Let’s make it a little bit nicer – change the following settings.
- Show Title
Enable this setting. - Title
Set to %n.
This will display the name of the quest (%n).
The Content defines the actual text used to display the quest information – we can use a range of text codes to add the information we want, e.g. a list of active tasks or the rewards of the quest. How a task or reward is displayed is defined in following settings.
- Content Text
Set to:
%d
#text.bold#text.color2#Tasks#<color#<style
#text.size16#%tac#<size
#text.bold#text.color2#Rewards#<color#<style
#text.size16#%ral#<size
The headers (tasks, rewards) will be displayed in bold, yellow text, the active tasks (%tac) and rewards (%ral) will display in a smaller text size.
Now, the reward texts are fine as they are – they’ll display the name and quantity of the reward. We will change the task text – we want to add information about the finish requirement (%rfi).
- Task Text
Set to %n %rfi.
This will append the requirements directly to the task’s name – we’ll use this to simply add the number of killed and required enemies to the task’s name. - Requirement Text
Set to %/%m.
This will display the current number (%) and the required number (%m) of the requirement’s goal (in our case, the number of killed Evil Pants).
That’s it for the default quest layout.
Quest notifications
Notifications are simple dialogues that will automatically close after some time. We can set up notifications to let the player know of newly added quests or finished tasks. They’re also set up in Game > Game Settings in the Quest Settings. Change the following settings.
- Queue Quest Notifications
Enable this setting. - Queue Task Notifications
Enable this setting.
Quest Added
This notification is displayed when a new quest is added to the player’s quest list.
- Show Notification
Enable this setting. - GUI Box
Select Area Notification. - Text
Set to Quest ‘%n’ added.
Quest Finished
This notification is displayed when a quest is finished.
- Show Notification
Enable this setting. - GUI Box
Select Area Notification. - Text
Set to Quest ‘%n’ finished.
Task Activated
This notification is displayed when a task is activated (i.e. when a new task of a quest is available).
- Show Notification
Enable this setting. - GUI Box
Select Area Notification. - Text
Set to ‘%qn’: New task activated.
Task Finished
This notification is displayed when a task is finished.
- Show Notification
Enable this setting. - GUI Box
Select Area Notification. - Text
Set to ‘%qn’: Task finished.
And that’s it for the notification settings – for our current quest we don’t need more notifications (e.g. we currently can’t fail the quest).
Click on Save Settings to save your changes.
Creating a quest event
To add a quest into our game, we need to create a game event. The event will first let the player decide if he wants to do this quest and display different dialogues based on the current progress of the quest. Finally, the event will also finish the last task of the quest (reporting back). Navigate to Events and create a new Game Event.
The finished event will look something like this:
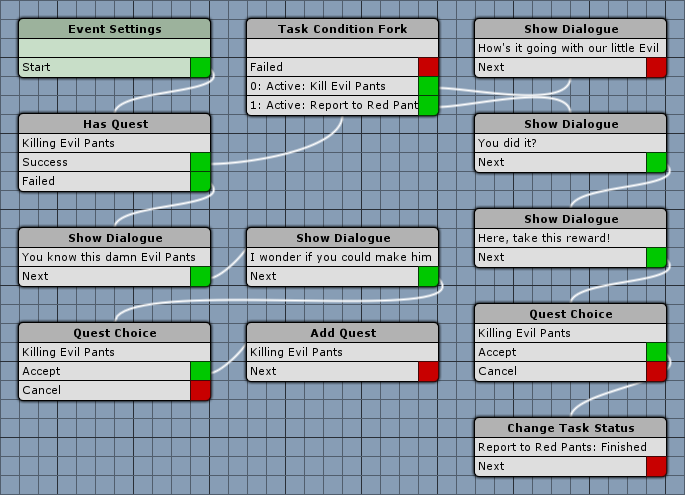
Event Settings
- Blocking Event
Enable this setting. - Block Player Control
Enable this setting. - Block Camera Control
Enable this setting.
Click on Add Actor to add an actor (this will be Red Pants for our dialogues).
- Type
Select Object. - Event Object
Enable this setting. - Set Name
Enable this setting. - Name
Set to Red Pants.
Has Quest
Add > Game > Quest > Has Quest
This step will check if the quest is already added. If it’s already added, the event continues with checking the different status of the tasks, otherwise display some dialogues and let the player decide to start the quest.
- Quest
Select Killing Evil Pants.
Show Dialogue
Add > UI > Dialogue > Show Dialogue
This step is connected to the Failed slot of the Has Quest step.
- Dialogue Type
Select Message. - GUI Box
Select Bottom Dialogue. - Use Speaker
Enable this setting. - Actor
Select Red Pants. - Show Name
Enable this setting. - Message
Set to:
You know this damn Evil Pants fella?
He caused some ruckus lately …
Show Dialogue
We’re going to use the same settings, so copy the previous Show Dialogue step and change the following settings.
- Message
Set to:
I wonder if you could make him … go away …
Quest Choice
Add > UI > Dialogue > Quest Choice
This is a special choice dialogue that can display quest information using a quest layout. The choice itself doesn’t do anything with the selected quest, it only displays information. Depending on the player’s choice, you can add the quest or finish it and collect rewards after the quest choice.
- Quest
Select Killing Evil Pants. - GUI Box
Select Bottom Dialogue. - Allow Cancel
Enable this setting.
Add Quest
Add > Game > Quest > Add Quest
This step will add the quest to the player’s quest list.
- Quest
Select Killing Evil Pants.
Task Condition Fork
Add > Game > Quest > Task Condition Fork
This step is connected to the Success slot of the Has Quest step. It’s used to check multiple quest tasks for their current status and continue the with the first valid state.
Click on Add Task Condition to add our first task check.
- Is Valid
Enable this setting.
You can use this setting to negate a check, e.g. checking for the finished state with Is Valid disabled will be valid for inactive, active and failed. - Quest Task
Select Kill Evil Pants. - Check Status
Select Active.
Click on Add Task Condition to add the 2nd check.
- Is Valid
Enable this setting. - Quest Task
Select Report to Red Pants. - Check Status
Select Active.
Show Dialogue
This step is connected to the Task Condition Fork‘s first condition slot (0, checking for Kill Evil Pants). We’re going to use the same settings as the previous dialogues, so copy one of the other Show Dialogue steps and change the following settings.
- Message
Set to:
How’s it going with our little Evil Pants problem?
Show Dialogue
This step is connected to the Task Condition Fork‘s 2nd condition slot (1, checking for Report to Red Pants). Again, copy one of the other Show Dialogue steps and change the following settings.
- Message
Set to:
You did it?
Finally … I’m not going to miss him.
Show Dialogue
Again, copy one of the other Show Dialogue steps and change the following settings.
- Message
Set to:
Here, take this reward!
Quest Choice
Add > UI > Dialogue > Quest Choice
This time, we’ll use the quest choice to only display the rewards of the quest and let the player decide if he wants to finish the quest (i.e. take the rewards) or not.
- Quest
Select Killing Evil Pants. - GUI Box
Select Bottom Dialogue. - Allow Cancel
Enable this setting. - Use Choice
Enable this setting. - Add Cancel Choice
Enable this setting. - Accept Button Text
Set to Take Rewards.
We’re using a different quest layout this time – since we only want to display the rewards.
- Own Layout
Enable this setting. - Content Text
Set to:
#text.bold#text.color2#Rewards#<color#<style
%ralThis will display the rewards header in bold, yellow letters and add a list of all rewards.
The rest of the layout settings can stay as they are.
Change Task Status
Add > Game > Quest > Change Task Status
Finally, we’ll finish the report task – due to our settings, this will also finish the quest.
- Quest Task
Select Report to Red Pants. - Status
Select Finished.
And that’s it for our event – click on Save Event and save it as, e.g. killQuest.
Close the ORK Framework editor.
Adding the quest to game
Open the town scene (1 Town, found in Assets/Tutorial Resources/Scenes/). Coming from the game tutorials, we don’t have a Red Pants NPC in there yet, so drop it into your scene – you can find the prefab (NPC_red) in Assets/Tutorial Resources/NPCs/.
Use the ORK Scene Wizard to add an Event Interaction to the NPC: Add Component > Event Interaction
- Event Asset
Select killQuest (or however you named your event).
Click on Ok after you selected the event. In it’s current state, the NPC can already be used, but we’re going to add a Quest Condition to only execute the event when our quest isn’t already finished. This is useful if you’re using a NPC to give multiple quests or events. Click on Add Quest Condition and change the following settings.
- Is Valid
Disable this setting. - Quest
Select Killing Evil Pants. - Check Status
Select Finished.
And that’s it, save the scene.
Testing the quest
To test our quest, open the main menu scene (0 Main Menu) and hit play – when talking to Red Pants, you can start the quest, go out and kill enough Evil Pants and return to report.