
Learn using Mecanim animations instead of the legacy system.
This gameplay tutorial will replace the Brown Pants prefab with a different one using Mecanim animations. I’m going to use Unity-chan, available in the Unity® Asset Store.
Please note that you’ll need to be familiar with the Mecanim animation system for this tutorial. Also, this is only one of different ways to add Mecanim animations to ORK Framework.
Creating the Animator Controller
First, we need to create an Animator Controller that handles the animations. If you already have your animator controller set up, you can skip this step – but you may need to do some settings differently later on.
The rest of the tutorial is based on the settings made in this step. The finished animator controller will look something like this.
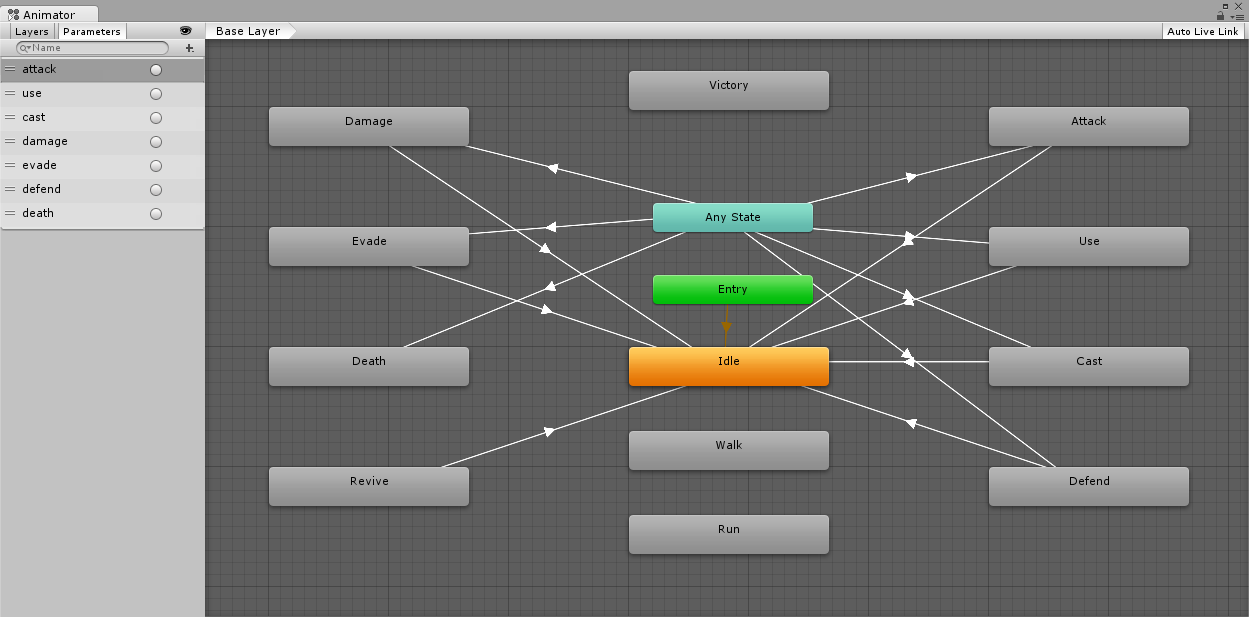
For our animator controller, we’ll add Parameters, States and Transitions.
Parameters
First, we’ll add some parameters – we only use Trigger parameters to trigger some of the animations (e.g. attack). Add the following trigger parameters.
- attack
- use
- cast
- damage
- evade
- defend
- death
We’ll use those parameters for transitions later.
States
The states contain the actual animations that will be played – I’m not going into detail on what animations you should select, that’s up to you and what’s available for your model. Add the following states and select appropriate animations in their Motion field. The names of the states will later be referenced in ORK Framework, so watch out for case sensitivity.
- Idle
- Walk
- Run
- Damage
- Evade
- Death
- Revive
- Victory
- Attack
- Use
- Cast
- Defend
Set the Idle state as Default State (right-click > Set as Layer Default State).
Transitions
The transitions handle changes from one state to another – in our animator controller, we’ll use them to do a nice change between two animations and play animations based on triggers. Again, the detailed settings depend on your animations. Add the following transitions.
- Any State > Attack
Add attack as condition.
This will play the attack animation when the attack trigger is set. - Attack > Idle
Enable Has Exit Time.
This will return to the idle animation after the attack animation has been played. - Any State > Use
Add use as condition. - Use > Idle
Enable Has Exit Time. - Any State > Cast
Select cast as condition. - Cast > Idle
Enable Has Exit Time. - Any State > Defend
Select defend as condition. - Defend > Idle
Enable Has Exit Time. - Any State > Damage
Select damage as condition. - Damage > Idle
Enable Has Exit Time. - Any State > Evade
Select evade as condition. - Evade > Idle
Enable Has Exit Time. - Any State > Death
Select death as condition.
We don’t need a transition back to Idle here. - Revive > Idle
Enable Has Exit Time.
We don’t need a starting trigger condition here (the animation will be played directly).
As you can see, some animations don’t use transitions at all, e.g. Walk or Run, as they are played directly using the Cross Fade function.
That’s it for the animator controller.
Preparing the prefab
Now that we have an animator controller, we can create our prefab. The settings you need depend on the model/prefab you’re using, so I’m only touching the general settings here.
Character Controller component
We’re still using ORK’s built-in game controls, which require a Character Controller component.
Make sure to add one to your prefab and place it accordingly (i.e. it ends at the feet of your prefab). The height/radius should be set to enclose your prefab tightly.
Animator component
To use Mecanim animations on our prefab, you need to add an Animator component. The following settings are crucial.
- Controller
Select the Animator Controller we’ve created earlier. - Apply Root Motion
Disable this setting.
Since we’re using ORK’s built-in controls, which use a Character Controller, we can’t use root motion as those don’t work well together.
If you’re using a different control without a character controller, you can try enabling this setting.
That’s pretty much it for the prefab – keep in mind that you may have to adjust the Interaction Controller settings in ORK Framework to match your new player.
Adding Mecanim animations
Now it’s time to set up the Mecanim animations in ORK Framework. Open the ORK Framework editor and navigate to Base/Controls > Animations. Add a new animation setting and change the following settings.
- Name
Set to Default Mecanim.
Click on Add Mecanim Animation in the Mecanim Settigns to add a mecanim animation setting – we’ll need 11 animations in total.
The Layer Index of all animations will be set to 0, as we only have one layer in our animator controller.
Mecanim Animation 0: Idle
- Animation Type
Select Idle. - State Name
Set to Idle. - Play Mode
Select Cross Fade.
The animation will be played directly through fading between the current and this state, i.e. we don’t need to change parameters to cause a transition.
Mecanim Animation 1: Walk
- Animation Type
Select Walk. - State Name
Set to Walk. - Play Mode
Select Cross Fade.
Mecanim Animation 2: Run
- Animation Type
Select Run. - State Name
Set to Run. - Play Mode
Select Cross Fade.
Mecanim Animation 3: Damage
- Animation Type
Select Damage. - State Name
Set to Damage. - Play Mode
Select None.
This animation will be played by setting a trigger parameter, allowing the transitions to handle the playback.
Click on Add Parameter (Play) to add a parameter that will be set when this animation is played by ORK.
- Parameter Name
Set to damage. - Value Type
Select Trigger.
Mecanim Animation 4: Evade
- Animation Type
Select Evade. - State Name
Set to Evade. - Play Mode
Select None.
Click on Add Parameter (Play) to add a parameter that will be set when this animation is played by ORK.
- Parameter Name
Set to evade. - Value Type
Select Trigger.
Mecanim Animation 5: Death
- Animation Type
Select Death. - State Name
Set to Death. - Play Mode
Select None.
Click on Add Parameter (Play) to add a parameter that will be set when this animation is played by ORK.
- Parameter Name
Set to death. - Value Type
Select Trigger.
Mecanim Animation 6: Revive
- Animation Type
Select Revive. - State Name
Set to Revive. - Play Mode
Select Cross Fade.
Mecanim Animation 7: Victory
- Animation Type
Select Victory. - State Name
Set to Victory. - Play Mode
Select Cross Fade.
Mecanim Animation 8: Attack
- Animation Type
Select Attack. - State Name
Set to Attack. - Play Mode
Select None.
Click on Add Parameter (Play) to add a parameter that will be set when this animation is played by ORK.
- Parameter Name
Set to attack. - Value Type
Select Trigger.
Mecanim Animation 9: Use
- Animation Type
Select Use. - State Name
Set to Use. - Play Mode
Select None.
Click on Add Parameter (Play) to add a parameter that will be set when this animation is played by ORK.
- Parameter Name
Set to use. - Value Type
Select Trigger.
Mecanim Animation 10: Cast
- Animation Type
Select Cast. - State Name
Set to Cast. - Play Mode
Select None.
Click on Add Parameter (Play) to add a parameter that will be set when this animation is played by ORK.
- Parameter Name
Set to cast. - Value Type
Select Trigger.
Mecanim Animation 11: Defend
- Animation Type
Select Defend. - State Name
Set to Defend. - Play Mode
Select None.
Click on Add Parameter (Play) to add a parameter that will be set when this animation is played by ORK.
- Parameter Name
Set to defend. - Value Type
Select Trigger.
That’s it for the animations.
Updating the player combatant
Finally, it’s time to set up our player to use Mecanim animations. Navigate to Combatants > Combatants and select Brown Pants. Change the following settings.
Base Settings
- Prefab
Select the prefab you’ve created earlier.
Animation Settings (Animations & Movements)
- System Type
Select Mecanim. - Animations
Select Default Mecanim (the animation settings we just created). - Use Battle
Disable this setting.
We didn’t set up special battle animations that override the default ones.
If you want to use different animations (e.g. other idle/run animations like it has been set up in the game tutorials), you can create a new animation setting which uses only those animations similar to the legacy animations in the game tutorials. - Use Auto Animation
Enable this setting.
This will handle playing idle/walk/run animations for us.
And that’s it – click on Save Settings to save our changes.
Testing the animations
To test our new player, open the main menu scene (0 Main Menu) and hit play – Brown Pants should be replaced by your new prefab, using Mecanim animations.
Run around, do some fighting and enjoy your new animations!
Troubleshooting
There are a few quirks that can come up when using Mecanim. This depends on your setup and when the animations are called.
Waiting for animations
Due to Mecanim not reporting back any animation durations, the Wait settings when playing animations use the Animation Duration setup you’ve made for the animation (in Base/Control > Animations).
- Fixed
Uses a defined duration, optionally also using the animator’s speed. - Animation Clip
Finds the animation’s duration based on the animation clip name.
You can either set the clip’s name or use the state name you defined (e..g if it matches the clip name).
The clip’s duration will be multiplied by the animator’s speed.
No move animations
When using Automatic Move Animation, the combatant’s movement speed is determined by other components (e.g. a Character Controller or Rigidbody). If those components are attached to the combatant’s game object, but not used to move it, their move speed will be 0.
Enable Use Position Change in the combatant’s Movement Settings to use the actual change of the game object’s position to determine the move speed.
Continuing move animation
If the player’s combatant keeps playing the running animation when entering battle, this can be due to the movement components (e.g. Character Controller or Rigidbody) still having a speed although the game object was stopped.
Enable Use Position Change in the combatant’s Movement Settings to use the actual change of the game object’s position to determine the move speed.
Stuttering when moving (also in battle)
When using Automatic Move Animation, the transition between walk, run and sprint animations can cause stuttering between 2 of the states when the combatant moves around the same speed as the minimum run/sprint speed.
Use the Run Speed Threshold and Sprint Speed Threshold settings for a better transition between the movement states.
E.g. a value of 0.5 can help here.
Ignored animations in battle events
Due to Mecanim being state driven, using transitions to play a different animation can sometimes be overruled by other transitions or playing an animation directly (or playing the animation directly being overruled by a transition). This can often happen in battle events, e.g. when first moving to the target and playing an attack animation directly afterwards.
Add Wait steps before playing animations (e.g. using a Combatant Animation step).
E.g. a small wait of 0.1 or even 0.01 can give the animator controller enough time to allow the desired transition.