
ORK Framework uses a node editor to allow you to create certain parts of your game logic.
The node editor is used to create:
- Formulas
Used to calculate values (like hit chance, damage of an attack). - Battle AI
Used to create the AI of computer controlled combatants in battle. - Events
Used for a wide variety of things, like creating game logic, cut scenes, quests or animating battles.
The data you’ll create is called a node tree – it represents a sequence of steps, where each step does something (like adding a value or checking for a condition) and decides which step is executed next.
The sequence of the steps depends on the connections of the nodes. Each node tree starts at the start node, which calls the first node, which calls the next node, and so forth.
The editor
The node editor is structured like this:
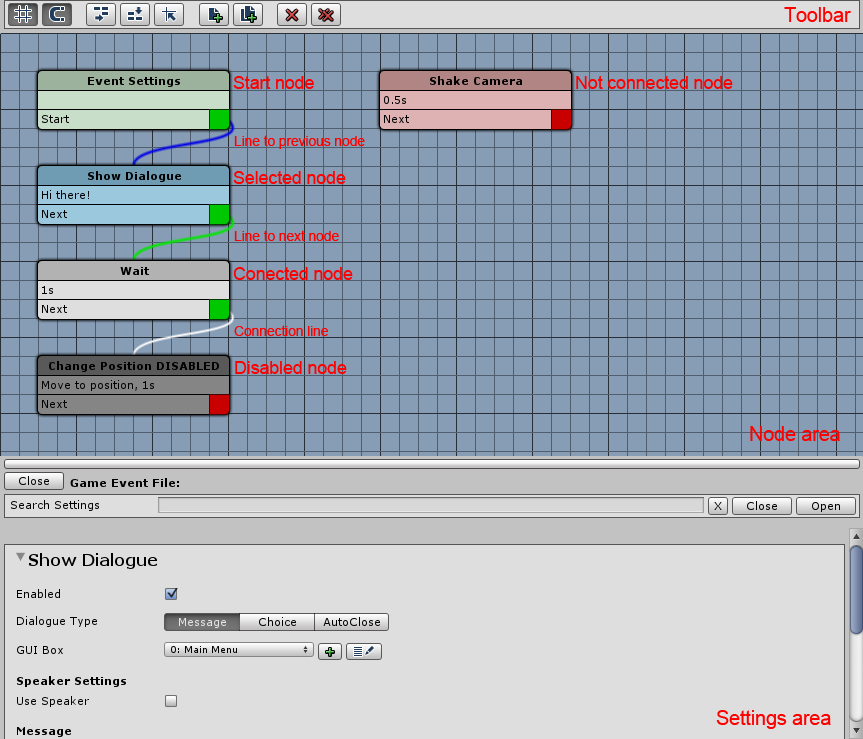
Toolbar
The toolbar allows you to show/hide the grid, toggle snapping nodes and use other functions that are also accessible through the context menu:
- Sorting nodes horizontally/vertically
- Placing nodes on the grid
- Adding nodes
- Copying nodes
- Removing nodes or a chain of nodes
Node area
The node area is used to control the nodes, you can:
- add nodes
- remove nodes
- move nodes
- connect/disconnect nodes
- select/deselect nodes
Nodes are selected by clicking on them, to deselect the node, simply click anywhere in the node area (without a node).
Double clicking on the node area will close a limited node view (i.e. displaying only a selected branch of the node tree).
Settings area
The settings area displays a selected node’s settings. The settings depend on the selected node.
You can use the search bar to search for a specific setting of the node and to close/open all foldouts.
Start node
The start node is displayed in green (when not selected). It’s the start for each node tree and can’t be removed.
It holds the main settings of the formula, battle AI or event.
Connected node
A connected node is displayed in gray (when not selected). It’s connected to the node tree and can (depending on what’s going on in the tree) be executed at some point.
Not connected node
A not connected node is displayed in red (when not selected). It’s not connected to the node tree and wont be executed (but it’s still saved).
Disabled node
A disabled node is displayed in dark gray (when not selected). It can be connected or disconnected from the node tree, but wont be executed either way.
If a disabled node is connected to the node tree, the next node (if connected) will be executed instead.
Selected node
A selected node is displayed in blue. The settings of the selected node are displayed in the settings area.
The nodes
A node is structured like this:
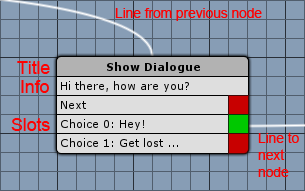
Title
Displays the title (name of type) of a node.
Double clicking on a title will limit the node view to display only this node and all onward nodes (i.e. the next nodes). Double clicking again will close the limited view. This can also be done using the context menu.
Info
Displays some information about a node. Usually a summary of the settings.
Slots
The slots are used to connect the nodes and determine which node will be executed next. The name of the slot tells you when it will be used (like ‘Success’ and ‘Failed’ in check nodes).
The connection box at the right side of a slot displays it’s connection status. A connected slot will display a green box, a not connected slot a red box.
Most nodes only have one slot available – some offer multiple slots. Which of the slots will be executed next depends on the node. A random node (like in the picture) will randomly select one of it’s slots, while a check node (two slots, comes in many varieties) will select the slot based on some kind of check (like a chance check).
Lines
The lines connect the slots to nodes. The line coming from the previous node will connect to the upper center of the node. The lines originate from slots.
To connect nodes, drag a line from a slot to a node: click on the slot’s connection box and hold the mouse button, now drag the line to the node you want to connect to and release the mouse button when the cursor is over the node. You can also connect lines by double clicking on a slot’s connection box and clicking on the node you want to connect it to.
The context menu is used to add, remove or sort (automatically arrange) nodes. The available options and what they do depend on where you click.
Open the context menu by doing a right click with the mouse.
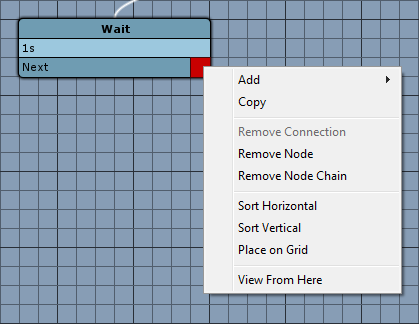
Add
Displays the list of available nodes in sub menus: Add > Category > Node
You can also search for nodes: Add > Search …
When called on the node area, the new node wont be connected to any other node.
When called on a slot, the slot will automatically connect to the new node. If the slot already has been connected to a node, the new node will be added between those nodes (i.e. the slot connects to the new node, the new node connects to the slot’s previously connected node).
When called on a node, the first free slot will be connected to the new node. If no slot is free, the new node will be connected to the first slot.
Only available when called on a node, slot or the node area.
Copy
Creates a copy of the node.
Only available when called on a node. Not available for the start node.
Remove Connection
Removes the connection from a slot to a node.
Only available when called on a slot.
Remove Node
The node will be removed. The previous node (if connected) will connect to the removed node’s next node (if connected).
Only available when called on a node. Not available for the start node.
Remove Node Chain
The node and all following nodes will be removed.
Only available when called on a node. Not available for the start node.
Sort Horizontal/Vertical
The nodes will automatically arrange horizontally or vertically.
When called on the node area, all nodes will be sorted.
When called on a node, only the nodes that follow this node will be sorted.
Place on Grid
All nodes will automatically be placed on the grid.
When called on the node area, all nodes will be placed.
When called on a node, only the nodes that follow this node will be placed.
View From Here
Limits the node view to display only the selected node and all nodes onward (i.e. the next nodes).
This is only available when calling the context menu on the node’s title.
View All
Closes the limited node view.