
In this tutorial we’ll add random battles to our game.
For now, we’ll only add them to the World scene (Assets/Scenes/) outside of town, so open it.
We’ll do two things:
- set the battle scene variable
- add random battle areas
Let’s get to it.
Battle Scene Variable #
Create a new empty game object using the scene hierarchy’s context menu: Create Empty
Change the newly created game object’s name to Set Battle Scene.
Variable Changer #
Add a Variable Changer component to the game object using the component menu.
Variable changers are used to change, well, variables – without having to go through a schematic. They can e.g. be started automatically when loading the scene (which we’ll do), when entering a trigger or started by interacting with them.
Variable Change Settings #
We’ll set the battleScene string variable to the scene name we want our battles to take place in.
Click on Add Variable.
- Change Type
Select Variable.
We’ll directly change a variable instead of using a template. - Variable Key
Set to: battleScene - String Type
Select Value > Value.
I.e. the variable key is defined directly as a value, this is the standard way for variable keys, which you’ll use in 99.9% of the use cases. - Variable Origin
Select Global. - Type
Select String. - Operator
Select Set. - String Value
Set to: Forest Battle Arena
You might notice that the string value fields automatically have all scene names available for selection (at least of the scenes added to the Unity build settings).
Start Settings #
These settings define how the variable change is started – we’ll use the Auto setting’s Start start type (i.e. the machine will start when the level was loaded or the game object was instantiated).
Components like the Variable Changer have quick-setup buttons available, the Autostart button will handle the setup for us.
Click on Autostart.
That’s it for the variable changer – now, each time we enter this scene, the battle scene used by the battle start schematic will automatically be set to the Forest Battle Arena scene.
Adding Random Battles #
Next, we’ll set up the Random Battle Area. This component will start battles while the player moves within it’s trigger.
We can use the scene hierarchy’s context menu to create a ready-to-use setup for us: ORK Framework > Battle > Random Battle Area (3D)
This’ll create a new game object with a Random Battle Area component and a Box Collider 3D used as trigger.
Let’s adjust it to our needs.
Transform #
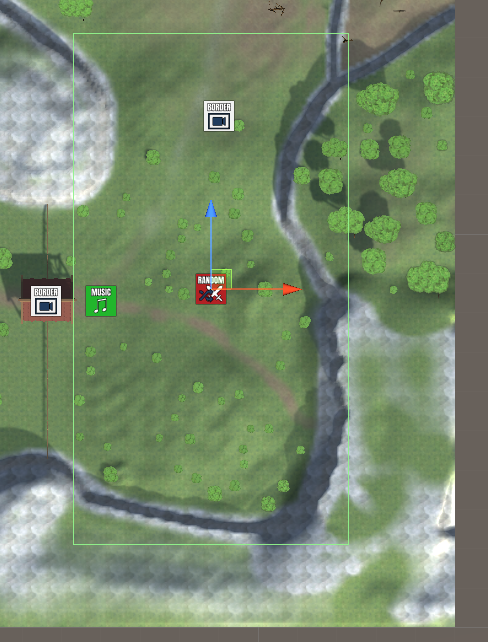
We’ll position it to cover the area outside the town gate.
- Position
Set to X=188, Y=10, Z=86.
Random Battle Area #
Now, let’s set up how often a random battle happens and which enemies can appear.
Random Battle Settings #
The Random Chance Settings in combination with the distance settings determine how often a battle happens. We’ll keep the default settings for battle chance and check interval.
- Battle Chance
Set to 10.
There’s a 10% chance to start a battle when checked.
Seems pretty high on it’s own. - Check Interval
Set to 0.5.
The time between performing 2 checks.
I.e. there are 2 checks per second possible.
We can control how often a battle starts via the distance settings.
- Minimum Move Distance
Set to 0.1.
The player needs to move at least 0.1 world units between checks. - Minimum Distance
Set to 10.
The next battle can start after the player has moved at least 10 world units. - Maximum Distance
Set to 25.
A battle will start without check if the player moved for 25 (or more) world units since the last battle.
Combatant Settings #
We’ll add multiple combatants/groups that will be used for random battles. Which one is used is determined by a chance check – each combatant/group we add defines the chance it has to occur.
The total of all chances should be 100 to have a full range of possible enemies. However, you can also define less or more – less would mean that if no enemy was found, no battle occurs. More, well, all exceeding the maximum chance (100 for all chance checks, can be changed in Game > Game Settings) would never occur. You can see the total chance of all added combatants/groups at the top of the component’s settings.
Let’s get to it. We’ll begin with editing the already added Combatant 0.
- Chance
Set to 60. - Faction
Select Enemies. - Use Group
Disable this setting. - Combatant
Select Wasp.
Copy the Combatant 0 setup and change the following settings.
- Chance
Set to 40. - Combatant
Select Snake.
That sums up to 100 percent – 60% chance to fight a wasp, 40% chance to fight a snake.
Box Collider #
We’ll adjust the size of the box collider to cover the whole area outside the town gate.
- Size
Set to X=70, Y=20, Z=130.
More Random Battle #
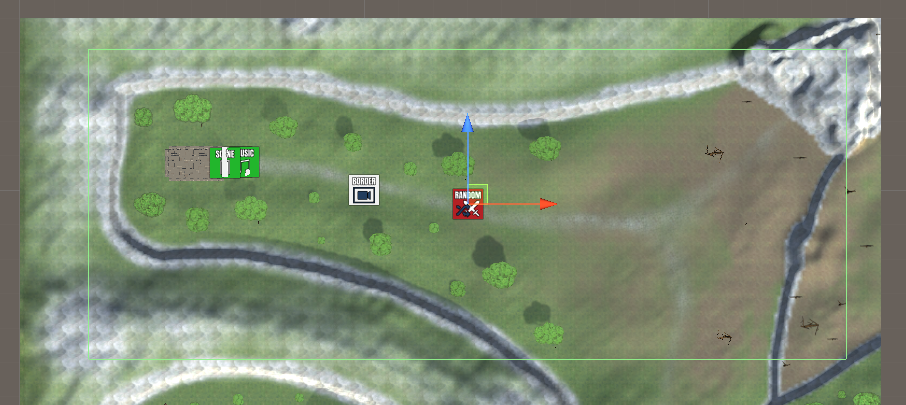
Copy the Random Battle Area game object we just created, we’ll adjust it and use it for the upper part of the scene.
Transform #
We’ll position it to cover the upper area of the scene.
- Position
Set to X=130, Y=10, Z=196.
Random Battle Area > Combatant Settings #
We’ll change the chances of combatants to appear and also add the combatant group we’ve set up.
Combatant 0 #
- Chance
Set to 30.
Combatant 1 #
- Chance
Set to 30.
Combatant 2 #
Copy the Combatant 1 setup and change the following settings.
- Chance
Set to 40. - Use Group
Enable this setting. - Combatant Group
Select Forest x2.
That sums up to 100 percent – 30% chance to fight a wasp, 30% chance to fight a snake and 40% chance to fight a group of 2.
Box Collider #
We’ll adjust the size of the box collider to cover the whole area outside the town gate.
- Size
Set to X=220, Y=20, Z=90.
That’s it for the random battle setup.
Save the changes you’ve made in the scene.
Testing #
It’s finally time to fight! Hit play in the World scene and run outside town.
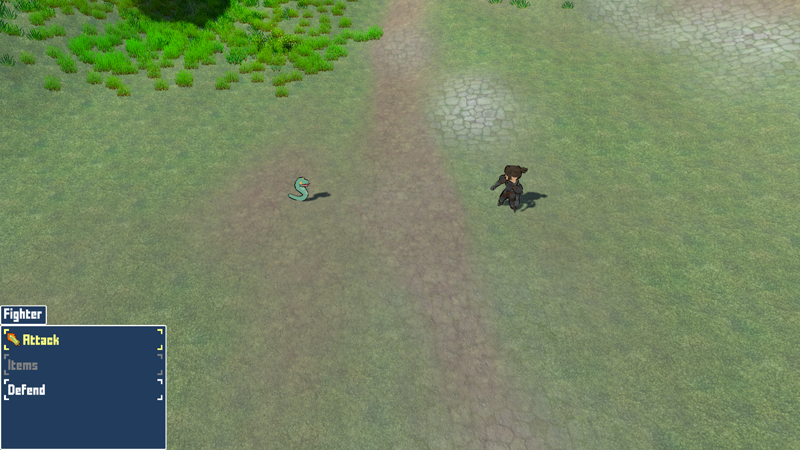
Everything seems to be working, we zoom into the battle and can attack the enemy (and get attacked or poisoned back).
Since our player doesn’t have any abilities (beside the base attack), the Ability battle menu option currently has nothing to display – also, there are no items in the player’s inventory, so the Item battle menu option is grayed out.
However, the actions appear to be happening at the same time. This is due to them not yet being animated, so they’re over in an instant.
Also, the camera is a bit far away, let’s change that.
Adjusting the Camera #
Open the Makinom editor and navigate to Base/Control > Game Controls.
ORK Control Settings > Camera Controls > Zoom Settings #
We’ll use zooming of our Top Down Border camera to define different distance and height limits for field and battle camera.
- Use Zooming In
Select Battle.
We don’t actually use any input to zoom, i.e. the player can’t zoom in or out, but we’ll set a limit for the camera.
Height Settings #
- Max Height Battle
Set to 10.
Distance Settings #
- Max Distance Battle
Set to 10.
Save Changes #
And that’s it!
Save the changes using the Save Settings button at the bottom of the editor.
Testing Again #
Hit play and start another battle outside of town.
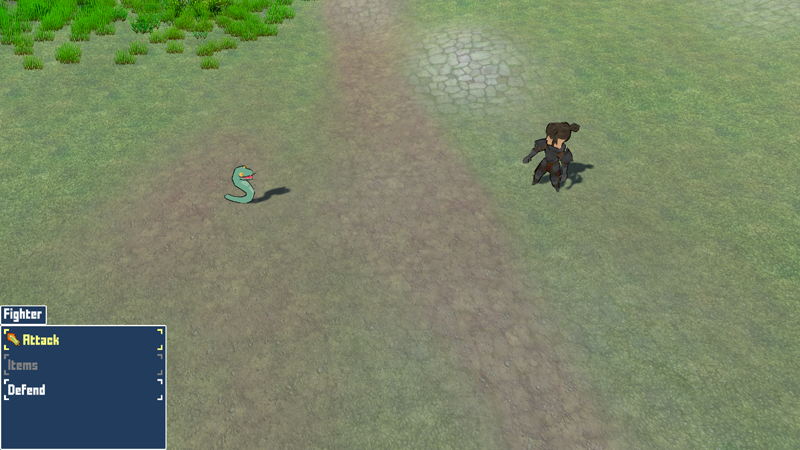
That’s much better!
Next, we’ll start animating our actions.


