
Implement a learning by doing type of leveling system by using Object Game Variables and Battle Events.
You want your player’s ATK (attack) to increase when he frequently uses physical attacks (abilities) or his DEF (defence) when he regularly takes a beating? Such a system can be implemented by using Object Game Variables and Battle Events.
Object game variables are used to bind game variables to a specific object in your game – e.g. your player. The variables will only be available for this one object and other objects that share the same Object ID. This allows us to check and change variables in an event that are only valid for one object, not on a global scale. We will use this to increase a counter on combatants each time a physical attack is used – once the counter reaches a defined value, the combatant’s ATK will be increased by one and the counter will reset to 0. By creating a Battle Event for this and adding this event to all abilities that do physical damage (e.g. the base attack), we will create a simple system that will influence the player’s status values based on how he plays the game.
This tutorial only focuses on one status value named ATK – but the mechanic is the same for others as well.
The battle event
First, let’s take a look at the battle event – open the ORK Framework editor and navigate to Events. Click on New Battle Event to create a brand new battle event.
The finished event will look like this.
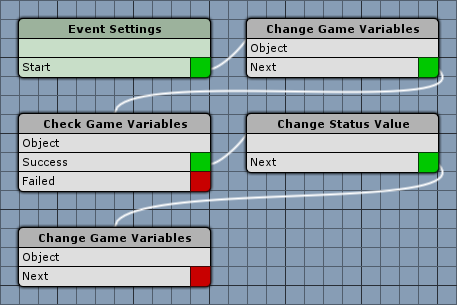
Event Settings
- Calculation Needed
Disable this setting. - Auto Damage Dealers
Disable this setting.
Change Game Variables
Add > Value > Variable > Change Game Variables
This step increases our counter.
- Variable Origin
Select Object. - Use Object
Enable this setting. - Object
Select Actor. - Actor
Select User.
Click on Add Game Variable to add the variable we will change.
- Value Type (Variable Key)
Select Value. - Value (Variable Key)
Set to ATK_UP. - Type
Select Float. - Operator
Select Add. - Value Type (Float Value)
Select Value. - Value (Float Value)
Set to 1.
Check Game Variables
Add > Value > Variable > Check Game Variables
This step checks if our counter reached its maximum.
- Variable Origin
Select Object. - Use Object
Enable this setting. - Object
Select Actor. - Actor
Select User.
Click on Add Game Variable to add the variable we will check.
- Value Type (Variable Key)
Select Value. - Value (Variable Key)
Set to ATK_UP. - Is Valid
Enable this setting. - Type
Select Float. - Check Type
Select Is Greater. - Value Type (Check Value)
Select Value. - Value (Check Value)
Set to 99.
The counter needs to be higher than 99 to increase ATK – e.g. 100.
Change Status Value
Add > Combatant > Status > Change Status Value
This step increases the combatant’s ATK status value.
- Object
Select Actor. - Actor
Select User. - Status Value
Select ATK. - Operator
Select Add. - Value Type
Select Value. - Value
Select 1.
Change Game Variables
Add > Variable Steps > Change Game Variables
This step resets our counter.
- Variable Origin
Select Object. - Use Object
Enable this setting. - Object
Select Actor. - Actor
Select User.
Click on Add Game Variable to add the variable we will change.
- Value Type (Variable Key)
Select Value. - Value (Variable Key)
Set to ATK_UP. - Type
Select Float. - Operator
Select Set. - Value Type (Float Value)
Select Value. - Value (Float Value)
Set to 0.
And that’s it for the event – click on Save Event and save it as e.g. ATK_UP.
Adding the battle event to abilities
Now it’s time to add the battle event to abilities that should increase our ATK. Navigate to Status > Abilities and select an ability that does physical damage (e.g. a base attack).
Animation Settings
I’m assuming that your ability is already animated – so you should have Animate set to be enabled. Click on Add Animation to add another battle event.
- Battle Event
Select ATK_UP. - Chance
Set to 100. - Perform In
Enable the battle system types you want to use the ATK up event – having them all enabled can’t hurt.
Depending on your design, you can prevent the player from spamming abilities in the field to increase his status values by disabling Field.
And that’s pretty much it – add the event to all abilities you like to influence ATK.
Add object game variables to your combatant
The battle event will only increase the ATK on combatants with object game variables, so we need to add an Object Variables component to our player combatant’s prefab – this can be done automatically by ORK Framework. Navigate to Combatants > Combatants and select your player’s combatant.
Object Variable Settings
- Use Object Variables
Enable this setting. - Local Variables
Disable this setting.
Otherwise the counter wont be remembered when the player’s game object has been destroyed, e.g. when changing the scene. - Object ID
The object ID is used to store the variables, each object that uses the same ID will also share the same variables.
We need to make sure our player has a unique object ID, so it’s best to not name it player, but use the combatant’s name, e.g. brownPantsPlayer.
And that’s it – remember to save the changes and click on Save Settings.
Tips
Other status values
To change other status values, you simply need to change the used variable key, e.g. DEF_UP for defence. Keep in mind that you may need to change the used Actor from User to Target in some cases. E.g. to increase DEF, you would most likely want to use the Target of physical attacks.
Using formulas
You can use formulas in the battle event to have different maximum counter based on the status value that will be changed. Simply select Formula as the float value type and select a formula using the status value (e.g. ATK * 10).
Notifying the player
To notify the player that a status value increased, you can either use the different Notification Settings in the status value’s settings (remember to enable Show Notification in the Change Status Value step), or by adding Show Dialogue step to the event (e.g. an Autoclose dialogue).