
Let’s continue creating our menus!
Open the ORK Framework editor and navigate to Menus > Menu Screens.
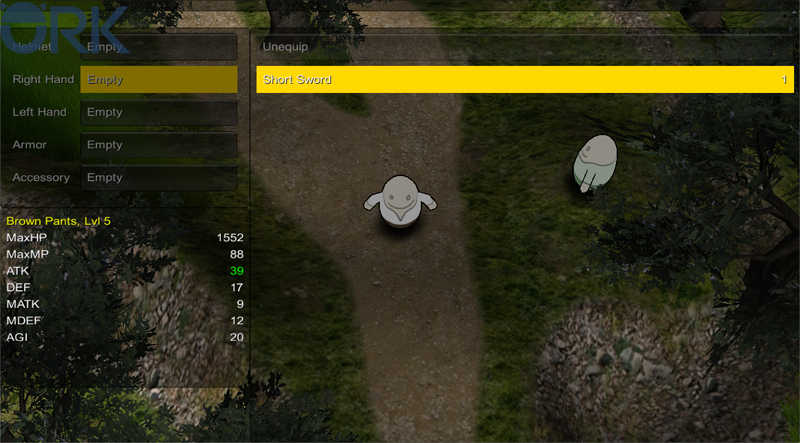
The equipment menu will list all equipment parts of a combatant and allows changing the equipment. Additionally, a combatant info will display the changes to status values a selected equipment will make.
Add a new menu screen and change the following settings.
- Name
Set to Equipment. - Block Controls
Enable this setting. - Single Screen
Enable this setting. - 2nd Call Closes
Enable this setting.
Part 0: Equipment
Click on Add Menu Part and than on Equipment. The equipment part will manage a combatant’s equipment – change the following settings.
- All Equipment Parts
Enable this setting. - Sort By
Select ID.
We want to keep the order in which we added the equipment parts.
Part Box Settings
- Equipment Part Box
Select Menu Small. - Show All Parts
Disable this setting.
Equipment Box Settings
- Show Equip Box
Enable this setting. - Display Part > Equipment
Select Multi. - Weapon/Armor Box
Select Menu Big. - All Weapons/Armors
Disable this setting. - Add Unequip Button
Select First.
This will add a button to unequip weapons and armors from an equipment part as the first button in the list.
That’s it for the equipment part.
Part 1: Description
Click on Add Menu Part and than on Description to add a description part. Change the following settings.
- GUI Box
Select Top Info. - Always Visible
Enable this setting.
That’s it for the description part.
Part 2: Combatant
Click on Add Menu Part and than on Combatant – we’ve already used a combatant part in the Overview menu, but this time we’ll use it to display a single combatant and the changes a selected equipment will do to the status values. Change the following settings.
- GUI Box
Select Menu Info. - Combatant Scope
Select Current.
This will use the current user combatant of the menu.
By default, the user is the player.
Element 0
Click on Add Status Element to add a HUD element to the combatant part. Change the following settings.
- Type
Select Information. - Text
Set to %n, Lvl %. - Text Alignment
Select Left. - Text Color
Select Yellow. - Position
Set to X=0, Y=0. - Anchor
Select Upper Left. - Relative To
Select Upper Left. - Use Last Element
Disable this setting. - Width
Set to 100. - Is Percent (Width)
Enable this setting. - Adjust Width
Enable this setting. - Height
Set to 30. - Is Percent (Height)
Disable this setting. - Adjust Height
Enable this setting.
Element 1
Again, click on Add Status Element and change the following settings.
- Type
Select Status Value. - List Status Values
Select Status Value Type. - Status Value Type
Select Normal. - Offset
Set to X=0, Y=30. - Text
Set to %n. - Text Alignment
Select Left. - Position
Set to X=0, Y=0. - Anchor
Select Upper Left. - Relative To
Select Lower Left. - Use Last Element
Enable this setting. - Width
Set to 100. - Is Percent (Width)
Enable this setting. - Adjust Width
Enable this setting. - Height
Set to 200. - Is Percent (Height)
Disable this setting. - Adjust Height
Enable this setting.
Element 2
Copy the last status element and change the following settings.
- Value Origin
Select Preview.
This allows displaying a preview of a status value based on a selected equipment. - Text Color (Positive Change)
Select Green. - Text Color (Negative Change)
Select Red. - Text
Set to %. - Text Alignment
Select Right. - Relative To
Select Upper Left.
And that’s it for the equipment menu screen.
The ability menu will list all abilities a combatant. Similar to the inventory menu, we can separate the abilities by ability type.
Add a new menu screen and change the following settings.
- Name
Set to Abilities. - Block Controls
Enable this setting. - Single Screen
Enable this setting. - 2nd Call Closes
Enable this setting.
Part 0: Ability
Click on Add Menu Part and than on Ability. The ability part will display a combatant’s abilities – change the following settings.
- Default Action
Select Use. - All Ability Types
Enable this setting.
Type Box Settings
- Type Display
Select GUI Box. - Show Empty Types
Disable this setting. - Display Type > Abilities
Select Multi. - Type Box
Select Menu Small.
Ability Box Settings
- Ability Box
Select Menu Big. - Add Attacks, Add Counter, Add Class Ability
Disable this settings. - Add Active Abilities, Add Passive Abilities
Enable this settings.
And that’s it for the ability part.
Part 1: Description
Click on Add Menu Part and than on Description to add a description part. Change the following settings.
- GUI Box
Select Top Info. - Always Visible
Enable this setting.
That’s it for the description part.
It’s time to add our new menus to the overview menu. In the Button List part, click on Add Menu Item and change the following settings.
- Type
Select Menu Screen. - Menu Screen
Select Equipment. - Select Combatant
Enable this setting.
This will display a combatant selection before opening the menu screen.
The selected combatant will be the user of the menu screen – we’ll use this for future group members. - Name
Set to Equipment. - Description
Set to: Change your equipment.
Again, click on Add Menu Item and change the following settings.
- Type
Select Menu Screen. - Menu Screen
Select Abilities. - Select Combatant
Enable this setting. - Name
Set to Abilities. - Description
Set to: Show your abilities.
And that’s it – click on Save Settings and close the ORK Framework editor.
Testing time
Open the main menu scene (0 Main Menu) and hit play.
This leaves the status menu and some other settings.
And that’s it for now – the next lesson will continue with menu screens.