
It’s time to give our battle a proper intro – we can do this using Battle Start Events.
You can set up the battle start events for each battle system type individually – and each battle can override those default events as well. This way you can have special intros to things like boss battles, etc.
Camera positions
This time we’ll be using camera positions to get some action into our events. You can read more about them in this how-to.
Open the ORK Framework editor and navigate to World > Camera Positions. We’ll need two camera positions, so change the following settings.
Camera position 0: Battle Start Zoom
This camera position is used to create a cool zoom-in effect at the start of a battle.
- Name
Set to Battle Start Zoom. - Position Offset
Set to X=0, Y=0, Z=0. - Rotation
Set to X=0, Y=0, Z=90. - Look At
Enable this setting. - Ignore X/Y Rotation
Enable this settings. - Ignore Z Rotation
Disable this setting. - Set Field of View
Enable this setting. - Field of View
Set to 150.
That’s it for this camera position.
Camera position 1: Battle View
This camera position is used to have a nice view of our battle while fighting.
- Name
Set to Battle View. - Position Offset
Set to X=-8, Y=13, Z=9. - Rotation
Set to X=0, Y=0, Z=0. - Look At
Enable this setting. - Ignore X/Y/Z Rotation
Disable this settings. - Set Field of View
Enable this setting. - Field of View
Set to 40.
That’s it for the camera positions, click on Save Settings.
Battle start event
The battle start event is in charge of playing a battle music clip and spawning/moving combatant’s to their battle spots. Although the battle system will also spawn any combatants that haven’t been spawned yet (but participate in the battle) at the start of the battle, it looks better when doing it in a battle start event – e.g. when the camera is looking somewhere else or the screen has been faded out.
Navigate to Events and Click on New Battle Start Event to create a new battle start event. We’ll create a small animation that plays the battle music, zooms in on the fight, fades out the screen in a white flash, places the combatants, set’s up our camera for the battle and fades back in.
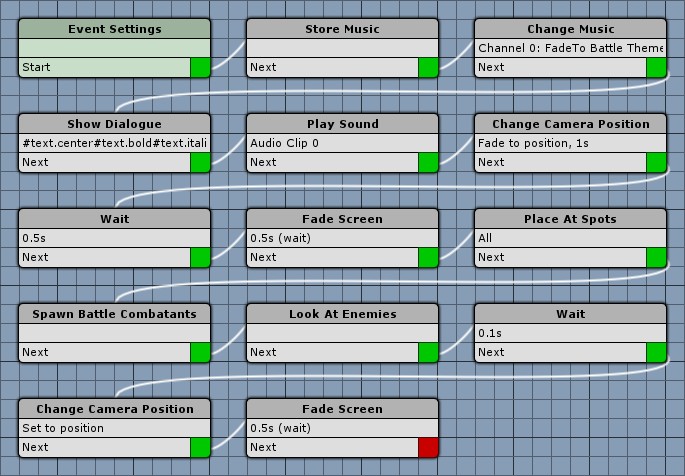
Event Settings
- Block Player Control
Enable this setting. - Block Camera Control
Enable this setting.
Click on Add Audio Clip to add an audio clip.
- Audio Clip
Select NearExplosionB.
Store Music
Add > Animation + Audio > Music > Store Music
This step will store our currently playing music clip and the track’s position – we’ll play the stored music after the battle ends. No further setting.
Change Music
Add > Animation + Audio > Music > Change Music
Now we’ll play the battle music we set up earlier.
- Play Type
Select Fade To. - Music Clip
Select Battle Theme. - Fade Time (s)
Set to 1.
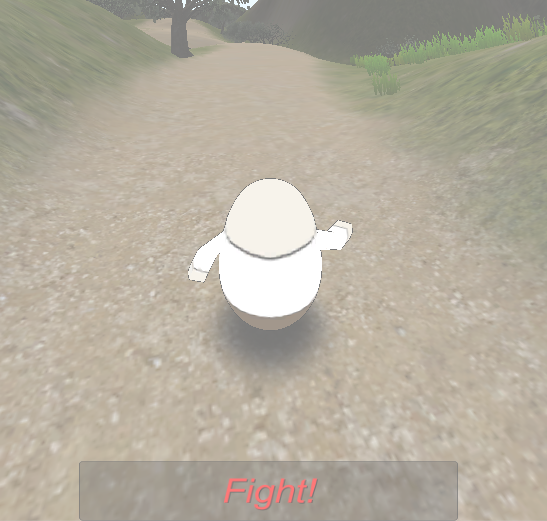
Show Dialogue
Add > UI >Dialogue > Show Dialogue
We’ll display a simple message to state that we’re fighting now.
- Dialogue Type
Select AutoClose. - GUI Box
Select Area Notification. - Message
Set to #text.center#text.bold#text.italic#text.color3##text.size40#Fight!.
This displays the text Fight! in the center of the GUI box, in bold italic text of size 40 and red text color. - Block Accept Button
Enable this setting. - Close After (s)
Set to 3. - Wait
Disable this setting.
Play Sound
Add > Animation + Audio > Audio > Play Sound
- Object
Select Waypoint. - Waypoint
Select Arena. - Audio Clip
Select Audio Clip 0. - Play One Shot
Enable this setting.
Change Camera Position
Add > Game Object > Camera > Change Camera Position
Now it’s time to use our new camera positions – we want to zoom in on the battle (arena).
- Camera Position
Select Battle Start Zoom. - Object
Select Waypoint. - Waypoint
Select Arena. - Fade Position
Enable this setting.
We don’t want to just set the position, we’ll fade to it, creating a cool effect. - Time (s)
Set Value Type to Value.
Set Value to 1. - Wait
Disable this setting. - Interpolation
Select Ease In Quad.
Wait
Add > Base > Wait
- Time (s)
Set to 0.5.
Fade Screen
Add > UI > Fade Screen
Now we’re fading out the screen in a white flash.
- Wait
Enable this setting. - Time (s)
Set to 0.5. - Fade Alpha/Red/Green/Blue
Enable this settings. - Start Color
Select a white color with no alpha (R=1, B=1, G=1, A=0). - End Color
Select a white color with full alpha (R=1, B=1, G=1, A=1).
Place At Spots
Add > Battle > Combatant > Place At Spots
This will place all already spawned combatants (i.e. mainly our player) at their battle spots.
- Place All
Enable this setting.
Spawn Battle Combatants
Add > Battle > Combatant > Spawn Battle Combatants
This will spawn all not yet spawned combatants at their battle spots.
- Spawn All
Enable this setting.
Look At Enemies
Add > Battle > Combatant > Look At Enemies
This simply let’s every combatant group look at the center of their enemies. No further settings.
Wait
Add > Base > Wait
We need another small wait step to make sure fading to the new camera position has finished by now. Otherwise our next camera position change can get interrupted by the previous.
- Time (s)
Set to 0.1.
Change Camera Position
Add > Game Object > Camera > Change Camera Position
Now we set the camera to use our Battle View position.
- Camera Position
Select Battle View. - Object
Select Waypoint. - Waypoint
Select Arena. - Fade Position
Disable this setting.
Fade Screen
Add > UI > Fade Screen
And now, fade in the screen again.
- Wait
Enable this setting. - Time (s)
Set to 0.5. - Fade Alpha/Red/Green/Blue
Enable this settings. - From Current
Enable this setting.
We can simply start from the last color we used here. - End Color
Select a white color with no alpha (R=1, B=1, G=1, A=0).
And that’s it for the battle start event – click on Save Event and save it as simpleStart in Assets/Events/Battle Start/.
Using the battle start event
We have to set up the battle start (and battle end) events for each battle system type individually. We’re currently only using the Turn Based Battles, so navigate to Battle System > Turn Based Battles and change the following settings.
Default Start/End Events
- Start Event
Select simpleStart.
That’s it – click on Save Settings and close the ORK Framework editor.
Let’s test it!
As always, open the main menu scene (0 Main Menu) and hit Play. Walk outside of the town and into the battle – and be amazed by the cool start event we just created!
That still leaves us to do the battle end events though …
And that’s it for now – the next lesson will cover battle end events.