
Beside using Calculate steps in battle events, you can also deal damage upon physical contact using Damage Dealers and Damage Zones – we’re going to use them in Real Time Battles.
This tutorial focuses on setting up attacks (for real time battles) with weapons for our little game – if you want to learn more about damage dealers/zones and doing damage in general, you can read this how-to.
Adding Damage Zones
A damage zone is a simple component that allows receiving damage from damage dealers. Damage zones are added to the prefabs of our combatants – you can add multiple damage zones to create vulnerable areas on your combatants.
We’ll use the ORK Scene Wizard to add the damage zones to all our combatant prefabs. First, select all prefabs (Blue Pants, Brown Pants, Evil Caster, Evil Pants, Evil Supporter) found in Assets/Tutorial Resources/Prefabs/Combatants/. Now, use the scene wizard to add the Damage Zone component to all prefabs: Add Component > Damage Zone
This will add a Rigidbody component and the Damage Zone component (with damage factor 1) to all prefabs.
Adding Damage Dealers
A damage dealer is a more complex component that deals damage to combatants with damage zones attached. Damage dealers need to be set up for certain actions and activated by them to actually do damage.
Again, we’ll use the scene wizard to add damage dealers to prefabs – but this time it’s the weapon prefabs. Select all prefabs (FireSwordPrefab, LongSwordPrefab, ShortSwordPrefab) in Assets/Tutorial Resources/Prefabs/Weapons/. Now, use the scene wizard to add the Damage Dealer components to all prefabs: Add Component > Damage Dealer
Like with the damage zones, this will add a Rigidbody component and the Damage Dealer component to all prefabs. The weapon prefabs should already have a BoxCollider (using Is Trigger) attached. Now we need change the following settings on all three prefabs.
Collision Settings
- Type
Select Trigger Enter.
The damage will be dealt when a damage zone enters the trigger.
Damage Settings
We’ll use the Auto Activation in combination with Tags to activate our weapon’s damage dealers in battle.
- Real Time Battles
Enable this setting.
This will enable auto activation in real time battles.
Deactivate the other battle types (Field, Turn Based, Active Time and Phase). - One Time Damage
Enable this setting. - One Target
Enable this setting.
Click on Add Tag to add an activation tag. The damage dealer can be activated by specifying this tag.
- Tag
Set to weapon.
Our weapons are now set up to be automatically activated in real time battles when using the weapon tag and will deal single damage to one target.
Remember to repeat these settings on all three weapon prefabs.
A new battle event
Since we’re using the damage dealers to do damage in real time battles, we need a new battle event that isn’t using the Calculate step.
Open the ORK Framework editor and navigate to Events. Click on New Battle Event to create a new battle event.
Event Settings
- Calculation Needed
Disable this setting.
The battle event wont force a calculation (since we’re doing this with damage dealers).
This setting is by default disabled. - Auto Damage Dealers
Enable this setting.
The battle event will use auto activation for damage dealers.
This setting is by default enabled.
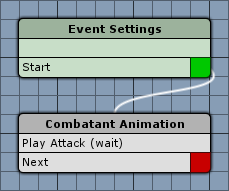
Combatant Animation
Add > Animation + Audio > Animation > Combatant Animation
We’ll play the attack animation and wait for half of the it’s duration.
When using damage dealers, make sure to have some time pass during your event, as the damage dealer needs to be active in order to be able to actually connect to a damage zone. If there’s no wait time in the event, the damage dealer will be activated and deactivated within the same frame, not doing any damage.
- Object
Select Actor. - Actor
Select User. - Animation Type
Select Attack. - Wait
Enable this setting. - Normalized Time (0-1)
Set to 0.5.
That’s it for the event – click on Save Event and save it as attackNoCalculation in Assets/Events/Battle/.
Changing the attack abilities
Now, all we need to do is add some things to our attack abilities (Attack, Mug Attack) to use our new battle event in real time battles, and to activate the right damage dealers. Navigate to Status > Abilities and change the following settings for Attack and Mug Attack.
Animation Settings
We already have three battle events added to the abilities. Change the following setting on all three battle events.
- Real Time
Deactivate this setting.
This means a real time battle wont use those events. Now, click on Add Animation to add a new battle event.
- Battle Event
Select attackNoCalculation. - Perform In
Enable Real Time, disable the rest.
Damage Dealer Settings
These settings determine which damage dealers will be auto activated by the ability.
Click on Add Tag to add an activation tag.
- Tag
Set to weapon.
All damage dealers on the ability’s user with a weapon tag will be activated – this also means weapons displayed by the Equipment Viewer.
We can add a sound and a prefab to the damage dealers – they will be used on the combatant that was hit by the damage dealer.
First, we’ll set up the sound – we’ll use similar settings to the attack battle event we created in a previous tutorial.
- Add Audio
Enable this setting. - Use Sound Type
Enable this setting. - Sound Type
Select Damage. - Use Target
Enable this setting.
This will use the target’s defined audio clip. - Play One Shot
Enable this setting.
Now, we’ll set up the prefab – again, similar to the prefab used in the previous attack battle event.
- Add Prefab
Enable this setting. - Prefab
Select Sparks.
Can be found in Assets/Tutorial Resources/Prefabs/BattleSystem/. - Stop Particles
Enable this setting.
We want to stop the particles before destroying the prefab, this ensures a better visual effect. - Stop After (s)
Set to 0.1. - Destroy After (s)
Set to 1.
That’s it – click on Save Settings.
And that’s it for now – the next lesson will cover control maps.