
We all know them, we all love them – let’s go to an Inn and rest for a bit!
Inns are a common way in role-playing games to regenerate the player, and take some money from him – in ORK Framework, this can be done using the Event System. In this tutorial, we will also create a simple Information HUD to display the amount of money the player currently owns, displaying the HUD will be bound to a game variable condition.
Money information HUD
First, we’ll set up the new HUD to display the player’s current amount of money. Open the ORK Framework editor and navigate to Menus > HUDs. Create a new HUD and change the following settings.
HUD Settings
- Name
Set to Money Info. - GUI Box
Select Top Info. - HUD Type
Select Information.
Display Conditions
Displaying the HUD will be handled through a Variable Condition – we don’t need to rely on a specific Game State, so we can set them all to Ignore.
- In Control, Shop, In Event, Changing Scene, Game Paused, In Battle, Blocking Menu Screen, etc.
Set to Ignore.
Click on Add Game Variable to add a variable condition.
- Condition Type
Select Variable.
We want to check a single variable in this condition – this setting would also allow us to check a template or multiple conditions. - Value Type (Variable Key)
Select Value. - Value (Variable Key)
Set to moneyHUD. - Is Valid
Enable this setting. - Type
Select Bool.
Information Element
Click on Add Information Element to add a HUD element that will display our information.
- Text
Set to:
#currency.name0#: #currency.inventory0#
This will display the name (#currency.name0#) and current amount (#currency.inventory0#) of currency with ID/index 0. - Text Alignment
Select Center. - Position
Set to X=0, Y=0. - Anchor
Select Upper Left. - Relative To
Select Upper Left. - Use Last Element
Disable this setting. - Width
Set to 100. - Is Percent (Width)
Enable this setting. - Adjust Width
Enable this setting. - Height
Set to 100. - Is Percent (Height)
Enable this setting. - Adjust Height
Enable this setting.
And that’s it for the HUD – click on Save Settings to save the changes.
The inn event
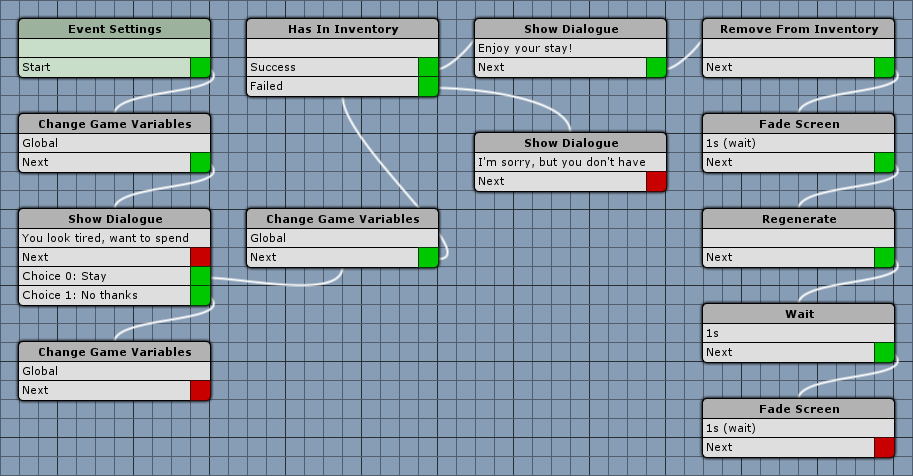
Navigate to Events and click on New Game Event to create a new event. The finished event will look something like this.
Event Settings
- Blocking Event
Enable this setting. - Block Player Controls
Enable this setting. - Block Camera Controls
Enable this setting.
Click on Add Actor to add an actor.
- Type
Select Player.
Click on Add Actor to add another actor.
- Type
Select Object. - Event Object
Enable this setting. - Set Name
Enable this setting. - Name (English)
Set to Inn Keeper.
Change Game Variables
Add > Value > Variable > Change Game Variables
- Variable Origin
Select Global.
This means that a global game variable will be checked.
Click on Add Game Variable to add a variable.
- Value Type (Variable Key)
Select Value. - Value (Variable Key)
Set to moneyHUD. - Type
Select Bool. - Value
Enable this setting.
Show Dialogue
Add > UI > Dialogue> Show Dialogue
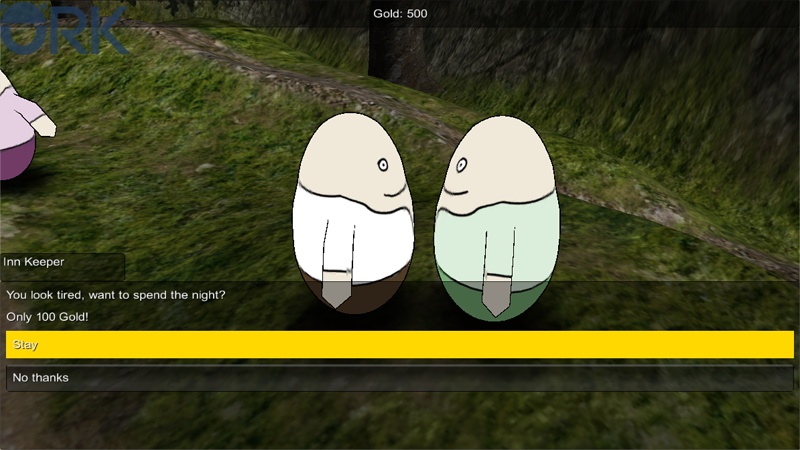
Now, we’ll display the choice if the player wants to stay in the inn.
- Dialogue Type
Select Choice. - GUI Box
Select Bottom Dialogue. - Use Speaker
Enable this setting. - Actor
Select Inn Keeper. - Show Name
Enable this setting. - Text
Set to:
You look tired, want to spend the night?
Only 100 #currency.name0#!
Click on Add Choice to add the first choice.
- Text
Set to Stay.
Click on Add Choice again to add another choice.
- Text
Set to No thanks.
Change Game Variables (No thanks)
- Value
Disable this setting.
Change Game Variables (Stay)
Has In Inventory
Add > Combatant > Inventory > Has In Inventory
Now we need to check if the player has enough money to stay in the inn (i.e. 100 gold). This step is connected to the previous Change Game Variables step, following the Stay choice of the dialogue.
- Object
Select Actor. - Actor
Select Player.
Change the following settings in the already added item.
- Type
Select Money. - Selection
Select Gold. - Value Type (Quantity)
Select Value. - Value (Quantity)
Set to 100.
Show Dialogue (Failed)
Add > UI > Dialogue > Show Dialogue
This dialogue tells the player that he doesn’t have enough money, i.e. it’s connected to the Failed slot of the Has In Inventory step.
- Dialogue Type
Select Message. - GUI Box
Select Bottom Dialogue. - Use Speaker
Enable this setting. - Actor
Select Inn Keeper. - Show Name
Enable this setting. - Text
Set to:
I’m sorry, but you don’t have enough.
Show Dialogue (Success)
Add > UI > Dialogue > Show Dialogue
The inn keeper wishes the player a good night – i.e. it’s connected to the Success slot of the Has In Inventory step.
- Dialogue Type
Select Message. - GUI Box
Select Bottom Dialogue. - Use Speaker
Enable this setting. - Actor
Select Inn Keeper. - Show Name
Enable this setting. - Text
Set to:
Enjoy your stay!
Remove From Inventory
Add > Combatant > Inventory > Remove From Inventory
It’s time to pay.
- Object
Select Actor. - Actor
Select Player.
Change the following settings in the already added item.
- Type
Select Money. - Selection
Select Gold. - Value Type (Quantity)
Select Value. - Value (Quantity)
Set to 100.
Fade Screen
Add > UI > Fade Screen
Let’s make it dark, so that the player can sleep.
- Wait
Enable this setting. - Time (s)
Set to 1. - Interpolation
Select Linear. - Fade Alpha/Red/Green/Blue
Enable these settings. - Start Color
Select a black color without alpha (R=0, G=0, B=0, A=0). - End Color
Select a black color with full alpha (R=0, G=0, B=0, A=1).
Regenerate
Add > Combatant > Status > Regenerate
Regenerates the player group, i.e. sets Consumable type status values to their maximum value.
- Object
Select Actor. - Actor
Select Player. - Revive Dead
Enable this setting.
Dead combatants in the player group will be revived. - Whole Group
Enable this setting.
All members of the player group will be regenerated.
Wait
Add > Base > Wait
Wait for a second for a better visual effect of the night.
- Time (s)
Set to 1.
Fade Screen
Copy the previous Fade Screen step and change the following settings.
- Start Color
Select a black color with full alpha (R=0, G=0, B=0, A=1). - End Color
Select a black color without alpha (R=0, G=0, B=0, A=0).
And that’s it for the event – click on Save Event and save it as, e.g. inn in Assets/Events/.
Adding to the scene
This part is easy and you’ll most likely already have done it often, but here goes – select the game object you want the inn event to be on, e.g. an NPC. Use the ORK Scene Wizard to add an Event Interaction: Add Component > Event Interaction
- Event Asset
Select the inn event asset.
Click on Ok to use the selected event. The rest of the settings should already be set up correctly, to make sure, check:
- Start Type
Set to Interact.
And that’s it – don’t forget to save your scene.
If you now test your game, you’ll be able to sleep in the inn and regenerate your player.
Tip: Changing music
If you want to change the music during the fading/regenerating using the Change Music step, don’t forget to store the currently playing music first.
E.g. modify the inn event with the following steps:
- Store Music
This step will store the currently playing music and it’s play time position.
Add this step before the fade step. - Change Music
Play your night music (or whatever you want to play), e.g. using Fade To.
Add this step after storing the music. - Change Music (back to stored)
Don’t forget to play the stored music again, enable Play Stored Music.
Add this step e.g. after the fading the screen back in.