
Create a custom time and day system with the event system and game variables.
This can be easily done by using three game variables for minute, hour and day (of the week), a simple game event that counts the time and a global event that automatically calls that event periodically.
Initial game variables
First, we want to set the initial values for the game variables to start at 8:00 on Monday (day 1). Open the ORK Framework editor and navigate to Game > Game Settings and change the following settings in Initial Game Variables. We’ll also add another variable to optionally block the time from increasing (e.g. during certain parts of the game).
Click on Add Game Variable to add our first variable (minute).
- Value Type (Variable Key)
Select Value. - Value (Variable Key)
Set to minute. - Type
Select Float.
- Operator
Select Set. - Value Type (Float Value)
Select Value. - Value (Float Value)
Set to 0.
Click on Add Game Variable to add the next variable (hour).
- Value Type (Variable Key)
Select Value. - Value (Variable Key)
Set to hour. - Type
Select Float.
- Operator
Select Set. - Value Type (Float Value)
Select Value. - Value (Float Value)
Set to 8.
Click on Add Game Variable to add the last time variable (day).
- Value Type (Variable Key)
Select Value. - Value (Variable Key)
Set to day. - Type
Select Float.
- Operator
Select Set. - Value Type (Float Value)
Select Value. - Value (Float Value)
Set to 1.
The week starts with day 1 (Monday) and ends with day 7 (Sunday).
Click on Add Game Variable to add the block variable.
- Value Type (Variable Key)
Select Value. - Value (Variable Key)
Set to timeRunning. - Type
Select Bool.
- Value
Enable this setting.
That’s it for the inital game variables – click on Save Settings to save the changes.
Tip!
If you want to set the time and day to a specific time/day later in the game, you can just use the above settings for minute, hour and day in a Game Event using Change Variables event steps.
The event
It’s time for our time/day event – navigate to Events and click on New Game Event to create a new game event.
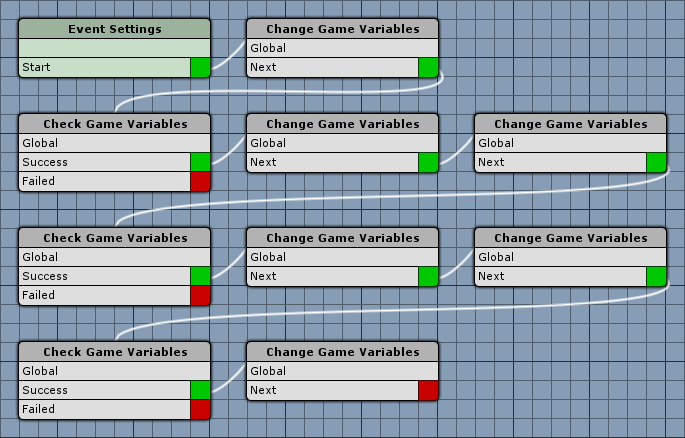
As you can see, it’s a series of changing and checking game variables (our minute, hour and day).
Event Settings
Make sure to disable all the blocking options, otherwise the event will keep blocking the game for a short amount of time periodically.
Change Game Variables
Add > Value > Variable > Change Game Variables
First, we’ll increase minute by one.
- Value Type (Variable Key)
Select Value. - Value (Variable Key)
Set to minute. - Type
Select Float.
- Operator
Select Add. - Value Type (Float Value)
Select Value. - Value (Float Value)
Set to 1.
Check Game Variables
Add > Value > Variable > Check Game Variables
Now, we’ll check if minute is 60 (i.e. a full hour).
- Value Type (Variable Key)
Select Value. - Value (Variable Key)
Set to minute. - Is Valid
Enable this setting. - Type
Select Float.
- Check Type
Select Is Equal. - Value Type (Check Value)
Select Value. - Value (Check Value)
Set to 60.
Change Game Variables
Add > Value > Variable > Change Game Variables
Connected to the previous check step’s Success slot, so we’ll set minute back to 0.
- Value Type (Variable Key)
Select Value. - Value (Variable Key)
Set to minute. - Type
Select Float.
- Operator
Select Set. - Value Type (Float Value)
Select Value. - Value (Float Value)
Set to 0.
Change Game Variables
Add > Value > Variable > Change Game Variables
It’s a full hour, so we’ll increase hour by one.
- Value Type (Variable Key)
Select Value. - Value (Variable Key)
Set to hour. - Type
Select Float.
- Operator
Select Add. - Value Type (Float Value)
Select Value. - Value (Float Value)
Set to 1.
Check Game Variables
Add > Value > Variable > Check Game Variables
Next, we’ll check if hour is 24 (i.e. a full day).
- Value Type (Variable Key)
Select Value. - Value (Variable Key)
Set to hour. - Is Valid
Enable this setting. - Type
Select Float.
- Check Type
Select Is Equal. - Value Type (Check Value)
Select Value. - Value (Check Value)
Set to 24.
Change Game Variables
Add > Value > Variable > Change Game Variables
Connected to the previous check step’s Success slot, so we’ll set hour back to 0.
- Value Type (Variable Key)
Select Value. - Value (Variable Key)
Set to hour. - Type
Select Float.
- Operator
Select Set. - Value Type (Float Value)
Select Value. - Value (Float Value)
Set to 0.
Change Game Variables
Add > Value > Variable > Change Game Variables
It’s a full day, so we’ll increase day by one.
- Value Type (Variable Key)
Select Value. - Value (Variable Key)
Set to day. - Type
Select Float.
- Operator
Select Add. - Value Type (Float Value)
Select Value. - Value (Float Value)
Set to 1.
Check Game Variables
Add > Value > Variable > Check Game Variables
Finally, we’ll check if day is 8 (i.e. start of a new week).
- Value Type (Variable Key)
Select Value. - Value (Variable Key)
Set to day. - Is Valid
Enable this setting. - Type
Select Float.
- Check Type
Select Is Equal. - Value Type (Check Value)
Select Value. - Value (Check Value)
Set to 8.
Change Game Variables
Add > Value > Variable > Change Game Variables
Connected to the previous check step’s Success slot, so we’ll set day back to 1.
- Value Type (Variable Key)
Select Value. - Value (Variable Key)
Set to day. - Type
Select Float.
- Operator
Select Set. - Value Type (Float Value)
Select Value. - Value (Float Value)
Set to 1.
And that’s it for the event – click on Save Event and save the event as timeDay in Assets/Events/.
Setting up the global event
We’re using a global event to periodically run our timeDay event and increase the in-game time. Navigate to World > Global Events, add a new global event and change the following settings.
- Name
Set to Time and Day. - Event Asset
Select our timeDay event file.
Event Execution
These settings define how this global event will be executed – in hour case we want it to run every 2.5 seconds, resulting in a day in-game being an hour in real time.
- Event Type
Select Auto. - Check Timeout (s)
Set to 2.5.
Next, we’ll select the Required Game States – this determines when in the game the event will be able to run. To only execute the event while the player is in control, not while in battle, menus, shops or events, set up the following game states.
- In Control
Select Yes. - Menu Screen, Shop, In Event, Changing Scene, Game Paused, In Battle
Select No.
Finally, we’ll add the variable condition using our timeRunning to only run the event while this is enabled. Click on Add Game Variable.
- Value Type (Variable Key)
Select Value. - Value (Variable Key)
Set to timeRunning. - Is Valid
Enable this setting. - Type
Select Bool.
And that’s it – click on Save Settings to save the changes.
We now already have a fully fledged time and day system in our game!
Base other events on the current time and day
To make things depend on the time or day, we’ll use Variable Conditions, e.g. in event interactions, item collectors or combatant spawners.

Let’s look at some examples.
8:00 to 16:00 on Monday
For this, we’ll need three variable conditions with Needed set to All.
First, let’s check the day.
- Value Type (Variable Key)
Select Value. - Value (Variable Key)
Set to day. - Is Valid
Enable this setting. - Type
Select Float.
- Check Type
Select Is Equal. - Value Type (Check Value)
Select Value. - Value (Check Value)
Set to 1.
After that, we’ll need two conditions to check the hour range.
- Value Type (Variable Key)
Select Value. - Value (Variable Key)
Set to hour. - Is Valid
Enable this setting. - Type
Select Float.
- Check Type
Select Is Greater. - Value Type (Check Value)
Select Value. - Value (Check Value)
Set to 7.
And the last one.
- Value Type (Variable Key)
Select Value. - Value (Variable Key)
Set to hour. - Is Valid
Enable this setting. - Type
Select Float.
- Check Type
Select Is Less. - Value Type (Check Value)
Select Value. - Value (Check Value)
Set to 17.
That’s it.
Weekday (Monday – Friday)
That one is pretty simple and can be done with a single condition.
- Value Type (Variable Key)
Select Value. - Value (Variable Key)
Set to day. - Is Valid
Enable this setting. - Type
Select Float.
- Check Type
Select Is Less. - Value Type (Check Value)
Select Value. - Value (Check Value)
Set to 6.
That’s it.
Tuesday or Saturday
This time we’ll need two conditions and Needed set to One.
Check for Tuesday.
- Value Type (Variable Key)
Select Value. - Value (Variable Key)
Set to day. - Is Valid
Enable this setting. - Type
Select Float.
- Check Type
Select Is Equal. - Value Type (Check Value)
Select Value. - Value (Check Value)
Set to 2.
Check for Saturday.
- Value Type (Variable Key)
Select Value. - Value (Variable Key)
Set to day. - Is Valid
Enable this setting. - Type
Select Float.
- Check Type
Select Is Equal. - Value Type (Check Value)
Select Value. - Value (Check Value)
Set to 6.
That’s it.
Night time (18:00 – 6:00)
We’ll need two conditions with Needed set to One.
In the evening, we’ll check for hour greater than 17.
- Value Type (Variable Key)
Select Value. - Value (Variable Key)
Set to hour. - Is Valid
Enable this setting. - Type
Select Float.
- Check Type
Select Is Greater. - Value Type (Float Value)
Select Value. - Value (Float Value)
Set to 17.
And in the morning for hour less than 7.
- Value Type (Variable Key)
Select Value. - Value (Variable Key)
Set to hour. - Is Valid
Enable this setting. - Type
Select Float.
- Check Type
Select Is Less. - Value Type (Float Value)
Select Value. - Value (Float Value)
Set to 7.
And that’s it – you can use those variable conditions as a template for your own.
Keep in mind, if you want to use multiple times of a day, you can always add multiple interactions to an object.