
Let’s continue with animating our battles. We’ll do the next batch of battle events!
This time we’re animating some items and abilities.
We’re creating four events for this:
- A use battle event, playing the combatant’s item use animation.
- A cast battle event, playing the combatant’s ability cast animation.
- A battle event to spawn a particle effect prefab, play a sound and calculate the outcome.
- A battle event to spawn and move particle effect prefab to the enemy, spawn another prefab, play a sound and calculate the outcome.
And we don’t have to create new battle events for each ability or item, only because we need to exchange a prefab or an audio clip. We can do this by overriding them in the ability’s (or item’s) battle animation settings – what a time saver!
The use event
First, we’ll create the use battle event, it’s pretty simple. Open the ORK Framework editor and navigate to Events. Click on New Battle Event to create a new event. We only need a single step this time.
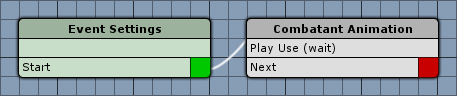
Combatant Animation
Add > Animation + Audio > Animation > Combatant Animation
We want to play the combatant’s use animation type and wait for some part of it. We’ll only wait for 40% of the animation’s duration instead of the full animation to have the battle flow better – this results in whatever being used will do its thing (e.g. spawn prefabs) while the animation is still playing).
- Object
Select Actor. - Actor
Select User. - Animation Type
Select Use. - Wait
Enable this setting. - Normalized Time (0-1)
Set to 0.4.
That’s it for this event – click on Save Event and save it as use in Assets/Events/Battle/.
The cast event
For the cast event we simply change the use event.
Combatant Animation
Change the following setting.
- Animation Type
Select Cast.
That’s it for this event – click on Save Event As … and save it as cast in Assets/Events/Battle/.
The simple effect with calculation
Click on New Battle Event again. This time we’ll spawn a prefab, play a sound and calculate the outcome of the ability or item the event is used in.
This means we’ll need a prefab and an audio clip in our event – we’re going to add them in the Event Settings, but we aren’t selecting any prefab or audio clip. That’s because we’re overriding them in each ability or item we’re using this battle event.

Event Settings
Add a prefab by clicking on Add Prefab and an audio clip by clicking on Add Audio Clip.
No further settings needed.
Spawn Prefab
Add > Game Object > Prefab > Spawn Prefab
We’ll spawn our prefab and also play the audio clip at the same time.
- Prefab
Select Prefab 0. - Object
Select Actor. - Actor
Select Target. - Mount
Enable this setting.
This means the spawned prefab will be made a child object of the target object, i.e. follow it’s movement. - Play Audio
Enable this setting. - Audio Clip
Select Audio Clip 0. - Play One Shot
Enable this setting.
Wait
Add > Base > Wait
- Time (s)
Set to 1.
Calculate
Add > Battle > Action > Calculate
- Animate Target
Enable this setting.
Emit Particles
Add > Game Object > Component > Emit Particles
This steps lets us start or stop emitting particles on a particle effect.
- Emit
Disable this setting.
We want to stop emitting particles. - Object
Select Prefab. - Prefab
Select Prefab 0. - Spawned Prefab ID
Set to -1.
This will use all spawned instances of the prefab.
Destroy Prefab
Add > Game Object > Prefab > Destroy Prefab
We’ll destroy our prefab after some time.
- Prefab
Select Prefab 0. - Spawned Prefab ID
Set to -1. - Destroy After Time
Enable this setting. - Time (s)
Set to 5. - Wait
Disable this setting.
The prefab will be destroyed after 5 seconds without waiting for it – the time can exceed the events duration.
Wait
Add > Base > Wait
- Time (s)
Set to 1.
That’s it for this event – click on Save Event and save it as calculateEffectTarget in Assets/Events/Battle/.
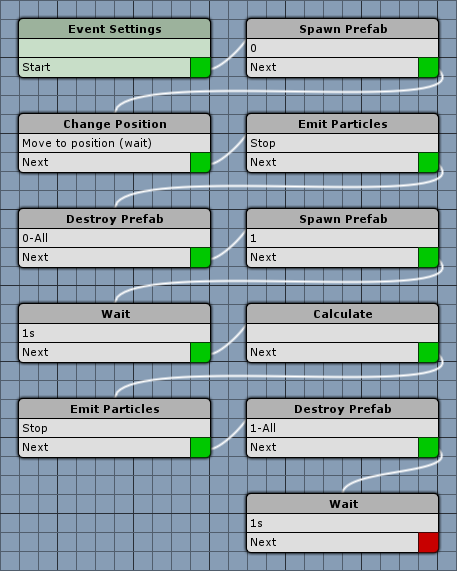
The more complex effect with calculation
Click on New Battle Event again. This time we’ll spawn a prefab at the user, move it to the target, spawn another prefab, play a sound and calculate the outcome of the ability or item the event is used in.
This means we’ll need two prefabs and an audio clip in our event.
Event Settings
Add two prefabs by clicking on Add Prefab twice and one audio clip by clicking on Add Audio Clip.
No further settings needed.
Spawn Prefab
Add > Game Object > Prefab > Spawn Prefab
- Prefab
Select Prefab 0. - Object
Select Actor. - Actor
Select User.
Change Position
Add > Movement > Movement > Change Position
Now we’ll move the prefab to the target.
- Object (Moving Object)
Select Prefab. - Prefab
Select Prefab 0. - Spawned Prefab ID
Set to -1. - To Object
Enable this setting.
We’re moving to the target’s game object. - Object (Target Position)
Select Actor. - Actor
Select Target. - Move
Enable this setting. - Wait
Enable this setting. - Controller Move
Disable this setting. - Stop Distance
Set to 0. - No Combatant Radius
Enable this setting.
We don’t want to stop before reaching the position due to a combatant’s radius. - Move By Speed
Enable this setting. - Speed Type
Select Value. - Speed
Set to 3. - Follow Position
Enable this setting.
Emit Particles
Add > Game Object > Component > Emit Particles
- Emit
Disable this setting. - Object
Select Prefab. - Prefab
Select Prefab 0. - Spawned Prefab ID
Set to -1.
Destroy Prefab
Add > Game Object > Prefab > Destroy Prefab
- Prefab
Select Prefab 0. - Spawned Prefab ID
Set to -1. - Destroy After Time
Enable this setting. - Time (s)
Set to 5. - Wait
Disable this setting.
Spawn Prefab
Add > Game Object > Prefab > Spawn Prefab
- Prefab
Select Prefab 1. - Object
Select Actor. - Actor
Select Target. - Play Audio
Enable this setting. - Audio Clip
Select Audio Clip 0. - Play One Shot
Enable this setting.
Wait
Add > Base > Wait
- Time (s)
Set to 1.
Calculate
Add > Battle > Action > Calculate
- Animate Target
Enable this setting.
Emit Particles
Add > Game Object > Component > Emit Particles
- Emit
Disable this setting. - Object
Select Prefab. - Prefab
Select Prefab 1. - Spawned Prefab ID
Set to -1.
Destroy Prefab
Add > Game Object > Prefab > Destroy Prefab
- Prefab
Select Prefab 1. - Spawned Prefab ID
Set to -1. - Destroy After Time
Enable this setting. - Time (s)
Set to 3. - Wait
Disable this setting.
Wait
Add > Base > Wait
- Time (s)
Set to 1.
That’s it for this event – click on Save Event and save it as calculateEffectTarget2 in Assets/Events/Battle/.
Adding the events to items
Navigate to Inventory > Items. It’s time to animate our items with the new battle events.
The procedure is the same for all items, but we’re using different prefabs (and audio clips, although we only have one to use for this …).
Item 0: Potion
Battle Animation
- Animate
Enable this setting.
This item’s animation consists of two battle events. Change the already added battle event settings.
- Battle Event
Select use. - Chance
Set to 100. - Perform In
You can leave these settings as they are for now.
Turn Based, Active Time, Real Time and Phase should be enabled.
Click on Add Animation to add another battle event.
- Battle Event
Select calculateEffectTarget. - Chance
Set to 100. - Set Prefabs
Enable this setting. - Prefab 0
Select Heal1.
Can be found in Assets/Tutorial Resources/Prefabs/BattleSystem/. - Set Audio Clips
Enable this setting. - Audio Clip 0
Select fire.
Can be found in Assets/Tutorial Resources/Audio/.
We don’t have that many audio clips, so we’ll stick with this one for multiple items and abilities.
That’s it for this item.
Item 1: Magic Potion
Repeat the settings from the previous item, but this time select Heal2 as the prefab.
That’s it for this item.
Item 2: Revive Potion
Repeat the settings from the previous item, but this time select Sparkle Rising as the prefab.
That’s it for this item.
Item 3: Cure Potion
Repeat the settings from the previous item, but this time select Soap Bubbles as the prefab.
That’s it for this item.
Item 4: Fire Scroll
Repeat the settings from the previous item, but this time select Flame as the prefab.
That’s it for this item.
Item 5: Paralyze Scroll
Repeat the settings from the previous item, but this time select Fireworks as the prefab.
That’s it for the items.
Adding the events to abilities
Navigate to Status > Abilities. Change the following settings.
Ability 2: Fire
Battle Animation
- Animate
Enable this setting.
This ability’s animation consists of two battle events. Change the already added battle event settings.
- Battle Event
Select cast. - Chance
Set to 100. - Perform In
You can leave these settings as they are for now.
Turn Based, Active Time, Real Time and Phase should be enabled.
Click on Add Animation to add another battle event.
- Battle Event
Select calculateEffectTarget2. - Chance
Set to 100. - Set Prefabs
Enable this setting and add 2nd prefab by clicking on Add Prefab. - Prefab 0
Select Fire1. - Prefab 1
Select Fireball. - Set Audio Clips
Enable this setting. - Audio Clip 0
Select NearExplosionB.
That’s it for this ability.
Ability 3: Water
Repeat the settings from Fire, but use Water Surface Splash as Prefab 0, and Water Fountain as Prefab 1.
That’s it for this ability.
Ability 4: Poison
Battle Animation
- Animate
Enable this setting.
This ability’s animation consists of two battle events. Change the already added battle event settings.
- Battle Event
Select cast. - Chance
Set to 100. - Perform In
You can leave these settings as they are for now.
Turn Based, Active Time, Real Time and Phase should be enabled.
Click on Add Animation to add another battle event.
- Battle Event
Select calculateEffectTarget. - Chance
Set to 100. - Set Prefabs
Enable this setting. - Prefab 0
Select Detailed Smoke. - Set Audio Clips
Enable this setting. - Audio Clip 0
Select fire.
That’s it for this ability.
Ability 5: Small Heal
Repeat the settings from Poison, but use Heal1 as Prefab 0.
That’s it for this ability.
Ability 6: Boost
Repeat the settings from Poison, but use Sparkle Rising as Prefab 0.
That’s it for this ability.
Ability 7: Lessen
Repeat the settings from Poison, but use Sparks as Prefab 0.
That’s it for the abilities – click on Save Settings and close the ORK Framework editor.
What time is it? It’s testing time!
Open the main menu scene (0 Main Menu) and hit Play. Walk outside of the town and into the battle – the items and abilities are now also animated!

But we’re still lacking a proper intro to the battle … and an ending.
And that’s it for now – the next lesson will cover battle start events.